
Winter arrived over a month early this year and upset my autumn backpacking plans. While I still mourn the lost season, I’ve embraced the winter conditions and been out hiking and snowshoeing a good amount already. I’m a trip leader for the 6000+ member Random Hiker’s Meetup, which hikes primarily in the White Mountains, and I’ve been posting a lot of trips these past few weeks. I like to hike with other people in winter because it gives me a chance to recharge my social batteries and because it’s just safer. The White Mountains are no joke in winter and team efforts are usually far more successful than solo ones. North Kearsarge Mountain is a highly visible landmark in the Mt Washington Valley Area, towering over the town of North Conway, which is the epicenter of winter sports and micro-brewed beer in the Whites. While the trailhead to North Kearsarge is close to town, it’s easy to underestimate the effort and gear required to get to the summit in winter. There are two trails up to the old firetower on North Kearsarge: the popular North Kearsarge Mountain Trail and the more remote and seldom-hiked Weeks Brook Trail, which approaches the summit from the east. For this trip, I decided it would be fun to hike both trails, climbing the Weeks Brook Trail to the firetower and descending by the North Kearsarge Trail. The total distance of this hike is 8.2 miles with 2700′ feet of elevation gain. Hiking in a group made this route possible because we could run a 16 mile shuttle from the beginning of the hike to the end. Here’s a map of our route. This is a georeferenced PDF created using Caltopo. You can navigate with it using an app like Avenza (directions here) or just print it out. North Kearsarge Firetower TraverseThe Weeks Brook Trail starts at a gated forest service road near the bottom of Hurricane Mountain Road off Rt 113a. The start of the trail follows the road before turning off into open woods. We wore snowshoes from this point to the summit. The snow was dry powder for the most part, but too deep for bare-booting. The trail is well blazed and easy to follow. This being hunting season, most of use were wearing blaze orange clothing.
The first part of the Weeks Brook Trail passes though an area that has been logged in the past few years. While the trail crews did a good job of cleaning up the debris, the disturbance is considerably less noticeable under a foot of snow. If you can, hike the Weeks Brook Trail in winter, at least for the next few years. Once past the logged area, the trail is quite pleasant. It begins to climb an old logging road to Shingle Pond, with a good view of the firetower on the horizon. We lost the trail as we circled around the pond however and it took a while for us to re-aquire it. After fanning out and searching for blazes, I whipped out Guthooks New England England Hiker app which has GPS-enabled maps of the White Mountain Trails. I quickly located the buried trail and we were quickly able to find the blazes again. It’s a great app to have in winter when it’s much harder to follow out local trails.
The Weeks Brook Trail takes a roundabout way getting to the summit from the pond, climbing up a northeast ridge to the summit. The trail climbs next to a stream before climbing steeply up the final 850′ of elevation to the ledges below the summit. This was tough going in deep powder, and we were all sweating fiercely with the effort. I always forget how steep that final pitch is. Once there, we had great views of the mountains and lakes in nearby Maine, which are just a stone throws away. 
The firetower has a wraparound balcony and 360 degree windows, so you can come inside to get out of the weather. The views are great. You can see Mt Washington and the entire southern Presidential Range, Crawford Notch, and the lakes and peaks in Maine to the north and east. We had the place to ourselves as we munched on snacks and rehydrated. 
Sunset comes early at this time of the year, so we left the firetower by 1:00 pm and headed down the North Kearsarge Trail to our cars on Hurricane Mountain Road. The trails drops elevation very quickly, but we were able to shed our snowshoes for the descent and hike down in microspikes because the trail was packed out. It still took an hour and half to get down, but gravity helped. Where would we be without it? Recommended Guidebooks and Maps:
The post Hiking a North Kearsarge Firetower Traverse in Snovember appeared first on Section Hikers Backpacking Blog. from https://sectionhiker.com/hiking-a-north-kearsarge-firetower-traverse-in-snovember/
0 Comments
Light Intensity and ColorThe Bindi is a small headlamp, but don’t let that fool you. Both the white and red light modes will hurt your eyes if you look directly into them. That said, the battery capacity of the Bindi (680 mAh) is about half that of other rechargeable headlamps, making it more suitable for in-camp use where the battery life will be longest and not for extended night hiking or trail running in the dark. See SectionHiker’s Gear Guide: 10 Best Rechargeable Headlamps for a list of the best rechargeable headlamps that we recommend. For example, the Bindi has three white light intensities: low (5 lumens), medium (100 lumens), and high (200 lumens). The lower the intensity, the longer the battery will last: the low setting will burn for 50 hours, the medium setting for 3 hours, and the high setting for 2 hours. There’s no way to dim the light in between these settings or to focus the beam, which is set to a broad flood light spread. The battery life in red mode is significantly better, but it is also better for in-close nighttime tasks like reading a map or sitting around a campfire. The red light comes with two settings, a low intensity light that burns at 1 lumen for 33 hours and a strobe light, good for night cycling or running that will burn for 200 hours and is visible from 400 meters. If you do drain the Bindi battery unexpected fast, it has a unique white light reserve mode that will continue to burn for 90 minutes at 3 lumens. While dim, this will give you enough light to get you settled for the night in your sleeping bag or an emergency bivy sack. This is a fairly unique safety feature among headlamp manufacturers, but a quite useful one, given the Bindi’s limited power capacity. 
Control Login, Battery Meter, LockThe sequence of button presses used to control the Bindi is completely digital but easy to enumerate by pushing the control button repeatedly (even if you can’t remember them), in order to cycle through the white and red lights and their intensity levels. Petzl’s documentation for this headlamp is also very good and available in both graphic and written form. I dislike headlamps that have complicated push button control sequences because I don’t use them frequently enough to commit them to memory. Simplicity is a benefit, for me, at least. When to you start the Bindi, the battery meter will display a colored light for 4 seconds that indicates the headlamp’s charge level. There are three energy ranges indicated by red, orange, and green lights, that correspond to 0-33%, 33%-66%, 66%-100% level charges. While these levels are directional are directional at best, you can mitigate the risk of running out of power by recharging the headlamp after each use and by carrying a portable battery, even a small one to recharge it if necessary. The Bindi has two locks to prevent accidental activation. A long 4 second press on the control button will digitally lock the headlamp, while a subsequent 4 second press will unlock it. Alternatively, or in addition, you can flip the headlamp upside down in its cradle. This blocks access to the control button and reduces the chance of accidentally pressing it. Cradle and Head BandThe Bindi swivels inside its cradle and can be pointed up or down a full 360 degrees on the angle you want it to the point if you’re using the head band. The cradle can also be use as separate stand to position the beam if you don’t want to use the head band. The Bindi’s head band takes some getting used to. It’s just an elastic cord that pinches uncomfortably if you make it too tight. Unfortunately, it’s tightly integrated with the Bindi’s cradle not easily replaceable. While a more conventional headlamp headband would have been overkill for such a small light, I far prefer the ultralight head band on the classic Petzl e+Lite and wished Petzl had used that instead. It’s not a deal killer, but does diminish the desirability of the head lamp. 
Do You Need a Rechargeable Head Lamp?If you already carry a power pack to recharge your cell phone in the backcountry, it makes sense to switch to a rechargeable headlamp like the Bindi if you haven’t already. There’s a huge shift underway towards the use of standardized rechargeable electronics in the backcountry that can be recharged with portable power packs and micro-USB, Apple Lightning, or USB Type C cable connectors. I use to carry device-specific spare batteries for my cell phone, camera, GPS, satellite messenger, and headlamp. No more. I’ve since switched to devices that can all be charged by carrying a single power pack and micro-USB or lightning adapters. It makes packing for a trip simpler and cuts down on waste. Comparable Rechargeable Headlamps
RecommendationThe Petzl Bindi is an ultralight, mico-USB rechargeable headlamp that’s well suited for in-camp use on backpacking trips where you don’t need a long burning, high intensity light. While the Bindi does have plenty of light output at high power,if you need it, it doesn’t have a big enough battery for hiking all night or long multi-hour trail runs. However, it has an easy-to-remember control sequence and comes with a full range of premium features including white and red light modes, a red strobe light, a battery meter, and 2 locks to prevent accidental activation. If you’re looking for a high quality, ultralight USB-rechargeable head lamp you’ll have a hard time topping the Petzl Bindi. Add in the fact that Petzl provides a 5 year warranty, you really can’t go wrong with it. Highly Recommended. Disclosure: The author purchased this product. Compare 5 Prices
Last updated: 2018-11-28 21:13:45
The post Petzl Bindi Rechargeable Headlamp Review appeared first on Section Hikers Backpacking Blog. from https://sectionhiker.com/petzl-bindi-rechargeable-headlamp-review/
Mountain climbers from around the world come to Mt Washington and the White Mountain’s Presidential Range to train for major expeditions to the great mountain ranges of the world. The steep terrain, cold temperatures, high winds, and abundant snowfall provide climbers with a perfect environment to test their skills. Climbing these peaks is not without peril, however, and there have been numerous injuries and fatalities in the Presidentials that have required the activation of professional and volunteer search and rescue teams to assist missing hikers and climbers. There are many state and local organization that staff these rescues and it’s pretty amazing how well they work together. Unfortunately, they get plenty of deployment opportunities all year-long. Ty Gagne’s book “Where You’ll Find Me: Risks, Decisions, and the Last Decisions of Kate Matrosova” has quickly become a mountaineering and hiking classic that’s well worth reading if you like to climb and play in the mountains or you have a loved one who does. While it’s written about a mountaineering accident that occurred in New Hampshire, it could have happened anywhere. The reason this book has proved so influential is that it transcends the place and the particular accident it examines, delving deeply into the emotional and logical pitfalls that can drive expedition decision-making. 
Gagne’s book also provides a behind-the-scenes account of how search and rescue is organized in the White Mountain National Forest, which is largely volunteer-based, and works hand-in-hand with New Hampshire’s state agencies. Gagne is a wilderness first responder and board member of one of the search and rescue organizations that attempted to rescue Kate Matrosova. He provides a deeply personal account of the rescue attempt and how it affected all of the people involved. This book provides a unique look into the heart of search and rescue personnel that I’ve never seen in any other mountaineering accident analysis. It’s a different perspective than you’ll find anywhere else. Incident SummaryKate Matrosova had the goal of climbing the highest mountains on each of the seven continents. She came to the winter White Mountains to train by hiking a Northern Presidential Traverse. This is an 15 mile route with 8700′ of elevation gain over the five tallest mountains in the Presidential Range: Mts Madison, Adams, Jefferson, Clay, and Mt Washington. She’d tried to recruit hiking partners from her circle of friends. But none were interested, so she decided hike to the route solo. These five mountains lie on a common ridge and encircle a deep glacial cirque called The Great Gulf. The ridge is completely exposed to the wind and the cold and looks like a moonscape in winter, barren, and devoid of landmarks. While she planned her route carefully, she was not familiar with the trail system and would need to rely on her GPS to find her way across the featureless winter moonscape. She also opted to hike it in a fast and light alpine style without any survival gear, like a sleeping bag or bivy sack, instead planning to race through the route and get down below treeline before any adverse weather could arise. 
Things did go wrong however. Matrosova had hoped to finish her hike before a vicious storm descended on the Northern Presidentials. After she’d summited the first peak, Mt Madison, she started working her way to nearby Mt Adams. Her pace began to slow. The wind speed on nearby Mt Washington had increased to 96 mph with a temperature of -17F and wind chill of -64F. Weighing just 125 pounds, Matrosova was likely knocked down by the wind, which would have made walking extremely difficult. Visibility would have been near zero as the wind whipped up the snow. Realizing she was in trouble, she initiated a Search and Rescue request with her SPOT. Rescuers believe she succumbed to hypothermia, and her body was discovered the next day frozen solid. Here’s a video of the actual search and rescue team effort to try and locate her to give you a sense of what 100 mph winds are like in the Presidential Range. Note the rescuers in the video who are blown to the ground by the wind. These are big strapping mountain guides carrying 80 lb backpacks and not a 125 lb waif like Kate Matrosova. We can only imagine how the wind speeds and cold affected her. Human Factors in Adventure Decision MakingThere are three elements to individual and group decision-making in extreme environments: physical, environmental, and human factors.
The interplay of these factors often determines how and what decisions we make as circumstances change in the field. Gagne’s analyzes Matrosova’s route and the decisions she made before she perished with this lens. His analysis isn’t judgmental, but an artful examination of the factors that could have led to her behavior as hypothermia in the adverse conditions set in. This type of analysis is the norm when analyzing many kinds of winter accidents, but Gagne’s makes it accessible to a broader audience. This book is a page-turner because many of us can identify with the circumstances that Matrosova found herself in. We’ve all made sketchy decisions outdoors at one point or another, and learning from them is an inextricable part of the outdoor experience. It doesn’t matter where you hike, climb, or ski, Gagne’s Where You’ll Find Me, has lessons for us all. Disclosure: The author purchased this book. Help support this site by making your next gear purchase through one of the links above. Click a link, buy what you need, and the seller will contribute a portion of the purchase price to support SectionHiker's unsponsored gear reviews, articles, and hiking guides.The post Death in the Presidential Range: The Kate Matrosova Incident appeared first on Section Hikers Backpacking Blog. from https://sectionhiker.com/death-in-the-presidential-range-the-kate-matrosova-incident/
The Deuter Aircontact Lite 45 + 10 SL is an adjustable frame backpack with great organizational features designed specifically for women. With a total of 55 liters of capacity, the Aircontact Lite is ideal for lightweight weekend and hut-to-hut backpacking trips where having a near-custom fit and good gear organization are priorities. The female-specific shoulder straps and hip belt provide an anatomically correct fit, while the lively X-stayed frame makes it responsive and maneuverable to carry. Note: The Aircontact series of packs was previously called ACT Lite and some retailers still have them listed under that moniker. Specs at a Glance
Backpack Storage and OrganizationThe Aircontact Lite 45 +10 SL is a top-loader with a top lid pocket and a main pack bag with a front sleeping bag hatch. Side mesh pockets let you stash water bottles while a front stuff-it pocket expands to accommodate clothing layers or damp items you want to dry out. The top lid is attached with four webbing straps, so it can float upwards if you want to overstuff the main compartment. It can also be removed completely (including its straps) to lighten the backpack if you want to shed some weight. The top lid has two pockets, a large top pocket and a hidden pocket under the lid, which is good for storing a toilet or first aid kit for easy access. 
There’s also a stuff-it pocket on the front of the pack, that has mesh along its sides so you can stuff damp or wet gear into it. The pocket isn’t very deep so you can’t pack bulky objects into it like camp shoes or a stove, but it is more suitable for stuffing clothing layers into. Unless you’re in a desert, I wouldn’t count on damp gear drying in this pocket. It’s really designed for temporary storage and to segregate wet clothing from the dry contents of your backpack . The sleeping bag compartment is formed with a fabric shelf, that can be unzipped and folded away if you to prefer to use the main compartment as one continuous space or to line the inside of your backpack with a thick trash compactor bag to keep the contents waterproof. While the pack is water-resistant, it does not come with a pack cover like many of Deuter’s other packs. 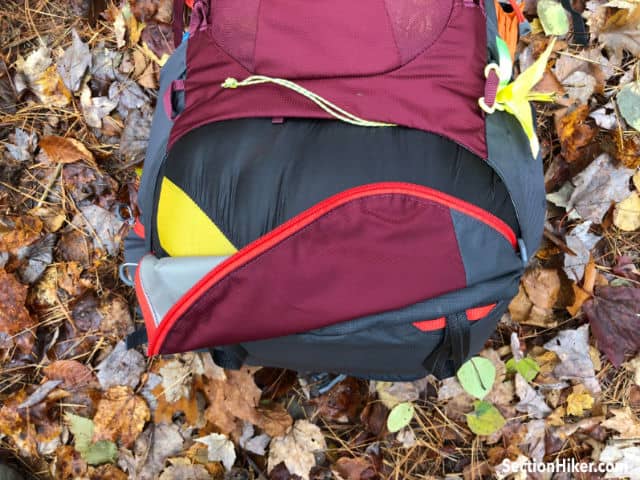
The side water bottle pockets are sized to fit a one liter Nalgene bottle, but the fit is very tight, especially when the pack is full. The side pockets are made of mesh, but it is quite tough and tear resistant. I could not reach back and pull out a water bottle while wearing the pack, but the Aircontact Lite does have an internal hydration pocket. The hose comes out through a center port, so you can route the hose to your right or left shoulder strap easily. The hip belt also has two tough mesh pockets, but I’m hesitant to put my phone or camera into them and would prefer pockets that are solid faced because they’re more durable and water-resistant. They’re fine for storing snacks or a compass though. One thing I do want to mention about the main compartment, is that the Aircontact Lite 45 + 10 is a narrow pack that fills tight and high. This is by design because women have narrower hips than men and a narrower pack is easier to control. But I often felt the top lid touching the back of my head when I packed the backpack full of gear. It may be that I was overpacking the top lid, but it’s something you want to be aware of. External Attachment and Compression SystemBackpacks are designed to carry gear strapped to the outside of the pack as well as inside and the Aircontact Lite does not disappoint on this dimension. For instance, the pack has two tiers of compression straps on the side of the backpack that can be use to strap pad or snowshoes to the side of the pack. The lower of these straps can also be routed over or through the side water bottle pocket so you can have side compression and still use the side water bottle pockets at the same time. 
The Aircontact Lite also comes with two ice axe loops at the bottom or the pack that can serve double duty as trekking pole holders. There are two elastic shaft holders provided, an important detail that many backpack makers omit. Deuter has also placed numerous gear loops along the pack’s seams so you can rig up custom attachment points with some elastic cord and cord locks. While they could have added extra webbing straps to the pack for this purpose, their goal was to keep the pack as light and streamlined as possible. For example, there are four additional webbing loops on the top lid, two short daisy chains along the sides of the front stuff-it pocket, and four additional gear loops around the perimeter of the sleeping pad pocket for this purpose. 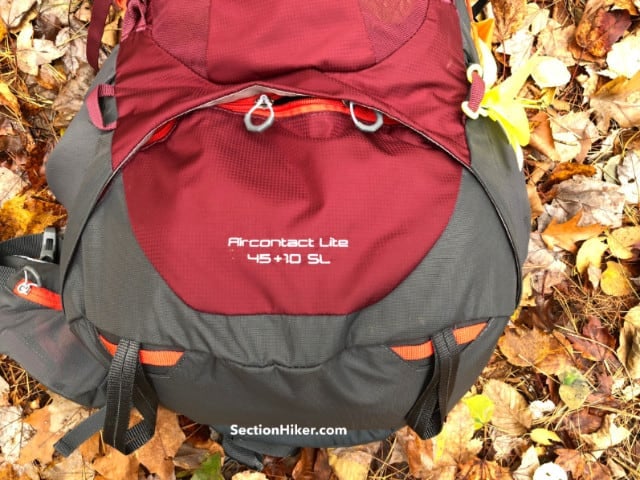
Backpack Frame and SuspensionWhile the Aircontact Lite 45 + 10 SL is an easy to use pack, the frame and suspension system is where it really shines. First off, this is an adjustable frame backpack meaning you can shorten or lengthen the torso length to fit your exact dimensions. There’s no compromising like you need to do with a fixed length pack. The design of the adjustable frame also provides excellent ventilation, without the overhead of a trampoline frame that moves the pack away from your back and makes it harder to carry. 
Deuter calls this the Variquick Frame System and it has a simple velcro’d shoulder yoke that you move up to lengthen the torso and down to shorten it. It is super easy to use because it’s so easy to access. However, the torso lengths aren’t labelled in inches or centimeters along the rear ladder locks, so you have to adjust the pack by feel, which isn’t the most obvious thing for beginners. If in doubt, fit the pack with a knowledgeable friend to help you. On the plus side, the Variquick Frame system has a large central air channel to help ventilate your back. The padding runs along the sides of your spine rather than on top of it, while keeping the frame locked closely on your hips to make loads easier to carry. The padding is flared slightly at the bottom to create a lumbar pad, but it’s very unobtrusive and feels just right. 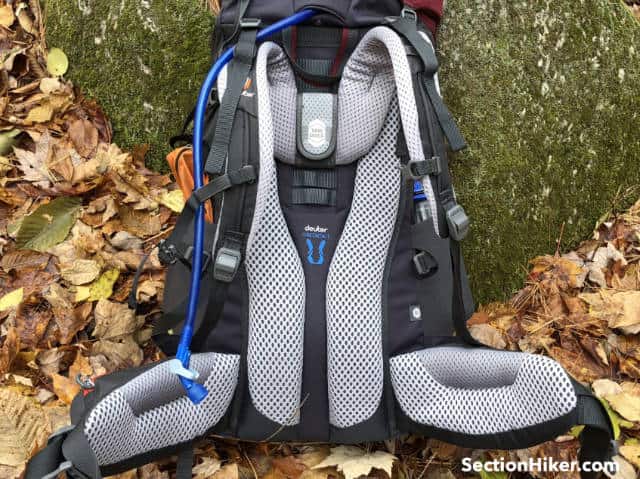
The frame itself consists of two sprung aluminum stays arranged in a X pattern so that they move with your torso, rather than resist it. A top horizontal cross-bar provides a secure anchor point for the pack’s load lifters, while helping to stiffen the pack and make it easier to carry. Female-friendly S-shaped shoulder straps provide better clearance with breasts, with a sliding sternum strap that is easy to adjust and doesn’t pinch. The Aircontact Lite hip belt is also female-specific, with two types of foam to provide a better hip wrap. The top soft foam rests on top of your hip’s iliac crest, while the stiffer bottom foam provides support and prevents any downward slide, keeping the belt where you want it. The hip belt closes with a single buckle and has push forward straps that make it easier to cinch tight. The belt also has rear control straps so you can pull the bottom of the pack closer to your hips for an even more efficient carry. Comparable Women’s Backpacks
RecommendationThe Deuter Aircontact Lite 45 + 10 SL is an adjustable frame backpack designed for women who want a comfortable frame and good storage options. It’s ideal for weekend trips or travel, with an expandable main compartment that provides an additional 10 liters of storage if you need to carry more gear and food. The female-specific shoulder straps and hip belt provide a very comfortable fit with a frame that is highly responsive and feels great when worn. The pack does ride a bit narrow and ungainly when packed tight with gear, so you might want to size up in volume to the Aircontact Lite 60+10 SL if you need more storage space, rather than pushing the capacity limits of the 45 + 10 SL pack. Disclosure: Deuter provided the author with a backpack for this review.
Beth Zimmer is an expert backpacker who's backpacked all over New England and Eastern Canada, with a long list of hiking accomplishments to her name. She's section hiked the New Hampshire Appalachian Trail, climbed the New England Hundred Highest and the New Hampshire 200 highest (mostly bushwhacks), redlined the White Mountain Guide (1440 miles), and climbed the White Mountain 4000 footers several times over. Beth also teaches GPS and off-trail navigation classes as a volunteer for the Appalachian Mountain Club and is co-chair of the New Hampshire Excursions Committee, which oversees all volunteer hiking and leadership training activities. When she's not hiking and backpacking, Beth resides in New Hampshire where she can usually be found sipping coffee and planning her next adventure.
Compare 4 Prices
Last updated: 2018-11-27 03:01:06
The post Deuter Aircontact Lite 45 + 10 SL Women’s Backpack Review appeared first on Section Hikers Backpacking Blog. from https://sectionhiker.com/deuter-aircontact-lite-45-10-sl-womens-backpack-review/
A headlamp is one of the most important 10 essentials for backpacking, hiking, and any kind of outdoor adventure sport. But traditional battery-powered headlamps are rapidly being replaced by rechargeable headlamps which are more convenient and less wasteful to use because you don’t need to throw out dead batteries. While you should alway charge your headlamp at home before a hike or trip, most people carry portable USB-compatible battery chargers in the backcountry now to recharge their phones and other electronics. Being able to recharge from a single shared battery helps you save weight, reduces toxic waste, and simplifies the use of electronics in the backcountry. Here are our top 10 picks for the best rechargeable headlamps for backpacking and hiking. While there are some familiar company names listed below, popular outdoor gear manufacturers have been slow to make USB rechargeable headlamps. Smaller, innovative companies that specialize in lighting have filled the void and make very competitive products. Be sure to check out our advice below about what to look for when buying a rechargeable headlamp for backpacking and hiking.
1. Black Diamond ReVolt
The Black Diamond ReVolt is a dual power headlamp that can be run using regular AAA batteries (alkaline or lithium) or the included Black Diamond AAA rechargeable batteries. These are recharged directly in the unit using a micro-USB cord. The ReVolt has a flood and spot light capability with 6 lighting modes including full strength in proximity and distance modes, dimming, strobe, red night-vision and lock mod. It has a lock mode to prevent accidental activation and a built-in battery meter.
2. Petzl Actik Core
The Petzl Actik Core is another dual power headlamp that can be used with regular AAA batteries or the Petzl Core battery. The Core battery can be recharged with a micro-USB cord and is also swappable between different Petzl “Core” headlamps. With a maximum of 300 lumens, the Actik has three white lighting modes: proximity, movement, and distance vision; in addition to red mode lighting in continuous or strobe modes. If you’ve had poor luck with headlamp durability, the Actik also comes with an impressive 5 year warranty.
3. Princeton Tec Axis Rechargeable
The Princeton Tec Axis has a built-in battery that is rechargeable with a micro-USB cord. It had four lighting modes: dual beam, spot, flood, and red night lighting, with a max light output of 200 lumens. We particularly like the twist style dimming switch on the side of the headlamp since it’s so intuitive to use. The Axis also has a digital lock to prevent accidental activation and a battery meter which flashes during recharging. The product has excellent documentation and comes with a 5 year warranty.
4. Nitecore NU 25
The Nitecore NU 25 is a light weight (1 ounce) state-of-the-art, multi-function headlamp available at a low price. With a max light output of 360 lumens, it has a built-in rechargeable micro-USB compatible battery. There are three LED light sources: a main white light, a softer white light for close-up tasks, and a night vision-preserving red mode, with four brightness modes: turbo, high, mid, low, as well as an SOS beacon. The NU 25 has a digital lock to prevent accidental activation and a battery meter. All of the button-press options can be a bit hard to remember, so check out the simpler Nitecore NU10, listed below.
Check for the latest price at 5. Nitecore NU 10
The Nitecore NU10 has a max light output of 160 lumens and 5 high output LEDs, including white and red light modes. It has three brightness levels: high, mid, and ultra low, along with two special modes including a flashing SOS. The NU10 provides a 170 degree wide field of illumination, making it ideal for night hiking and trail running. It also has a lock-out mode to prevent accidental activation as well as a battery indicator. Recharging requires a micro-USB cord (included).
Check for the latest price at: 6. Fenix HL 12R LED Rechargeable Headlamp
Weighing just 2.6 ounces, the Fenix HL 12R has 4 brightness levels in white, and a three modes in red including a reading mode, strobe and flash. The HL 12R has a maximum of 400 lumens for quick blasts of light and up to 110 hours of runtime on a single charge. Containing a built-in battery, this headlamp is USB rechargeable with a battery indicator so you’ll always know when charging is needed. The unit also has a digital lockout mode to prevent accidental activation.
Check for the latest price at 7. Petzl Bindi Headlamp
The 200 lumen Peztl Bindi is a 1.2 oz rechargeable headlamp with white and red lights. The white light has three power setting: high, medium, and low, while the red light has two modes: low and a strobe. The Bindi has a battery meter and a lock out function to prevent accidental activation. It also has a reserve power mode that kicks in to keep the light burning at 3 lumens for 90 minutes when you’re almost out of power. Battery capacity is limited however, so expect to recharge the Bindi often. Some people dislike the minimal head strap, but the Bindi is so lightweight, you soon forget about it.
8. Ultimate Survival Technologies (UST) Brila 580 Dual Power
The UST Brila 580 is a dual power headlamp that can be powered by a removable USB rechargeable lithium-ion battery or 3 x AAA batteries (not included.) It has a maximum light output of 580 lumens but can run on low for up to 18 hours at 30 lumens. The Brila 580 has three white light modes: high, medium, and low; and two red modes: steady and SOS flashing. It has a manual focus control that provides a long-distance spot beam or broad flood beam. The Brila does not have a lock out mode, but you can remove the battery to prevent accidental activation in your pack.
Check for the latest price at 9. LED Lensor SEO 7R
The LED Lensor SEO 7R is a dual power and dual color (white and red) headlamp that can be powered with a removable USB-rechargeable battery (included) or.3 AAA alkaline batteries. It has a maximum light output of 220 lumens with up to 20 hours of runtime at 20 lumens. The white light has four modes: high, low, auto dim, and flashing, while the red light has two modes: regular and blinking. There’s a manual focus adjustment that lets you switch between a spot or flood focus and a smart dimming capability that saves battery power by automatically reducing light intensity when it’s not needed. The SEO 7R has a built-in travel lock to prevent accidental activation and comes with a 5 year guarantee. The company is a division of Leatherman.
Check for the latest price at 10. Nite Ize Radiant 250
The micro-USB rechargeable Nite Ize Radiant 250 headlamp has a white light red mode capability with a max light output of 250 lumens. It has two switches that give you five lighting options: a white LED switch with high/low spot and high/low flood, and a red LED switch in flood to preserve night vision. It does not have a lock out capability to prevent accidental activation, but a battery indicator light is provided to signal when power is low. Charge time is very fast for a headlamp, at just 2 hours.
Check for the latest price at How to Choose a Rechargeable HeadlampHere are the most important features and considerations to evaluate when comparing different rechargeable headlamps. BatteriesMost rechargeable headlamps bundle in a cold-resistant lithium-ion battery, although there are also dual-power headlamps that can also be powered by alkaline batteries. If you already carry a USB-enabled power pack to charge your other electronic devices, then the latter is probably unnecessary, although it might be useful if your power pack runs out of juice and you can’t recharge it. Headlamp Head BandsAll of the headlamps listed above have battery packs that are integrated with their light sources, so a single headband strap is all that is needed to wear them. Multi-strap headlamp head bands are only necessary for very heavy headlamps or ones with remote battery packs that are carries separate from the light source and linked by an external wire. Lumens/Light OutputThe latest generation of LED lights available in headlamps are very powerful and the lumen outputs often exceed what’s required for nighttime use in camp or even for nighttime running. Anything headlamp with 100 lumens or more should be sufficient for general purpose backpacking and hiking. When purchasing a headlamp, the maximum light output is much less important than the length of time the headlamp can burn on low power, since that’s the setting you’ll use most often in camp or in your tent. Red Light ModeHeadlamps with a red light modes are good for preserving your night vision if you want to read in your tent or star gaze. They also help you avoid blinding your companions in camp or around the camp fire. The red light mode also uses far less energy than white light modes and is a good way to converse your battery power between charges. WeightWhile gear weight is important, it’s often less important than a headlamp’s features, efficiency, or battery life. For example, if you need to carry a heavier power pack to recharge a lighter weight headlamp more frequently, you probably haven’t saved as much weight overall as you might like. Focus on your needs, if you know them, and let that guide your decision as to which headlamp you select. On-Off LockHead lamps with manual or digital on-off locks are useful to prevent the accidental activation of a light when it’s packed. I won’t buy a headlamp without one, but that’s just my personal preference. Battery IndicatorSome sort of battery indicator is useful on a recharageable headlamp so you know when to recharge the battery and when it’s finished recharging. Without it, you’re more likely to try to use a headlamp that is out of power when you need it. Check Out All of SectionHiker's Gear Guides!
The post 10 Best Rechargeable Headlamps of 2018-2019 appeared first on Section Hikers Backpacking Blog. from https://sectionhiker.com/10-best-rechargeable-headlamps-of-2019/
The Oboz Bridger 10″ BDry is an insulated winter hiking and snowshoeing boot with a BDry waterproof/breathable membrane and 400 grams of Thinsulate insulation, making them suitable for cold weather use. Oboz doesn’t publish a temperature rating for them but they’re comparable to other 400 gram insulated winter hiking boots (-40F) in terms of warmth. The Bridger 10 has thick Nubuck leather uppers and a beefy, rubber front toe kick providing your toes with ample protection when wearing snowshoes or if you have to kick steps into hard snow. The tongue is gusseted to prevent water from leaking into the boot if you step into a deep puddle, and there’s a front gaiter ring at the base of the laces. The back of the boot has a rigid heel cup that gives the boot excellent stability and has a narrow protruding “shelf” to capture a rear snowshoe strap. 
The upper part of the boot is fairly stiff out of the box, but loosens up with use. But while the Bridger 10″ looks like a boot, it wears more like a running shoe, with a noticeable curved rocker that makes them easier to walk with. In terms of sizing, the Bridger 10″ boots run narrow and about a 1/2 size small, so size up. Oboz says that the heel is a size “C” width, which is indeed narrow, while the toe box is a regular size “D” width. The Bridger 10″ is NOT available in wide sizes, like many of Oboz’s other boots, so be forewarned. Unfortunately, the Bridger 10″ is the only 400 gram insulated boot made by Oboz and their other models, some which are available in wide widths, only have 200 grams of Thinsulate insulation. 
The Bridger 10″ comes with a wool covered insole that is coated on the bottom with reflective mylar. The insole is sculpted to cup your heel and has a small shock absorbing pad underneath. It provides good arch support and is a superior insole as manufacturer insoles go. But I’d still recommend swapping it out with an aftermarket insole, like aSuperfeet Green, because it prevents the pronation, which can lead to plantar fasciitis. The Bridger 10″ has an aggressive exterior sole with big lugs that provides excellent traction on snow and off. The lugs run up the sides of the sole a bit, making them good for scrambling on loose gravel or open ledge. If you’ve owned Oboz trail shoes or boots, then you’re probably familiar with the Granite Peak outsole used on the Bridger 10″, since it’s also found on many of Oboz’s other hiking shoes. Of course, you’ll still need microspikes or snowshoes when snow and ice make the scene. The sole has a nylon shank that provides very firm heel support with a TPU chassis to absorb shocks and a high arch for gaiter compatibility. A men’s 11 weighs 3 lbs 7.7 oz/pair. 
The lacing system uses a combination of fabric loops, metal eyes, and speed hooks near the top collar. However, the laces have a habit of untying themselves, so I usually triple knot them so they don’t come undone. The laces are round and I suspect that switching to flat laces will help ameliorate the problem, but I’ll leave that as an exercise for the reader. RecommendationThe Oboz Bridger 10″ is a comfortable and warm winter boot with excellent traction. The high cuffs provide excellent ankle support and help seal in the heat, while the boot’s beefy leather uppers provide excellent protection and durability. The aggressive Granite Peak lugged sole is identical to that used on many of Oboz’s other boots and shoes and equally capable in snow and slush. If you already use Oboz boots or shoes, and love the way they fit, then getting the Bridger 10’s is probably a no brainer, provided you don’t need a wide width. If you’ve never tried a Oboz boot, these are great cold weather hikers, well-built and with plenty of protection to keep your feet warm and happy on long, all day hikes and snowshoeing trips. The Oboz Bridger 9″ is the women’s version of this 400 gram insulated hiking boot. Compare 2 Prices
Last updated: 2018-11-23 02:45:06
Disclosure: Oboz provided the author with a pair of boots for this review. Help support this site by making your next gear purchase through one of the links above. Click a link, buy what you need, and the seller will contribute a portion of the purchase price to support SectionHiker's unsponsored gear reviews, articles, and hiking guides.The post Oboz Bridger 10″ BDry Winter Hiking Boots Review appeared first on Section Hikers Backpacking Blog. from https://sectionhiker.com/oboz-bridger-10-bdry-winter-hiking-boots-review/
Were there ever a line of MSR stoves that needed no introduction, it might just be the MSR XGK EX Liquid Fuel Stove. When Larry Penberthy introduced his Model 9 stove, the first in the XGK line, he revolutionized stoves and ushered in the modern mountaineering/backpacking stove era. Specs at a Glance:
The History Making Nature of the XGKFor a long period of time, back country stoves were “upright” style stoves with the burner mounted directly on top of the tank or with the tank in very close proximity to the burner. The heat from burner was used in part to pressurize the fuel tank. Indeed, many small stoves had no pump at all and worked on thermal feedback alone. 
The disadvantages of the upright style of stoves were twofold:
Mr. Penberthy, an engineer with a passion for mountaineering, learned that many mountaineering emergencies such as hypothermia could be traced back to dehydration. Why dehydration? The stoves of the day were heavy affairs and quite vulnerable to wind. Many mountaineers simply refused to carry a stove, and, lacking a stove to melt snow, ran out of water. Penberthy decided to design a new generation of stoves. The fuel bottles of the day were typically Sigg aluminum fuel bottles. Mr. Penberthy, an engineer, realized that the Sigg bottle itself was plenty strong enough to withstand the pressure used to operate a stove. He got rid of the fuel tank attached directly to the burner. Instead, he used the Sigg fuel bottle as the tank and moved it away from the burner. With the tank well away from the burner, a windscreen could be placed around the burner without fear of overheating the tank. Indeed, using a windscreen actually made the stove safer. The end result was a stove that was lighter, safer, and less vulnerable to wind. Mr. Penberthy introduced what was then called the Model 9 in 1973, and it garnered adoption quickly in the mountaineering community. To this day, the XGK has the reputation among mountaineers as a reliable workhorse for snow melting and water boiling. The latest incarnation of the XGK is the XGK-EX. The “X” in “XGK” stands for Expedition. The “G” and the “K” stand for Gasoline and Kerosene, respectively, and indicate the primary fuels the stove was designed for. “EX” was added to the name of the stove to emphasize its nature as a stove for expeditions. If one were to fully spell out the name of the stove, it would be the Expedition Gasoline/Kerosene Expedition stove, which is a bit redundant, but, as I say, MSR was quite keen to emphasize the expedition worthiness of the stove. If you would like to see what an earlier version of the XGK looks like, I have a review of the XGK II on my blog: https://adventuresinstoving.blogspot.com/2011/03/stove-of-week-msr-xgk-ii-pre-shaker-jet.html 
Characteristics of the MSR XGK-EXWell, enough history lesson, let’s take a look at the stove, shall we? The XGK-EX is a large stove, suitable for the size of pots used for groups or snow melting. I don’t normally use such a large pot, but the XGK-EX could reasonably support a pot up to five liters in size were it employed on stable, level ground. The XGK-EX’s pot supports are an improvement over previous generations of the XGK in terms of stability and the ability to support larger pots. Fuel BottleThe XGK-EX is fed liquid fuel from a standard MSR fuel bottle (sold separately). MSR sells 11 (325 ml), 20 (590 ml), and 30 (887 ml) fluid ounce sized bottles. The bottles will actually hold a bit more than the stated amount for storage, but for use in operating the stove, one must be careful not to overfill the bottle beyond the stated capacity. A certain amount of air space is required in the bottle so that the pump does not over-pressurize the fuel bottle. MSR specifies that only MSR fuel bottles should be used with MSR stoves, and of course, the only way MSR can 100% guarantee that a fuel bottle will be safe to use with an MSR stove is to have bottle manufactured to their specifications. However, in actual practice, many brands of fuel bottles use the same thread and can be used with MSR stoves with reasonable safety. 
Recall that originally MSR did not make their own bottles but rather used Sigg bottles. I myself have used MSR stoves with good results with Sigg, Snow Peak, Optimus, and Kovea fuel bottles. The only bottles I’ve had trouble with are the ones from Primus. The threads are the right size and pitch, but the threads are further recessed into the neck of the bottle, and the MSR pump cannot engage. Note that some other brands of bottles may not be a good fit with the pump collar of the MSR fuel pump. Generally, your best bet is an MSR fuel bottle, but other brands may suffice in a pinch. I would not use no-name, knock-off fuel bottles. Cheap knock off bottles may not be able to withstand the pressure needed to operate the stove. A failure (typically in the neck area of the bottle) would spill highly flammable fuel near a lit stove. This might not be in your best interests. Fuel PumpThe latest MSR fuel pump is what I refer to as the duraseal pump. Gone is the rubber “O” ring that used to seal the pump to the bottle. This “O” ring had a tendency to crack with age which could cause dangerous fuel leaks. The duraseal pump has a red “collar” that screws down over the mouth of the fuel bottle. At one time, I believe MSR was actually calling this pump the duraseal pump, but their website currently just calls it a fuel pump. 
Other improvements over earlier versions include a standard fuel filter on the fuel intake, a solid, non-deforming air supply tube, a reinforced valve assembly (the old ones would crack if you tightened the valve too much), and a more reliable means of pump shaft retention (the old ones would often crack, leaving the pump shaft free to pull out of the pump body). Overall, this is the best pump MSR has produced in decades. In addition, an “arctic” version of the pump (with a blue collar instead of the standard red one) is available for use in temperatures below 32 F/O C. Note that MSR fuel pumps designed for the Dragonfly stove are not compatible with an XGK-EX. 
Stove PrimingWith liquid fueled stoves, the stove has to be hot enough to vaporize the fuel before it reaches the burner. If the fuel isn’t fully vaporized, you’ll get a sooty yellow flame instead of a nice, clean blue flame. In order to get the stove up to operating temperature, one has to “prime” the stove. One primes the stove by burning a bit of fuel underneath the burner. There are some challenges associated with priming:
One of the ways around these challenges is to bring along a small bottle of ethyl, methyl, or denatured alcohol. Do not use isopropyl (“rubbing”) alcohol for priming! Isopropyl alcohol does not burn cleanly. Alcohol has several advantages over using white gasoline or kerosene for priming:
Alcohol works great as a priming fuel in decent weather. In really cold or windy weather, one must be prepared to double prime with alcohol. Great care should be taken when double priming since the stove will already be hot from the first prime and could ignite the alcohol. In actual practice, I’ve not had a problem with such premature ignitions, but one should take care. Another, safer, option is to crack the valve a bit add some gasoline the normal way (from the fuel tank) during the priming process. 
At left is a Bunsen burner pad. The Bunsen burner pad can be used as a heat diffuser. At top is the small parts kit that comes with each XGK-EX Stove BurnerThe MSR XGK-EX uses a simple “roarer” (vortex) type burner. This is the simplest type of burner design. With little to go wrong, it’s reliable and relatively easy to maintain. However, as one might gather from the name “roarer,” it isn’t exactly quiet. If one is bothered by loud noise, another stove might make a better choice. Indeed, the MSR Whisperlite was developed at least in part to give backpackers an alternative to the rather loud XGK. The XGK’s burner is extremely robust and can burn pretty much any type of fuel. The best fuels are white gasoline and kerosene, but automotive gasoline, jet fuel, diesel, and other fuels may be burned. Automotive gasoline, aviation gasoline, and especially diesel #2 make poor choices for stove fuel and may shorten the life of the stove if used extensively. Diesel #1 isn’t a bad fuel, but 1-K grade (US designation, designations elsewhere may vary) kerosene is the better choice. “Bunker” fuel of the type used in the maritime industry should be avoided. The other downside to the XGK’s burner (other than the noise level) is the lack of good flame control. The joke is that the XGK has but two settings: “Off” and “Blazing Inferno.” The reality is a bit more nuanced, but suffice it to say that the XGK is not a true cook’s stove. While the XGK excels at snow melting and water boiling, if one wanted to do more complex forms of cooking, the XGK would not be a good choice. One can get a lower flame than “blazing inferno” by using a half empty (or more) fuel bottle and only using 5 pump strokes instead of the normal 20 to 30 strokes. I wouldn’t call the resultant flame good for simmering, but it is quite a bit lower than full-on blazing inferno. 
I’ve found that I can cook instant rice, instant noodles, etc. on an XGK-EX reasonably well, without sticking or burning, using my reduced pressure technique as described above and doing a lot of stirring. One can also use some type of flame diffuser to lower the intensity of the flame. Even with reduced pressure, a lot of stirring, and a flame diffuser of some sort, I still would not say that an MSR XGK-EX is a good stove for sophisticated cooking. The MSR XGK-EX’s burner is most definitely an expedition stove burner. A small, compact burner for an individual it is not. It’s designed for groups and large pots. Still, in a 1.3 L Evernew pot, I was able to pack in the stove, parts kit, and some utensils reasonably well. I typically keep the pump in the bottle while out on the trail. This is generally the best protection for the most sensitive parts of the pump, and it’s an efficient use of space. Note that I do not keep the fuel bottle pressurized while in transit. I only keep the fuel bottle pressurized when I intend to use the stove. 
Suggestions for improvementThe fuel hose is too freaking stiff and should be replaced with a more flexible hose. I mean it really makes the stove far more bulky than it needs to be. No other manufacturer uses the gawd-awful stiff fuel hoses that MSR does. Primus, Optimus, etc. all have nice, supple fuel hoses that pack away so easily. MSR certainly has the technology. Their old Simmerlite stove (the canister gas version of which is still in production as the WindPro) had a wonderfully flexible fuel line. Why they went back to these stiff, pain-in-the-neck fuel hoses, I will never know. Yes, I get it that a stiff fuel hose forces the fuel bottle away from the burner which does make the stove safer, but the stiff fuel hose just is not practical. I value space in my pack just about as much as I do as light weight and reliability, and the difficult-to-pack XGK-EX baffles me. Why MSR would put themselves at a competitive disadvantage I just do not know. Another really nice improvement would be to add the ability to burn canister gas. Canister gas is becoming more and more widely available and would give one the ability to precisely control the flame that the XGK-EX now lacks. I’m not sure how cost-effective a redesign would be, but I do note that more and more stoves are coming out with dual liquid fuel and canister gas capability. MSR itself produces the Whisperlite Universal which can burn both liquid and canister gas fuels.] 
MSR XGK-EX Stove: Highly RecommendedWhat’s good about it?
What’s not so good about it?
I thank you for joining me on another Adventure in Stoving, HJ Disclosure: The stove in this review was provided at no cost to me by Section Hiker with the understanding that I would review the stove as I saw fit, in other words, with no restrictions or preconditions. I have reviewed the stove accordingly. Neither I nor Adventures in Stoving have any financial relationship with MSR, the manufacturer of the equipment reviewed. In addition, I receive no remuneration for the writing of this review nor do I receive any benefit from the sale of any stove discussed in this review. However, if MSR wanted to cut me in for a piece of the action, I’d be most amenable (fat chance of that ever happening). They could at least ship me a free case of canister gas, don’t you think? Compare 5 Prices
Last updated: 2018-11-21 15:22:32
About Hikin' JimHikin’ Jim is an avid hiker and backpacker residing in Southern California. Jim is something of a backpacking stove aficionado, owning well over a hundred backpacking stoves. You can find him most any weekend out field testing stove related gear in the local mountains or, in the summer, wandering the Sierra Nevada. Hikin’ Jim has a blog, Adventures in Stoving, devoted almost exclusively to backpacking stoves, including reviews, general stove tips, and other articles pertaining to the use of stoves in the backcountry.Check out all of Hikin' Jim's Stove Reviews
The post MSR XGK EX Liquid Fuel Stove Review appeared first on Section Hikers Backpacking Blog. from https://sectionhiker.com/msr-xgk-ex-liquid-fuel-stove-review/
Winter is a great time to gear up and get up for some cold weather hiking and snowshoeing adventure. The bugs are gone and so are the crowds, leaving the mountains and the hills to those who can’t live without their weekly dose of sun and snow. There’s no denying that winter gear costs a lot but it also lasts for many years and can be a good value if you use it. I own and have used many of the items list below. The rest is gear I want a special *someone* (hint) to buy me for the holidays! Julbo Vermont Classic Glacier Sunglasses
Julbo Vermont Classic Glacier Sunglasses block 100% of UV rays and 95% of visible light protecting your eyes from the snow’s glare. Moldable ear temples offer a customized fit. A leather nose piece and vented side shields block peripheral light and can be removed as needed. Multiple colors available. Learn MoreMSR Access 3 Winter Tent
The 4-season MSR Access 3 Tent is warm enough for cold winter nights, yet light enough to keep you nimble on the move. It provides the protection that backcountry skiers and snowshoers need for camping in less severe conditions, such as those near tree-line. The robust frame withstands overnight snow loading, and is quick to set up in the cold. Dual doors and vestibules provide easy access and gear storage. Learn MoreGregory Paragon and Maven Backpacks
The Gregory Paragon 58L (men’s) and Maven 55L (women’s) packs are lightweight, alpine-style packs weighing just over 3 pounds with a slim profile that’s perfect for winter hiking and backpacking. Featuring an adjustable length hipbelt and torso, they provide a custom fit for every physique. Remove the internal sleeping bag divider and use it in place of the top lid to shave even more weight for an ultralight configuration. Available in 48L\45L, 58L\55L, and 68L\65L volumes. Men’s Women’sGarmin inReach Explorer+ Satellite Communicator
The Garmin inReach Explorer+ Satellite Communicator is a GPS-enabled tracker, navigation device, and two-way texting device than lets you share your location or text with SMS phone numbers and email addresses. While it is larger and slightly heavier than the new Garmin inReach Mini, the Explorer+ is easier to use when wearing winter gloves. A built-in SOS button lets you summon emergency aid and sends confirmation that your SOS has been received. Preloaded Topo maps, an altimeter, and barometer let you follow routes, record tracks, keep trip statistics, and mark backcountry waypoints. You can even receive local weather forecasts. Learn MoreNEMO Sonic 0 Sleeping Bag
The NEMO Sonic 0 degree down sleeping bag is a spacious cold weather sleeping bag that can be comfortably used by back or side sleepers. Tricked out with top of the line features such as a taped zipper, zipper draft tubes, and large draft collar, the Sonic 0 has innovative Thermo-Gills that let you adjust the warmth of the bag without cracking open the zipper and introducing cold drafts. Learn MoreLowa Mountain Expert GTX EVO Boots
The lightweight, waterproof Lowa Mountain Expert GTX Evo mountaineering boots are ideal for use with step-in crampons on backpacking trips above tree line and for mixed climbing on rock and snow. Available for MEN and WOMEN, these boots are insulated (rare in leather mountaineering boots) with 200g of Primaloft with Gore-Tex waterproof, breathable membranes. The soles are also replaceable for long life. Men’s Women’sOutdoor Research Mt Baker Modular Mitts
The Outdoor Research Mt. Baker Modular Mitts, with removable PrimaLoft One liner gloves, provide high warmth and storm protection in cold, damp climates. GORE-TEX 3-layer laminated nylon shells offer waterproof, breathable protection with long gauntlets; synthetic leather palms add durability and good grip. PrimaLoft One liner gloves have a high warmth-to-weight ratio and continue to insulate when wet; when it warms up or you need better dexterity, they can be worn alone. The liners also have heat pack pockets on the backs. Learn MoreJetboil Joule Cook System
The Jetboil Joule Cooking System lets you burn canister gas in its liquid (upside down) form, letting you cook in temperatures down to 10 degrees. The insulated 2.5 liter FluxRing pot is ideal for efficiently melting snow, and while the 10,000 BTU stove can boil 1L water in just 2:40, it can still simmer. Learn MoreMSR Lightning Ascent Snowshoes
With tough, reliable decking, and security that tubular frames can’t touch, the ultralight MSR Lightning Ascent Snowshoes provide a solid platform for mountain snowshoeing. Available in MEN’S and WOMEN’S models. The 2-piece PosiLock AT bindings create a secure, freeze-resistant attachment, regardless of footwear. An integrated heel wire reduces calf-strain on climbs. Wrap-around 360 degree traction frames offer edge-to-edge grip while the split tooth crampons distribute forces for continuous contact, delivering traction on any terrain. Men’s Women’sCAMP USA Corsa Ice Axe
Quite possibly the lightest ice axe in the world, the CAMP USA Corsa excels at ski mountaineering, adventure racing and low-angle glacier travel. Built from 7075-series aluminum for dependable service and minimum weight, Corsa is hardly noticeable when packed. A hot-forged, aluminum head delivers solid bite, and the rear adze adds chopping power. Learn MoreHillsound Trail Crampons
The Hillsound Trail Crampons are a necessity for added traction when you’re out hiking on local trails or deep in the backcountry. Their heat-treated carbon steel spikes are strong and durable providing years of use. The elastomer harness ensures compatibility with most shoes and boots and make the Hillsound Trail Crampons easy to get on and off. Learn MorePatagonia Nano Puff Vest
An insulated vest is an ideal layer when winter hiking or snowshoeing because it provides freedom of motion for your arms, while keeping your core warm. The Nano Puff Vest is windproof and warm, made with 60g of Primaloft Gold Eco Insulation. With 55% post-consumer recycled content, it is the most thermally efficient synthetic insulation available today.Men’s Women’s
REI Alpine Gaiters
REI Alpine Gaiters are an excellent value and tough as nails for winter hiking and snowshoeing. Their water-resistant construction will keep your legs dry and warm when plowing through snowdrifts and down winter trails. Heavy-duty velcro front closures provide a secure and adjustable fit while hooks at the bottom assure compatibility with many kinds of boots. Learn MoreThe North Face Etip Insulated Gloves
Make calls, send texts and surf the web without compromising warmth in The North Face Etip gloves. They offer full finger and palm touch-screen conductivity. Four-way stretch fleece gives you full range of motion while pre-curved fingers improve warmth and blood flow to your fingers by mirroring the natural relaxed curve of the hand. Men’s Women’sBlack Diamond Trail Trekking Poles
Black Diamond’s Trail 3-section poles provide patented FlickLock adjustability with zero-slip security. Simply flick the lock open, set the length and flick the lock closed—a quick, tight, and easily accomplished task, even while wearing winter gloves. Includes low-profile baskets for general use and powder baskets for use in the snow. Men’s Women’sOsprey Kamber 32 Snow Pack
The Osprey Kamber 32 Snow Pack is ideal for winter snow sports like snowshoeing and backcountry skiing. It has internal reservoir pocket with insulated harness sleeve w/ an insulated hydration tube sleeve in the shoulder harness so you can stay hydrated in the cold winter air. Glove-friendly buckles and zipper pulls and a wet/dry gear division make it perfect for a wide range of winter adventures. Learn MoreReversible Polar Buff
The Polar Buff Can be worn as a neckliner, helmet liner, balaclava, mask, scarf, hood or hat to give you warmth where you need it, when you need it. One side is the covered with an original Buff while the other is covered with a layer of Polartec fleece to help minimize heat loss. Super warm and comfortable, the value of this item is its versatility in winter conditions. Learn MoreOutdoor Research Winter Ferrosi Hoody
The Winter Ferrosi combines the legendary lightweight toughness of breathable Ferrosi stretch soft shell fabric with a layer of synthetic Thermore insulation inside, adding up to an insulated jacket that can take some abuse. Men’s Women’sThe post Best Winter Hiking and Backpacking Gifts of 2018 appeared first on Section Hikers Backpacking Blog. from https://sectionhiker.com/best-winter-hiking-and-backpacking-gifts-of-2018/
The Tubbs Flex VRT is a plastic decked snowshoe with an aggressive crampon setup that’s ideal for snowshoeing in steep and mountainous terrain. It has an easy to use Boa binding system that clamps down around your boots and won’t slip in use, along with a flip-up heel bar to reduce calf fatigue when climbing hills. The decking provides good flotation and flex, although the plastic can be a little noisy on hard crusty snow. Tubbs also makes a snowshoe call the Flex Alp, which is identical to the Flex VRT, with the exception of the Boa binding. Specs at a Glance
BindingsThe Flex VRT has a Boa-style wire lace binding that clamps down on the front and sides of your boots, while a rear heel strap holds it in the binding. The Boa system consists of a wire and a knob that you twist to tension the wire. The wire loops through the tops and sides of the Flex VRT binding, so that when you tighten it, it clamps around your foot. If you pull up on the knob, the wire is released and goes slack so you can remove your foot. The nice thing about this Boa closure is that it doesn’t pop open when you’re snowshoeing. 
The top of the Boa binding has a foam pad that presses down on the top of your boot, distributing the pressure over a wide surface area. This helps prevents the formation of hot spots on the tops of your toes, especially if you wear a lighter weight boot without a beefy toe kick or toe box. There is a strap at the back of the binding which prevents the back of your boot from sliding out of it. The buckle that Tubb’s uses to secure the rear strap is non-intuitive, but works well if you simply pull on the end of the strap to lock it in place. 
I haven’t experienced any freeze up with the Boa system, although it’s a concern in mixed conditions when you have to trudge through puddles, mud, slush, and snow. I always carry hot drinking water, so worst comes to worse, I can pour it over the Boa knob to defrost it. However, ice does form inside and around the rear binding buckle. This isn’t a problem when removing the snowshoe, but ice chunks inside the buckle can prevent the internal pin from pushing through the holes in the strap. If the rear strap doesn’t stay closed, open it up and make sure ice hasn’t formed inside it. It’s easy enough to break it off with your finger. Having a snowshoe binding that stays closed and secure all day is huge benefit. Huge. The only downside of the VRT’s Boa binding is its bulk, because it can make it more difficult to attach the sides of a backpack, where they’re the most efficient to carry. If you do buy the VRT’s, make sure your backpack’s side compression straps are long enough that you can lash the snowshoes to the sides of your backpack. 
CramponsWhile the Boa binding is a slick feature that adds a lot of value to these snowshoes, the crampon system is where the rubber hits the road. The Flex VRT has a hinged crampon with six large crampon teeth that let you kick into slopes and climb steep hills. There are two long, toothed rails that run down the sides of the snowshoes, and a pair of shorter rails at the tail-end to keep you tracking straight. The Flex VRT’s crampon setup is on par with the MSR Lightning Ascent and MSR Evo Ascent, the two most capable snowshoe climbers available, although configured slightly differently. 
The hinged front crampon has crampon teeth that face backward and along the sides, in addition to forwards. This helps prevent backsliding on slopes or ice-covered ledge, while the side teeth prevent lateral sliding. The two side-rail crampons are curved, which provides a better grip on sheer ice, than the straight rails on the MSR Evo Ascent snowshoe. The side rails are quite long and run along the entire snowshoe. There’s also a small third crampon at the rear of the decking. The “Flex” in this snowshoe’s name refers to the fact that the rear decking flexes as you walk and this small rear binding helps prevent fishtailing so you’re stride remains straight and true. Net Net. The Flex VRT crampons are best in class. Heel BarThe Flex VRT has a heel bar that you can flip up when climbing hills or steep inclines. There’s a small depression in the back of the decking that lets you get your finder under the bar to flip it up. The heel bar lifts up the rear of your boot under the heel (the feeling is like walking in high heels) relieving stress on your calves and reducing fatigue on inclines. Imagine you’re hiking up a hill and your ankle is flexed so your toes point upwards. When the heel bar is deployed, your foot remains nearly flat, making it much easier to climb the incline. You almost have to experience it to understand what a huge difference it makes. When you reach level ground again, you flip the heel bar down and walk normally. 
I consider a heel bar a must-have if you plan on climbing hills or mountain trails. They’re completely revolutionized snowshoeing when they were introduced, but their usually not found on recreational snowshoes, just backcountry ones. FlotationThe Flex VRT provides excellent flotation, in part because it’s only available in 24″ and 28″ sizes. These are not the standard 22″, 25″, and 30″ inch sizes that most other snowshoe manufacturers sell. Being longer, they provide more surface area and therefore more flotation. However they are noisy snowshoes since they’re made with plastic decking. On the bright side, you’ll never surprise a large animal or hunter when wearing these snowshoes. They’ll hear you coming. 
RecommendationThe Tubbs Flex VRT is a premium backcountry snowshoe with a Boa wire lace binding system that is easy to secure and will stay locked on to your boots for the duration of your trip. The durability of its plastic and steel construction, aggressive crampons, and heel bar make it suitable for climbing up steep inclines and in mountainous terrain. If you’ve ever been frustrated by the strap-based binding on MSR’s Lightning Ascent Snowshoes or the MSR Evo Ascents, or its a concern, I’d recommend purchasing the Tubbs Flex VRT. While the VRT has a bulkier binding, it’s definitely in the same class as those two best of breed snowshoes. Highly Recommended. Compare 4 Prices
Last updated: 2018-11-19 18:22:01
Disclosure: Tubbs provided the author with snowshoes for this review. Help support this site by making your next gear purchase through one of the links above. Click a link, buy what you need, and the seller will contribute a portion of the purchase price to support SectionHiker's unsponsored gear reviews, articles, and hiking guides.The post Tubbs Flex VRT Snowshoe Review appeared first on Section Hikers Backpacking Blog. from https://sectionhiker.com/tubbs-flex-vrt-snowshoe-review/
Here are our top 10 recommended winter sleeping bags for cold weather backpacking. For more information, see our evaluation criteria and buying advice below.
1. NEMO Sonic 0 Sleeping Bag
The NEMO Sonic 0 is a mummy-style sleeping bag insulated with 800 fill power water-resistant down. It has a highly adjustable draft collar that encircles your neck and shoulders as well as a zipper draft tube to seal in warmth. The Sonic 0 has innovative Thermo-Gills (see picture) that let you release up to 20 degrees of the warmth so you can regulate your temperature without cracking open the zipper and introducing cold drafts.
2. Big Agnes Orno 0 Sleeping Bag
The Big Agnes Orno 0 is insulated with 850 fill power water-resistant down. It has a 1/2 length zipper to save weight, an oversized draft collar, zipper draft tube, and a contoured hood that prevent moisture from your breath from re-entering the bag and chilling you. Body mapped and vertically oriented baffles let warm air flow from one end of the bag to another, while reducing the weight of the materials required. The Orno 0 does not come with a sleeping bag sleeve like many of Big Agnes’ classic sleeping bags.
3. Marmot Lithium Sleeping Bag
The Marmot Lithium is a feature-rich mummy-style sleeping bag insulated with 850 fill power water-resistant goose down. It has a full-length two-way zipper with a draft tube and snag guard, so you can vent the bottom by your feet or anywhere you’re too warm. The Lithium has an adjustable, double-sided draft collar that runs over your chest and neck and and behind your back to seal in your warmth. A second 1/4 length zipper on the other side provides additional ventilation and increases the bag’s range of use.
4. Western Mountaineering Kodiak 0 Sleeping Bag
The Western Mountaineering Kodiak 0 is a spacious mummy sleeping bag insulated with 850 fill power goose down. Designed for large folks up to 7′ in height (multiple lengths are available), it has 66″ of shoulder girth and 7″ of loft, to keep you comfortable and toasty. The Kodiak has a 3-dimensionally cut draft collar and zipper draft tube, as well as continuous baffles. Found on many high-end bags, these let you shake the down to where it’s needed most (for example to your chest or feet) and help you configure the insulating power to satisfy your individual needs.
5. Feathered Friends Snowbunting EX 0 Sleeping Bag
The Feathered Friends Snowbunting Ex 0 is a mummy-shaped sleeping bag insulated with ultralight and ultra-warm 900 fill power goose down. It has a generous sized draft collar, draft tube, with an overlapping zipper-guard that prevents snags. The shell is made with Pertex Shield EX water-resistant/breathable laminate, which is fully waterproof and windproof, making it good for use in snow caves and bivy sacks. The flexibility of continuous baffles allow the Snowbunting to also transition into the warmer months.
Check the latest price at: 6. Big Agnes Blackburn UL 0 Sleeping Bag
The Big Agnes Blackburn UL 0 is an 850 fill power down mummy bag with a sleeping bag sleeve to keep you on your insulated sleeping pad all night, a very useful thing. It has a yoke-style draft collar and draft zipper tube to seal in warmth, along with Insotect vertical baffles to prevent down shift. Designed with side sleepers in mind, there’s a pillow sleeve in the hood, so you can sleep in your normal position all night long.
7. The North Face Inferno 0 Sleeping Bag
The North Face Inferno 0 is a mummy style sleeping bag insulated with 800 fill power goose down. It has a 1/2 length center zipper that makes it easy to get in and out of the bag or sit up in a tent while preventing zipper snag. A wrap around draft collar and overlapping down baffles under the zipper seal in warmth, while trapezoidal side baffles prevent downshift from the top of the bag to the bottom. An internal pocket is provided for storing a flash lite, glasses case, electronics, and personal items, which is super useful in the confines of a winter bag.
8. Sierra Designs Nitro UL 0 Sleeping Bag
The Sierra Designs Nitro UL 0 is a low-cost 1/2 zip mummy-style sleeping bag insulated with 800 fill power water-resistant down. Weighing just 2 lbs 8 oz, it has a simple draft collar and zipper draft tube to seal in your body’s warmth. Plus, there’s a foot vent on the bottom of the bag that you can stick your feet out of if you’re too warm at night. Nothing fancy, but it gets the job done and the price is right.
9. Feathered Friends Ibis Ex 0 Sleeping Bag
The Feathered Friends Ibis Ex is insulated with 900 fill power goose down, cut wide in the shoulders, that excels when you are pushing the comfort rating of bag and need space to wear a down jacket in the sleeping bag. It has a draft collar, draft zipper tube, and is made with a waterproof/breathable fabric enabling use with bivy sacks and in snow caves. Snap closures on the draft collar and zipper are easier to use than velcro fasteners, while continuous baffles let you position the down where you need it.
Check the latest price at: 10. Montbell Down Hugger 800 #0
Montbell’s Down Hugger 800 #0 is a down-filled mummy sleeping bag with diagonally oriented baffles that conform to your body shape. Sewn with elasticized thread, the sleeping bag moves with you as you change positions throughout the night, drawing the goose down closer to your body and eliminating dead spaces. It has a draft collar that runs in front and behind your chest/back with dual zipper draft tubes for maximum heat retention.
Check the latest price at: Winter Sleeping Bag Selection AdviceMummy Sleeping Bag or Quilt?A mummy sleeping bag is warmer and more comfortable than an ultralight down quilt under 20 degrees fahrenheit. While quilts are popular for warm weather use, mummy bags are far less drafty when the mercury drops below 20 degrees. They also provide a warm overnight space where you can keep water, filters, and footwear overnight to prevent them from freezing. This is harder to do with an ultralight quilt, which is usually shorter and sized narrow to save weight. Sleeping in temperatures below freezing definitely changes your behavior and requires a different skill set and gear list than regular three-season camping or backpacking in warmer weather. Temperature RatingWhat is the best sleeping bag temperature rating to get for winter backpacking? While there are bound to be regional differences, a zero degree bag is usually a good baseline temperature to aim for because you can easily make it warmer by 20 degrees by wearing insulated clothes or by using a sleeping bag liner. A zero degree bag can also be used in warmer temps up to about 20-30 degrees by cracking open the zipper or loosening up the hood and venting it if you’re too warm. The weight and packability of a zero degree sleeping bag is also pretty reasonable compared to a minus 20 degree bag and usually doesn’t require the purchase of a larger backpack to carry. Best Type of InsulationIf you plan to do any winter backpacking, you’re going to want a down-insulated sleeping bag because it’s the warmest insulation available by weight. It compresses very well, making it very packable. Aim for down fill powers of 800, 850, 900, or 950: the higher the better. Higher fill power down traps more warmth by weight than lower fill power down. People often wonder whether goose down is better than duck down. All down is graded the same way, in a species-independent manner. In other words 800 fill power goose down is as good as 800 fill power duck down, only more expensive because there’s a smaller supply. Sleeping Bag DimensionsIt is common to sleep with boot liners or boots, water bottles, and other items, like water filters, that should not freeze overnight. This means you’ll want some extra space in a cold weather sleeping bag to store the gear, while still maintaining your personal comfort. In addition to added shoulder, hip, and foot width, some people get a longer sleeping bag so they can store gear below their feet. Winter nights are long and it pays to be comfortable, especially if you have to sleep with cold, damp boots and water bottles. Must-have featuresWinter sleeping bags should have a draft collar, zipper draft tubes, and snag-free zippers at a minimum. Partial length zippers, continuous baffles, vents, and even water-resistant down are all nice-to-haves, but you can get by without them to save on cost or because they’re not strictly necessary. Draft CollarMost winter sleeping bags have draft collars and I consider it a cold weather essential. A draft collar is a tube of insulation that drapes over your chest and neck and seals in the bag’s warmth. Without it, the war air inside the bag will rush out around your neck when you move around inside. The simplest draft collar is a down tube that covers the front of your chest. Higher end bags add a second draft collar around the back of your shoulders and neck and provide additional controls, so you can tighten or loosen it. Zipper Draft TubesDraft tubes are tubes of down that cover up the side zipper so your legs don’t come in contact with it (because it’s cold). Most winter bags have at least one zipper draft tube, although some have two, both top and bottom, that fall into place when you zipper up your bag. Snag Free ZipperSnag-free zippers prevent the side zipper’s teeth from tearing the shell fabric of your bag and spilling its insulation. The zipper is usually bordered by stiff fabric of some sort, to keep it away from the down baffles. Nice-to-have featuresWater-Resistant DownWater-resistant down is a nice to have, not a must-have in a winter sleeping bag. The truth is most people can keep their sleeping bags dry. If you notice moisture on the outside of your sleeping bag in the morning, it doesn’t mean that the down inside is wet. Simply drape it over your tent in the sun while you eat breakfast and it will dry in no time. Continuous bafflesContinuous baffles usually run horizontally across a bag. They allow you to shake the down in the baffles and move it to a different location. For example, if you’re too warm, you could shake the down so it fell down the sides of the bag, rather than keep it on your chest. While continuous baffles let you customize the distribution of down for different needs, many people prefer baffles that keep the down in one place reliably and permanently. It’s one less thing to worry about. Partial length zippersPartial length zippers are often used as a weight-saving feature, however they can reduce use across a wider temperature range by limiting your venting options. VentsVents like NEMO’s Thermogills or Sierra Design’s Foot Vent can increase the temperature range of a sleeping bag, but they’re just one way of accomplishing this goal. See also:
The post 10 Best Winter Sleeping Bags for Backpacking in 2018-2019 appeared first on Section Hikers Backpacking Blog. from https://sectionhiker.com/10-best-winter-sleeping-bags-for-backpacking-in-2018-2019/ |

ABOUT MEHello my pleaseure to introduce myself, I am Jose Johnson. I am 26 years old from Monroe, LA. I love to got for hikings with my friends on holidays. Archives
April 2019
Categories |


 The Petzl Bindi


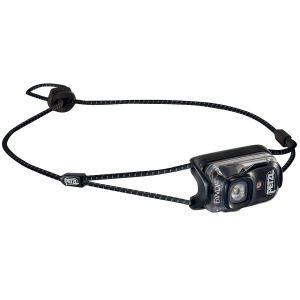


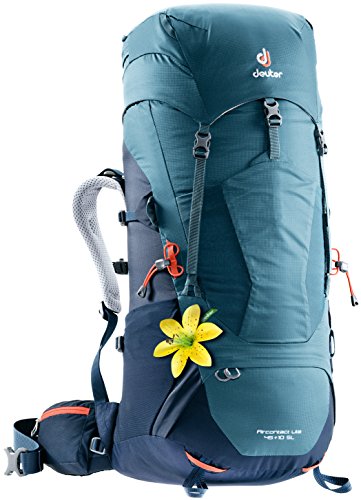
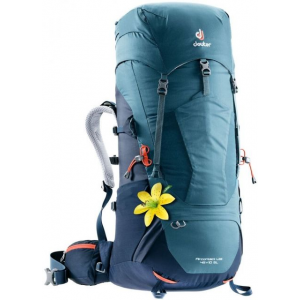
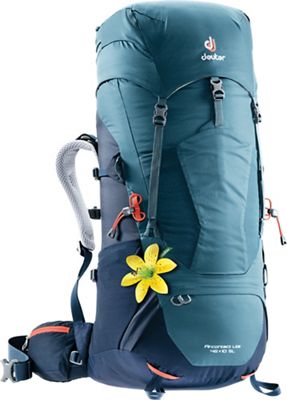
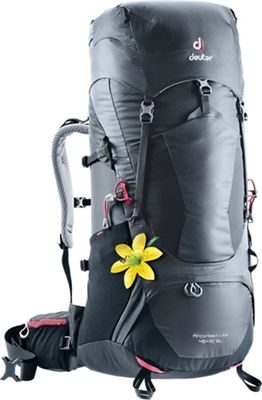


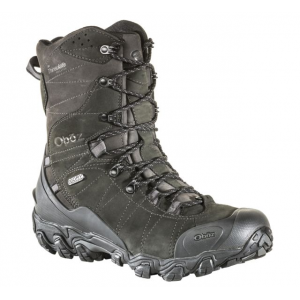


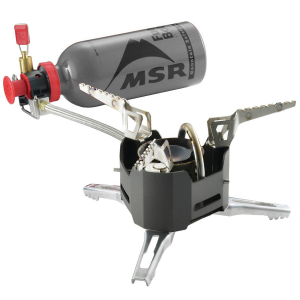


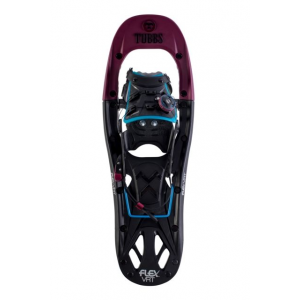


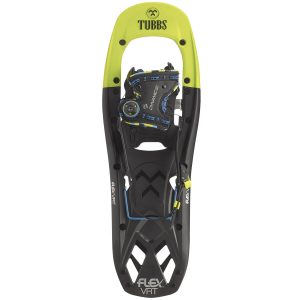

 RSS Feed
