|
The Howker Ridge Loop is a 2 day, 18 mile loop that climbs all of the peaks in the Northern Presidential Range: Mounts Madison, Adams, and Jefferson. The route passes several unusual geological features including small peaklets known locally as Howks, an alpine tarn called Star Lake, and towering rock spires called castles. After climbing Madison and Adams, we recommend spending the night at one of the Randolph Mountains Club’s huts or campsite, close to treeline. The next day begins with a short hike to Edmands Col before climbing Mt Jefferson and then a looping descent past numerous waterfalls to the valley below.
Rating/Difficulty*****/4 out of 5 Distance/Elevation Gain18 miles w/6600′ of cumulative elevation gain White Mountain 4000 Footers
Recommended Duration2 days SeasonJune thru October Permits RequiredNone. RegulationsBackcountry Camping Regulations for the White Mountain National Forest.
New to the White Mountains? Read this Quick and Dirty Guide to Backpacking in the White Mountains for information about camping regulations, road access, trail shuttles, lodging, dangerous wildlife, weather, etc.
Weather CautionsThis route is sensitive to seasonal weather which can make it hazardous. Most of this route is above-treeline and travels across exposed terrain where high wind, cold temperatures, fog, thunderstorms, lightning, and hail storms are common during the summer months. 
The best way to avoid difficulties or injury is to time your hike to avoid poor weather (by checking the Weather.gov and Mt Washington Observatory Higher Summits Forecasts) and to bring proper clothing, equipment, and navigational aids. If you’re inexperienced with above-treeline backpacking, I’d also recommend bringing a more experienced friend or guide to show you the ropes. Trailhead Directions
Trail SequenceThe route follows the following trails in sequence. Refer to the AMC White Mountain Trail Map 1: Presidential Range (2017 ed), which is the best waterproof map available for this region, although I’d recommend buying the complete AMC White Mountain Waterproof Map Set (2017 ed) rather than one map at a time, because it’s less expensive that way. More detailed trail descriptions can be found in the AMC White Mountain Guide (2017 ed), which is considered the hiking bible for the region. Take photos of the relevant pages using your phone for easy reference, instead of carrying the entire book with you on hikes.
Scenic HighlightsThe following list provides cumulate distances on the route to each view or landmark
Camping and Shelter Options
WaterNatural water sources are plentiful in the White Mountains although you may need to descend to them from ridgelines along side trails if you run short. In any case, carry a detailed topographic map with you and don’t rely on the overview map provided with this trip description to find water sources. I also recommend purchasing the WMNF Presidential Range Map in Guthook Guide’s New England Hiker Smartphone App (IOS, Android) which is a GPS guide to all of the trails, trailhead, shelters, campsites, views, and water sources in the White Mountains National Forest. I use it all the time and it is much more complete and current than using the maps bundled with the Gaia Smartphone App. On the TrailThis route starts at the Randolph East parking lot, which is down a short side road called Pinkham B, just east of the famous Appalachia Trailhead on Rt 2. At the trailhead, follow signs for the Howker Ridge Trail, which runs through hardwoods and past several small waterfalls before it begins to climb up the east ridge of Mt Madison. The RMC or Randolph Mountain Club maintains many of the trails and shelters that you’ll use on this hike. They’re a small local club with a storied history of trail building in the Northern Presidentials and worth supporting. You also get a much reduced nightly rate at their shelters and camps if you’re a member (click for membership).
After passing several waterfalls and cascades, the Howker Ridge Trail begins climbing the northeast ridge of Mount Madison with many ups and downs. There are four howks as they’re called, or peaklets on the ridge, which are look like rounded humpish hills, when you’re looking down on the trail from above. 
The first of these occurs after 2.3 miles and the second at 3.0 miles. The Pink Link Trail joins the Howker Ridge Trail on the left and the two coincide for 0.3 miles, climbing to the third howk which has a good view of Madison. The two trails diverge again and the Howker Ridge Trail continues to climb, passing the fourth howk at mile 3.5 (4315′). The trail soon ascends above treeline where it is completely exposed to the wind and weather. Continue climbing, before turning SW onto the Osgood Trail which follows the ridgeline over the Mt Madison summit. 
The view from Mt Madison is quite spectacular and affords descent wind protection if you hunker down behind the rocks near the summit sign. Looking to the southeast, you should see a long, curving, boulder-covered ridge descending to Pinkham Notch. This is also the Osgood Trail, but headed in the opposite direction from where you’ll be going. Turning to the southwest is Mt Adams, the second highest mountain in the Whites, on the other side of the Madison Col. Beyond that in the distance, you can just make out Mt Jefferson as well. 
From the Madison summit sign, follow the Osgood Trail west to the AMC’s Madison Springs Hut. Located in the col between Madison and Adams, the hut is a good place to top off your water bottles, use the rest room, or buy a snack. Day hikers are welcome to come inside even if they’re not overnight guests. The hut is also a good place to check on the wind speed, barometer, and latest forecast, which is updated every morning. 
From the hut, follow the Star Lake Trail a short distance passing a small alpine tarn (pond). While it usually has some water in it, the level varies by season and weather conditions. Bear right past the tarn and continue following the Star Lake Trail which scrambles, steeply at times, to the summit of Mt Adams. When you crest the peak, be prepared for a blast of wind from the prevailing northwesterly prevailing winds that scour this exposed summit. Like Madison, the views from Adams are sublime. Look down into the Great Gulf, the great glacial cirque at the foot of the northern Presidentials ,and across it to “George”, as Mt Washington is known locally. 
From the Adams summit, follow the Lowes Path for 0.3 miles across a boulder field to the huge cairn at Thunderstorm Junction, which is visible below in clear weather. This section of the Lowes Path is marked with rock cairns and must be followed carefully. 
When you arrive at Thunderstorm Junction, I’d recommend calling it a day and heading down below treeline to stay at the RMC’s Gray Knob or Crag Camp Self-Service Cabin or The Perch Tentsite for the night. All three of these options are far less expensive than staying in the AMC’s Mountain Springs Hut, but are also self service. 
Gray Knob is a pleasant self-service hut to stay at overnight with mattresses on the floor and a small eating area. The RMC’s Crag Camp, a similar hut, is a short walk. If you prefer to camp, the RMC’s The Perch Campsite has a three-sided lean-to and tent platforms that are also available. All require payment of a small overnight fee, and now accept Paypal, in addition to cash. See the shelter description links above for details. 
All of the RMC Huts and Campsites can be reached by continuing along the Lowes Path for 1.2 miles. This trail is marked by quartz-topped cairns and best hiked in daylight. There is a small rock scramble 0.3 miles below Thunderstorm Junction over a sub-peak of Mt Adams called Mt Abigail Adams (also called Adams 4 on older maps), before the trail continues to a junction with the Gray Knob Trail and The Perch Path. Both the Gray Knob and Crag Camp Cabins are located along the short Gray Knob Trail, while the Perch Path leads to The Perch lean-to and tent site platforms. 
Resume the next morning by following the Perch Path almost due south, towards Mt Jefferson. Turn left at the Israel Ridge Path Trail Junction. In 0.4 miles, the Israel Ridge Trail meets the Randolph Path, and the two trails coincide for 0.1 miles. Continue along the Randolph Path for another 0.7 miles until its junction with the Gulfside Trail in Edmand’s Col, a sheltered windbreak in the lee of Mt Jefferson. 
Once the site of a rescue cache, Edmands Col has a plaque dedicated to J. Rayner Edmands, one of the great trail architects of the interconnected White Mountain Trail system. When hiking in the Northern Presidentials, you can still see evidence of his handiwork today. A stickler for precision, he built many of the major trails using carefully fitted stones, so they’re easy to follow across the rough, rock-strewn terrain. 
From Edmands Col, turn right onto the Gulfside Trail (bearing southwest) and follow it for 0.2 miles, turning right onto the Jefferson Loop Trail. Follow it for 0.4 miles, passing a large rock cairn, just below the summit which is a short scramble to the summit sign. Jefferson is one of the windiest spots in the Whites, short of the Mt Washington summit, so hold onto your hat, lest it blow into the Great Gulf. Descend to the large rock cairn, following the Jefferson Loop Trail to the Castle Trail, which runs down the mountain’s north side. Like the Howks, the Castle Trail is topped by rocky outcroppings known as castles, which tower above Castle Ravine below. There are two castles, just below 4500′ of elevation. 
You’ll dip below treeline after the second castle, near “The Link” trail junction. Turn right onto The Link, which is a long looping descent around the back of the Northern Presidential range. It passes through hugely varied terrain, beginning with steep descents, waterfalls, and several easy water crossings, followed by forested hardwoods. The Link is fairly well blazed and easy to follow, but seldom hiked by day hikers, so less heavily used than the trails running up to the peaks. Follow The Link for 5.3 miles, passing many trail junctions, until you cross over the pretty wooden Memorial Bridge, below Cold Brook Fall. Jog right onto the Sylvan Way, a pretty forested path for 1.0 mile, before turning left onto the Randolph Path for the remaining 0.7 miles back to the Randolph East parking lot and the end of the route.
About Philip Werner: Philip is the 36th person to finish hiking and backpacking all of the trails in the White Mountain Guide. He's also finished hiking many of the region's peakbagging lists including the White Mountain 4000 footers, the 4000 footers in Winter, the Terrifying 25, the RMC 100, and the Trailwrights 72. Philip is a 4 season backpacking leader for the Appalachian Mountain Club, a member of the executive committee for the Random Hikers, a Long Trail Mentor for Vermont's Green Mountain Club, and a Leave No Trace Master Educator. He also teaches several compass, GPS, and off-trail navigation courses each year, listed on Outdoors.org.
Safety DisclaimerThis trip plan can not alert you to every hazard, anticipate your experience, or limitations. Therefore, the descriptions of roads, trails, routes, shelters, tent sites, and natural features in this trip plan are not representations that a particular place or excursion will be safe for you or members of your party. When you follow any of the routes described on SectionHiker.com, you assume responsibility for your own safety. Under normal conditions, such excursions require the usual attention to traffic, road and trail conditions, weather, terrain, the capabilities of your party, and other factors. Always check for current conditions, obey posted signs, and Backcountry Camping and Wilderness Area Regulations. Hike Safe and follow the Hiker responsibility code.Published 2018. SectionHiker.com receives affiliate compensation from retailers that we link to if you make a purchase through them, at no additional cost to you. This helps to keep our content free and pays for our website hosting costs. Thank you for your support.The post Howker Ridge Loop Trip Plan: Backpacking the White Mountain 4000 Footers Guidebook appeared first on Section Hikers Backpacking Blog. from https://sectionhiker.com/howker-ridge-loop-trip-plan-backpacking-the-white-mountain-4000-footers-guidebook/
0 Comments
The New Hampshire Appalachian Trail begins at the bridge over the Connecticut River that separates Vermont and New Hampshire. That’s where I had my shuttle driver drop me off, before I headed up the hill thru Hanover Center, which was bustling with Dartmouth students. A few turns along some side streets and I entered the western end of the White Mountain National Forest, headed east on the Appalachian Trail. Most people don’t realize that the Whites begin in Hanover, which is 50 miles west of Mount Moosilauke, the first of the 4000 footers that thru-hikers have to climb on their way to Maine. All of the maps for the White Mountain National Forest leave out all of the trails west of Moosilauke, including those published by the Appalachian Mountain Club, although the descriptions and driving directions for them are included in the White Mountain Guide. 
While I’ve already section hiked the entire New Hampshire Appalachian Trail before, I picked this route because it was snow free. Backpacking in May, east of Glencliff, NH (the west side of Mt Moosilauke) can be a real challenge, because lingering snow makes many of the higher elevation trails impassable until Memorial Day, and some stay that way into July. Your best bet is to stick to trails under 3000′ in elevation, at least if you want to avoid carrying snowshoes and microspikes. The section of the AT east of Hanover resembles a popular town park, more than a wilderness trail. You soon come to the Velvet Rocks Shelter right outside of town. Being so close to civilization, it’s heavily used, and it looked like someone had been living there when I visited. The shelter area is on a loop off the main trail, which I followed (all the way around) before continuing east. I was interested in hiking all of the little side trails on this trip, mainly to the shelters, as well as the main trail. 
It’d been about 10 years since I’d hiked through this area and I’d forgotten what many sections of the trail looked like. Except for the shelters and a few landmarks, like mountain summits, I felt like I was hiking the trail for the first time. Given the frequent reroutes made to the Appalachian Trail, I might well have been. As I travelled east, the road crossings became less frequent and the wooded sections longer. I’d gotten a late start that morning, when my shuttle driver had arrived late due to engine trouble. That meant I was only going to make it to the Moose Mountain Shelter that evening, instead of hiking a few miles farther. On hindsight, I’d wished I had hiked farther because the water source at Moose Mountain was pathetic, just a trickle. There is a great stream farther down the trail, to the east of North Moose Mountain, where I wish I had camped. But somehow there’s psychological comfort in camping at the shelters and their tent sites, which is why people tend to spend the night at them rather than camping wild in the surrounding woods. 
I pitched my hammock, ate dinner, and crashed early as is my habit. It was a windy night, but I was snug as a bug in my Warbonnet Wookie. This being a 2-night, mid-week hike, I didn’t share the shelter areas with anyone and hardly saw anyone on the trails. Kind of how I like it, to be honest, because it gives me time to think and remember what I’m experiencing rather than chatting away obliviously. There’s a time for social hiking and a time for solitary hiking, and I was in the mood for the latter. This hike was going to be a short respite from worldly concerns and savored while it lasted. 
While the AT is well-marked when you get into the White Mountains, it does follow an existing trail system. This can be confusing to thru-hikers and local alike, since the AT follows a sequence of differently named trails that start and end every few miles. These local trail names are left out of David Miller’s AT Guide and Guthook’s Guide (smartphone) which can add to the confusion. In the eastern half of the Whites, AT thru-hikers often cross out the local trail names on signs with sharpie pens or carve out their names with knives, for reasons that I don’t care to guess at (See Appalachian Trail Sign Defacements.) Thankfully, these signs remained undisturbed. 
After leaving the Moose Mountain Shelter, I hiked from South Moose to North Moose Mountain, along a lovely section of the AT, stopping at Holt’s Ledge to admire the view of Smarts Mountain, well to the south. Smarts is a big hill that I’d climb later in the day, requiring 2000′ of elevation gain. That’s not a huge amount of elevation gain by itself, but it was going to be a big day. 
I hiked down to the Trapper John Shelter, a short distance off the main AT, to resupply my water. There’s a giant stone fireplace in front of the shelter and a small camping area behind it. The trail down to the shelter had some big blowdowns blocking it, so I guess the trail maintainers haven’t been out yet. 
I soon passed the 412 mile marker (that’s 412 miles remaining for NOBOs) before reaching the base of the climb to Smart’s Mountain. This climb has two parts. There’s the climb up to Lambert’s Ridge on the west side of the mountain that has the great views (see top photo) from a series of exposed ledges. The trail plateaus after the ledges before climbing very steeply again to the summit over iron ladders fused into the rock ledges. 
No big deal. I made it up to the Smart’s summit and had a snack on the bench besides the fire warden’s cabin, which is open and can be used as a shelter by hikers. The cabin water source was flowing well when I was there, and I refilled my bottles for the next leg of my hike. There’s also a fire tower at the summit, which I confess, I’ve never bothered to climb. I have camped up here before (this was my third ascent of the peak), but planned to continue to Mt Cube and the shelter there for the evening. 
The hike down the back of Smarts was longer than I’d remembered, but there was now a sturdy wooden bridge across Jacobs Brook and not the intimidating rock hop that I remembered from a decade earlier. This is a lovely stream, worth coming back for some swimming and Tenkara, sometime. I’d intentionally left my rod and tackle at home for this trip though, so as not to be tempted by too many long detours. 
I was pretty tuckered out by this point, but wanted to hike another 1.5 miles to the Hexacuba Shelter, a six-sided shelter, on the south side of Mt Cube. This was shaping up to be a respectable 17.5 mile day with over 4000 feet of elevation gain. I girded myself up the next 500′ of elevation gain, climbing the Eastman Ledges on the Kodak Trail, (naturally) before arriving at the shelter. 
It took me a while to find a good place to pitch my hammock in the vicinity of the shelter, because there were so many widow-makers from the winter. I ate dinner once I’d gotten situated and propped up my water filter so it wouldn’t freeze that night (a frost was forecast), before falling into a peaceful sleep. The trick is to leave your water filter (a Sawyer Squeeze) connected to a Platypus and suspended in a gravity filter configuration, so that the interior remains in contact with liquid water. The water will get cold, but it doesn’t freeze, so your filter remains undamaged. Whereas, if you just store your water filter damp, there’s a greater chance that it will frost up inside and be destroyed. I slept in the next morning and only broke camp by 8:00 am. It was a short, but steep climb to the summit of Cube, which is a far more magnificent peak than Smart’s though not as high. Topped by open ledges, you can see for miles from the summit. I hiked along the summit spur trail to North Cube and admired the view from the ledges there, before descending down the north side of Cube and the end of this short section. Hanover to Wentworth NH on Appalachian TrailTotal distance: 33 miles with 8500′ of elevation gain (Click to Download GeoPDF map) The post New Hampshire Appalachian Trail Section Hike: Hanover to Wentworth appeared first on Section Hikers Backpacking Blog. from https://sectionhiker.com/new-hampshire-appalachian-trail-section-hike-hanover-to-wentworth/
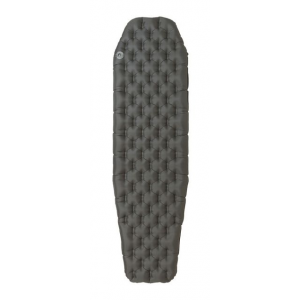
The Big Agnes AXL Air sleeping pad is a warm weather ultralight sleeping pad (mummy or full size) that beats the pants off the Therm-a-Rest NeoAir XLite in terms of comfort and compressibility when packed. But it takes a lot of effort to inflate by mouth and you’ll definitely want to bring a pump sack along to inflate it. If you’re counting ounces, that’s going to add to the total weight required to use the AXL Air pad, which might make you think twice about switching to it. Specs at a Glance
ComfortThe AXL Air is comfortable to sleep on and includes a heat reflective coating to keep you warmer at night. The AXL Air is also extremely quiet, without the notorious potato chip sound that often accompanies sleeping pads like the Therm-a-Rest NeoAir XLite. It’s covered with a high tenacity nylon ripstop for enhanced durability and low weight, with individually sprung cells like a spring mattress. The individuals cells support your body contours and are more comfortable than pads with horizontal or vertical baffles. The AXL Air is also quite a thick sleeping pad, a full 3.75″ deep, making it comfortable for back and side sleepers alike. Thicker side rails help keep you in the center of the pad at night. However, if you kneel on the pad, your knees will hit the ground below. Something to be aware of. Inflation and DeflationThe AXL Air has a single flat valve that is used for both inflation and deflation. While you can inflate the pad by mouth, it takes me 28 breaths to blow up. Give the amount of effort required (and dizziness), I’d recommend inflating the pad with the Big Agnes Ultralight Pump Sack which weighs an additional 2.9 ounces. Unfortunately, pump sacks from other companies, such as Sea-to-Summit or Exped, are not compatible with the AXL Air valve. 
A pump sack helps limit the amount of moisture you blow into a pad with your breath and can eliminate the growth of mold inside the pad itself, which will degrade the material over time. Sleeping pad companies, including Big Agnes, have gotten better about including fungicide treatments in their pads at time of manufacture to help retard it’s growth. Once inflated, you can adjust the firmness of the pad by releasing air or blowing more in. To deflate, you need to insert the pointed end of the valve cap into the valve to keep it open so air can escape. To deflate, simply roll the pad up to force the air out. Then fold it up along the pre-scored folds provided and roll it up for transport. The AXL Air is astonishingly small when packed up. 
Temperature RangeThe Big Agnes AXL Air is a “warm weather” inflatable sleeping pad, which in Big Agnes parlance means that it’s a sleeping pad best used in summer temperatures of 50 degrees or warmer. While I’ve taken the AXL Air down to 55 degrees for testing purposes, I wouldn’t recommend going lower than that without bringing a closed cell foam pad, like a Thermarest Z-lite, to layer under it in cooler temperatures. Your experience using the AXL Air will also be very dependent on the temperature rating of your sleeping bag or quilt, because a warmer bag can counteract the cooling effects of an lightly insulated pad. Unfortunately, Big Agnes decided not to publish an R-value or a recommended temperature range for the Air AXL Sleeping Pad. Why? For one, it’s expensive to run tests on all of your products, which is often the reason why smaller companies don’t publish sleeping pads ratings. Two, because there is no industry-standard way to measure sleeping pad R-values or recommended temperature ranges. Three, the best way to blunt a competitive product comparison is to NOT to publish an inferior value…when a company like Therm-a-Rest publishes R-values for all of their sleeping pads. While I can understand why Big Agnes didn’t want to publish “potentially” misleading metrics about this sleeping pad, I think not providing consumers with any directional information about their warmth relative to ALL the other sleeping pads that Big Agnes makes, is a mistake. Forget the competitors for a moment. If one assumes that Big Agnes uses the same testing methodology in-house across all of their products, a relative warmth ranking would be useful information for existing customers wanting to compare different Big Agnes sleeping pads. 
Whatever, the reason, I think Big Agnes and other brands that do not provide R-values or temperature guidance for their sleeping pad products are doing their customers a dis-service, and shooting themselves in the foot, at the same time. Get creative folks! Push the R-value standards process forward or form a smaller consortium with other brands, in the interim, to publish better temperature guidance for sleeping pads. Leadership has its rewards. RecommendationThe Big Agnes AXL Air is a lightweight, comfortable, and compressible inflatable sleeping pad, best used for warmer weather, 1-season backpacking. Weighing just 9.6 ounces (for a 20″ x 72″ x 3.75″ mummy pad) it’s best coupled with a 2.9 oz Big Agnes pump sack because it takes so many breaths to inflate. If reducing your pack weight is your primary motivation for selecting an AXL Air, you’d probably be better off buying a sleeping pad that can be used across a wider range of seasons and temperatures. I’d recommendthe Therm-a-Rest NeoAir XLite, which weighs 12 ounces, has an R-value of 3.2, and can be inflated by mouth without a pump sack. Therm-a-Rest also tests their products in a cold room to ensure that their real world performance is consistent with their published R-value metrics. If, on the other hand, you really are just interested in a comfortable, summer sleeping pad, the Big Agnes AXL Air has a lot going for it. It’s less expensive, lighter weight, and more comfortable than all of Big Agnes’ other lightweight pads, in addition to those sold by Therm-a-Rest. I’d still recommend using it with a pump sack, but the comfort of AXL Air sprung cell construction and cover fabric is really hard to beat. Compare 3 Prices
Last updated: 2018-05-29 19:26:49
Comparable Lightweight Air Pads
Big Agnes provided the author with a sleeping pad for this review. SectionHiker.com receives affiliate compensation from retailers that we link to if you make a purchase through them, at no additional cost to you. This helps to keep our content free and pays for our website hosting costs. Thank you for your support.The post Big Agnes AXL Air Sleeping Pad Review appeared first on Section Hikers Backpacking Blog. from https://sectionhiker.com/big-agnes-axl-air-sleeping-pad-review/
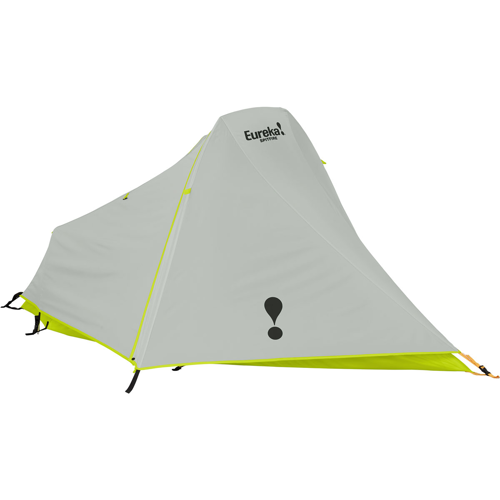
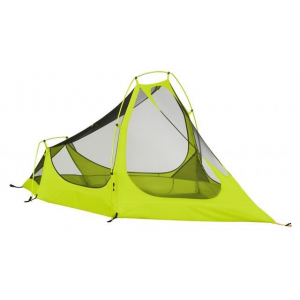
The Eureka Spitfire 1 Tent is a low-cost, lightweight, and durable double wall camping and backpacking tent that weighs 2 lbs 12 oz. Easy-to-setup, this classic hoop-style shelter has plenty of interior room to sit up inside, change your clothes, or store essential gear. Complete with durable aluminum poles, the Spitfire provides plenty of wind and rain protection with an abundance of interior mesh for good ventilation. If price is a priority, but you want to get a quality product that is going to work well and last for years, the Spitfire 1 is a top pick. That’s why I’ve included it in my list of the 10 Best One-Person Backpacking Tents. Specs at a Glance
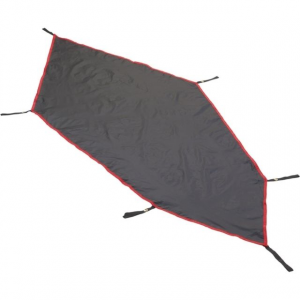
Inner TentThe Spitfire 1 has a diamond-shaped inner tent that has a deep bathtub tub floor suitable for camping on wet ground. The inner tent is suspended from two hoop-style aluminum poles which fit into side grommets, and staked at the head and foot end. When purchasing inexpensive tents, it’s always important to get a tent with aluminum poles and not fiberglass ones, which break very easily. The Aluminum DAC poles provided with the Spitfire are much more durable. While the inner tent is 100″ in length, the pointed ends are two narrow to lay in. The effective floor dimensions are closer to 72″ long x 39″ high x (42″ wide at the chest, tapering to 24″ wide) at the feet. In other words, the tent is best used for people who are 6′ tall or less, while the pointed ends are still quite good for gear storage. 
In addition to the abundant side-wall mesh, there are mesh panels situated near the feet to help keep the foot end of your sleeping bag or quilt dry, or dry out wet shoes if you stash them here at night. The amount of ventilation is quite nice, particularly when you can roll back the rain fly and let the wind blow through the side walls unfettered. There are side mesh pockets along the inner support walls to hold valuables. The inner tent also has a zipper in the roof, so you can reach open or close a roof vent in the rain fly without having to get out of the inner tent to do so. The inner tent has one zippered side door, with a long J-shaped zipper that provides easy entry and exit. The mesh side door can also be rolled up and secured if insect protection is not an issue. 
Rain FlyThe Spitfire rain fly drapes over the inner tents aluminum hoops and secures to its corners using durable plastic buckles. The head end is color-coded, so you can orient the fly in the right direction without having to think too much. Two stakes are needed to secure the vestibule door and the opposite side of the tent to the ground while velcro loops on the underside of the fly can be used to secure the fly to the hoop poles. There are also additional guy out points on the fly to stake down the tent in very windy weather, but you’ll need to supply your own reflective cord to guy them out. The Spitfire 1 has one vestibule on the door side, which is quite narrow and difficult to store gear in because it blocks the side door. If your pack is fairly empty, you can scoot it into the narrow space behind the door as shown. You can also compensate for this lack of vestibule storage by unloading keeping gear in the triangular head and foot end of inner tent, or even alongside you in the tent because it’s so wide. While there is a second covered space on the opposite side from the door, it’s not reachable from inside the inner tent. Adding a zipper there or a “closet-style” pass through, like those found on some Sierra Designs tents, would make that space a lot more functional. 
One place where the rain fly does shine is the top vent, which can be propped open or closed from inside the inner tent. It is ideal for venting the warm air that accumulates inside the tent (since it rises) and is the leading cause of internal condensation. Honestly, it’s difficult to get a super taut pitch with the Spitfire 1 rain fly because the fabric doesn’t have much stretch, like the lighter weight fabrics you’ll find on more expensive tents. The buckle tensioners and webbing can’t be pulled tight enough and the overall shape of the tent requires a uniformly flat pitching surface that you’ll be more likely to find in a campground than at a wild, off-trail trail site. If you’re willing to ignore these pitch aesthetics, the rain fly will still protect you in heavy rain and wind, even if it’s not the prettiest looking rain fly you’ve ever seen. The aluminum poles are plenty strong to maintain the structure of the tent, provided you stake it out completely before a storm. 
RecommendationThe Eureka Spitfire 1 is a surprisingly good value for a one person backpacking tent. It weighs just 2 lbs 12 oz and has durable aluminum poles, a spacious interior with excellent ventilation, and it’s easy to set up. While it’s quite long on paper, it’s best used by someone who’s 6 feet or less in height because the diamond-shaped interior isn’t completely usable as sleeping space. If that’s not a limitation, but cost is, you’ll have hard time buying a tent that’s as good at the Spitfire at a comparable price. It really is a great value, perfect for the occasional backpacker or scout. Compare 3 Prices
Last updated: 2018-05-28 12:36:31
The author purchased this product. SectionHiker.com receives affiliate compensation from retailers that we link to if you make a purchase through them, at no additional cost to you. This helps to keep our content free and pays for our website hosting costs. Thank you for your support.The post Eureka Spitfire 1 Tent Review appeared first on Section Hikers Backpacking Blog. from https://sectionhiker.com/eureka-spitfire-1-tent-review/
A GeoPDF Map is a PDF map that you can use for GPS Navigation on a Smartphone. You can easily make your own GeoPDF maps using a FREE online mapping tool called Caltopo.com (best used with a computer), email them to your phone, and navigate with them in a FREE GPS navigation app called Avenza Maps (IOS, Android). The US Geological Survey, the National Park Service, the National Forest Service, and the Bureau of Land Management all provide FREE GeoPDF maps for the lands and recreation trails they manage, and recommend the Avenza Smartphone app for reading them, so this is very mainstream stuff. When I teach Smartphone GPS Navigation for Hikers, I show students how they can create their own on-trail or off-trail hiking maps in Caltopo, save them as GeoPDF documents, open them in the Avenza GPS app, and start navigating with them. It’s a straightforward process, so let me show you how it’s done. Once you understand the steps, it’s easy to create a custom map for every hike you take, print it out on paper, or open it on your smartphone to find your current location and follow your route. You might also find the following background posts useful if you want to dig deeper into the details.
Step 1: Draw a Map in Caltopo.comCaltopo is a powerful online mapping tool that gives you the option to use a wide variety of maps, everything from USGS quads to satellite imagery. Open it up, search for the area where you want to plan a hike, and draw a route, like I’ve done in the map above. This is the hike I plan to do tomorrow, climbing a mountain called North Moat, before descending on a long exposed ridge, called Red Ridge. The last time I hiked the Red Ridge Trail was about 10 years ago and I remember that the trail was difficult to follow in spots. So this time, I’ll bring a GeoPDF map on my phone, that I’ll make now. Step 2: Print to PDF
Pull down the Caltopo print menu and select “Print to PDF or JPG.” All of the PDF maps the Caltopo generates are GeoPDF maps, so there’s nothing extra that you need to do to create one. Step 3: Select Print Area and ScaleWhen you select “Print”, Caltopo superimposes a transparent red overlay on the map. Drag it to the portion of the map you want to print and adjust the map scale so the red area covers everything you want to print. I’ve selected 1:24,000 below, which is a very common scale used by the US Geological Survey. 
Step 4: Generate PDFNavigate to the left hand side of the screen and click on the Generate PDF Button. This will generate the PDF Document shown here, which has a scale at the bottom and other important information like the current declination. Red Ridge GeoPDF MapIf you’d like to download a copy of this map, just click on this link and then save it. SummaryThere are a lot of things you can do, once you’ve learned a few Caltopo basics and start planning your own hiking routes. When you add GPS enabled maps to that mix, you can mix and match on-trail navigation and off-trail navigation with ease. There’s definitely a learning curve to using Caltopo.com, but if you’ve ever used Garmin Basecamp or a similar mapping app, you won’t have any problems coming up to speed. By making your own GeoPDF maps, you can explore areas where you’ve never been and with greater confidence, knowing that you can navigate yourself out of a jam if needed. SectionHiker.com receives affiliate compensation from retailers that we link to if you make a purchase through them, at no additional cost to you. This helps to keep our content free and pays for our website hosting costs. Thank you for your support.The post How to Make GeoPDF Maps in Caltopo appeared first on Section Hikers Backpacking Blog. from https://sectionhiker.com/how-to-make-geopdf-maps-in-caltopo/
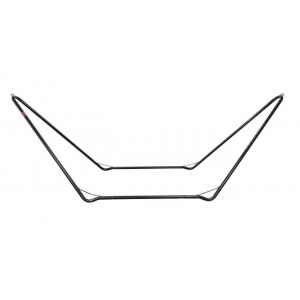
The Grand Trunk Hangout Hammock Stand is a portable, reasonably priced, and easy-to-assemble hammock stand so you can set up a hammock when there aren’t any trees around. It comes complete with a portable carry case that you can sling over your shoulder or throw into the back of your truck, making it perfect for car camping, your backyard, or even your living room! Specs at a Glance

While this isn’t a piece of gear that you’ll use for exploring a wilderness area or taking an expedition, it’s a great way to get MORE value out of the gear you own when your spouse or kids need you to stay near home during the weekend or they want to camp someplace that doesn’t have trees. If you’ve ever read Derek Hansen’s illustrated Portable Hammock Stands for Camping, you’ll quickly see why the Hangout Hammock is such a great product. I’ve always wanted a portable hammock stand, but I haven’t been that interested in building one from scratch (a sure sign that you’re a hammock nerd). 
Capable of holding 400 pounds, the eight-piece Hangout Hammock stand is easy for one person to set up by themselves in about 5 minutes. Two 18″ webbing straps are included, but you have to supply your own hammock and carabiners to connect to them. The metal tubes lock together with push-button metal pins that snap into place, eliminating the need for any tools. 
Grand Trunk claims that the stand is capable of supporting gathered end hammocks that are up to 11′ in length, but that depends on the amount of “stretch” in your hammock, how close you’re willing to get to the ground, and whether you need enough clearance to use a hammock underquilt. For example, I’m using a 10’6″ Grand Trunk Double Hammock below, and while I have good ground clearance, I’m a lot closer to the ground than when I hang from a tree. Still, the vast majority of simple “ENO-style” gathered-end hammocks are well under 10′ in length so you shouldn’t have any problems using them with the Grand Trunk Hangout Stand. 
I’ve tried using my 10′ Warbonnet Hammock as well, but it uses a whoopie sling suspension which adds another foot to the hammock’s minimum length , so it’s closer to 11′ in length. It still clears the ground when hung, but it’s awfully low if I want to use a puffy underquilt. I think the sag would be a lot less if I could use the Warbonnet without the whoopies and just clip it to the stand directly. Net net, the stand is probably best used with a hammock that has continuous loops/carabiners at the end, which add less extra length to the suspension. While the Hangout Hammock is painted and reasonably weather-resistant, it’s really simple to break it down when you’re done using it. If you want it to last, pack it away in its case after use. It’s so simple to assemble and break-down that there’s no good reason not to keep it in mind condition. The only thing missing from the Grand Trunk Hangout Hammock is a no-spill drink holder, but I bet that product is in the pipeline too! Compare 2 Prices
Last updated: 2018-05-23 11:27:03
Grand Trunk provided the author with a stand for this review. SectionHiker.com receives affiliate compensation from retailers that we link to if you make a purchase through them, at no additional cost to you. This helps to keep our content free and pays for our website hosting costs. Thank you for your support.The post Grand Trunk Hangout Hammock Stand Review appeared first on Section Hikers Backpacking Blog. from https://sectionhiker.com/grand-trunk-hangout-hammock-stand-review/
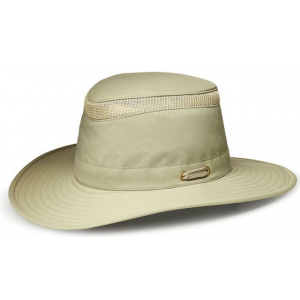
Tilley Airflo Hats have an iconic status in hiking and backpacking circles. Handmade in Canada, these durable hats have a wide brim to shield you from sun and rain, they come with a special wind strap developed by sailors to keep it on in windy weather, and even have a secret inner pocket, good for stashing a spare car or house key. You can scrunch up an Airflo hat, wash it frequently to get the sweat out, and it will come back for more. Tilley hats even float! Specs at a Glance
I got turned onto brimmed hiking hats the moment I stepped off trail and started exploring wilderness areas on foot. Having a 360 degree brim prevents tall vegetation from slapping you in the face and keeps an insect head net off your neck, so you sweat less and maintain a safe distance from black flies and mosquitos. They’re also great for fishing, paddling, hanging out at the beach, or snoozing in the back yard. Tilley makes a few different AirFlo style hats. My Tilley is an LTM6 Airflo Hat, which has a slightly wider brim and a mesh crown, than the LT5 Airflo which is about 0.5 oz lighter weight and quite popular with hikers. 
There are a couple of standout features in this hat that I appreciate. The first is the fit. I have a small head and Tilley offers the hat in a wide range of sizes. This hat is also not too floppy and not to firm, in a way that I find comfortable. The brim is wide enough to shield me from rain, but soft enough to fold under the hood of my rain jacket in the back. The inner sweat band is lock stitched to the hat rim, so it won’t slide down my forehead independent of the hat, which is soft, absorbent, and easily washed without shrinkage or loss of hat shape. While I haven’t felt the need to use the secret stash pocket in the hat’s crown, I really like the wind cord. This is a combination chin strap and size adjuster, that reduces the hat size so it snugs over the back of your head (like a state trooper hat) and fits more tightly. The size adjuster is just a self-tensioning fisherman’s knot tied into the chin strap, so you can adjust its length. Chin straps are necessary when you hike in the mountains and I use mine all the time, although I keep it fairly loose. There’s only one thing missing from the Tilley AirFlo Hats and that’s a factory InsectShield Permethrin Treatment. But I can ship it off to InsectShield myself or soak it in Permethrin at home. 
The Tilley Hat GuaranteeTilley has a unique guarantee that’s worth knowing about. They’ll repair or replace an LTM6 AirFlo hat due to normal wear and tear, or as the result of poor workmanship or faulty materials. You just have to register it with them shortly after purchasing it. They don’t guarantee all of their hats for life, but this is one of the ones covered (check the inside of the hats to see if it is). Tilley Hats also come with a two-year, all perils, 50% deductible insurance policy. If your Hat has been irretrievably lost, stolen or destroyed within 2 years of date of purchase, Tilley will replace it at 50% of current catalog price, plus shipping and taxes. Pretty awesome. Isn’t it time you got yourself a Tilley hat? Highly Recommended.Compare 5 Prices
Last updated: 2018-05-23 02:31:06
Disclosure: The author purchased this hat. SectionHiker.com receives affiliate compensation from retailers that we link to if you make a purchase through them, at no additional cost to you. This helps to keep our content free and pays for our website hosting costs. Thank you for your support.The post Tilley Airflo Hat Review appeared first on Section Hikers Backpacking Blog. from https://sectionhiker.com/tilley-airflo-hat-review/
The Big Agnes Seedhouse SL 1 is an easy-to-setup one person backpacking tent that weighs 2 lbs 8 oz. A long-time customer favorite, it has a roomy interior for people who want more interior living space to change clothes or hang out in without having to go to sleep. One of the notable things about this tent is that it’s built with thicker, more durable fabrics than some of Big Agnes’s ultralight backpacking tents. While that makes the Seedhouse a bit heavier, it is still a lightweight sub-3-pound tent, well-suited for a enthusiast backpacker who gets out a lot and wants a tent that is going to last without a lot of babying. Specs at a Glance
Front Entry Tents – Pros and ConsThe Seedhouse SL 1 is a one-person tent with a front entry and vestibule. While the inner tent is fairly long, (84″) it’s designed to have you sleep with your head by the door. While the latest version of the Seedhouse SL 1 has been redesigned to have a more vertical front door and side walls, most of the living space is up front, tapering in terms of width and volume as you get closer to the rear of the tent. I mention this because some people hate to sleep with their head at the door end of a tent, even though it often has the best ventilation. 
Front entry tents like the Seedhouse SL 1 are a lot like bivy sacks, because they’re narrow and directional with a definite head end and a foot end, although the Seedhouse SL 1 is wide enough and high enough that you can easily enter head first and turn around inside. The Seedhouse SL 1 also has a front vestibule which provides extra gear storage and side wind breaks that are handy if you want to cook or make coffee with the door open, while lying prone in your sleeping bag. While front vestibules provide valuable extra storage and a place to stash your pack and boots in a 1 person tent, they can also block the entrance unless you move them out-of-the-way. I don’t mind front entry tents, because they can often fit into tight spaces between trees or other obstructions where you could never fit a tent with side doors and a much wider vestibule area. But it’s helpful to consider the tradeoffs between the two tent orientations, particularly when choosing a 1 person solo tent. 
Inner TentThe Seedhouse SL inner tent is dead simple to pitch. It comes with a multi-segmented Y-shaped pole that you fit into grommets located at the front corners and rear of the tent. Plastic clips are used to suspend the mesh from the poles and take seconds to attach. You do need to stake out the two rear corners of the inner tent though to fully extend the floor and prevent the mesh/corners from collapsing over your feet. Those same stakes are also required to anchor the rain fly at the corners. Big Agnes classifies the Seedhouse SL 1 as “freestanding” on their web site, but it just isn’t so. If you have to stake out the inners corners to get the full width and length of the inner tent and/or anchor the fly with tent stakes, it ain’t freestanding. (Someone has to award these Pinocchios.) 
The inner tent has a high bathtub floor and is seam taped to make it waterproof. There are opaque panels along the sides for privacy and dust protection and then mesh overhead for ventilation. With a durable 30 denier ripstop nylon floor, there’s no need to use this tent with a foot print, saving you weight and money Rain FlyThe rain fly, like the tent floor, is made using a 30 denier nylon ripstop. When draped over the inner tent, it looks rather lumpish and unattractive, Luckily you’ll use the tent, mostly a night, when it’s dark. :-) 
The fly attaches to clips on the front corners of the inner tent, while guylines in the rear corners slip over the inner tent’s rear stakes. Another two stakes are required to secure the side wings of the front door to the ground. While optional, it’s helpful to stake out the side walls of the fly to promote ventilation. There are also glove clips on the inside of the rain fly that clip to the sides of the inner tent. These help increase the interior of the inner tent and air flow. 
The inner tent is set back a bit from the top of the vestibule door, so you’re not drenched at night when it’s raining and you have to take a midnight stroll. The vestibule door also has two zippers, so you can open the top of the door to create a transom style vent to expel moisture and hot air. The side walls or wings of the front vestibule also provide a useful wind break for cooking or additional privacy. RecommendationThe Big Agnes Seedhouse SL 1 is a lightweight backpacking tent made with durable fabrics and components. This newest redesign has increased the interior volume of the tent, with more vertical walls that add livability and comfort. The design of the front vestibule and the ability to create a transom vent also works well for increasing air flow and reducing internal condensation. While the Seedhouse SL 1 isn’t the lightest Big Agnes single person tent you can buy, it’s a very solid value, one that’s more affordable for your average Joe or Jane. Disclosure: The author purchased this tent. Compare 3 Prices
Last updated: 2018-05-21 20:14:15
The post Big Agnes Seedhouse SL 1 Tent Review appeared first on Section Hikers Backpacking Blog. from https://sectionhiker.com/big-agnes-seedhouse-sl-1-tent-review/
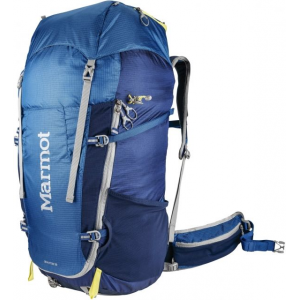
The Mountainsmith Scream 55 Backpack is a multi-day backpack that’s well-featured, quite durably built, and relatively inexpensive. It’s undergone some design changes this year, including a sturdier frame and a new U-shaped front panel opening that will appeal to overnight and weekend backpackers, as well as travelers. It’s also over a half pound heavier than the previous model, weighing just a hair under 3 pounds, with a max recommended load of 35-40 lbs. While these new features will increase the audience for the pack, they move away from its original minimalist premise, when it was simpler and lighter weight. Specs at a Glance
Backpack Organization and StorageThe Mountainsmith Scream 55 has a huge main compartment, two “double barrel” pockets on the front of the pack, and large side water bottle pockets. There are no interior pockets except a hydration reservoir sleeve and central hang loop. 
The main compartment is accessed from the top of the pack, which has a roll top closure, making it and easy and fast to pack and unpack. The advantage of a roll top pack over one with a top lid is that it’s easy to roll up the unused capacity and compress your load from the top. Once rolled up, the top webbing connects to buckles just above the side pockets, so they don’t interfere with pulling out or replacing water bottles them (a nice detail). You can also clip the two ends of the roll top together on top, but this leaves two dangling straps and buckles. A U-style zipper has been added to provide panel style access to the main compartment so you don’t have empty the pack to find gear buried deeply inside. It’s redundant with the roll top, so you have to wonder why Mountainsmith didn’t just drop the roll top, and make a pure panel loader instead to save weight and reduce the pack’s complexity. 
Moving to the front of the pack, the Scream 55 has two long cylindrical pockets that close with side zippers, which Mountainsmith calls “double barrel” pockets. They’re perfectly sized to store a cook pot, fuel bottles, a tarp, or layers that you want easy access to during the day without having to open up the main pack. Both pockets close with side zippers, but you need to be careful not to catch them on the fabric of delicate wind shirts or rain jackets if you stuff them here. The pockets don’t have drain holes though, so I wouldn’t recommend putting very wet gear into them. If you use a water filter, you’re going to have to figure out where to put that wet dripping thing, so it doesn’t soak your pants.
For those of you gear history buffs out there, this double barrel pocket design was first used in the Jensen Backpack, which is still available from vintage pack maker Rivendell Mountain Works (note: glacially slow website.) Mountainsmith used the same design in the now retired Haze 50 Backpack.
The pack also sports two long side mesh water bottle pockets capable of securely holding 32 ounce water bottles. The bottom of the mesh pockets is covered with solid fabric for better durability since mesh pockets frequently get ripped here when they come in contract with the ground or vegetation along the side of the trail. However, the mesh pockets are quite tall and it’s very difficult to reach back and pull out or replace a water bottle stored there. The bottom tier of side compression straps can be run over the side mesh pockets or through them, if desired, so you can carry a bottle in them and use the compression strap at the same time. External Attachment Points and Compression SystemThe Scream 55 has two tiers of side compression straps that can be used to reduce the volume of the pack and stabilize your load. If needed, you can also run webbing or cordage through the rear attachment points of the compression straps (which are open) to attach gear to the back of the pack using cord locks and accessory cord. While it’d be a little awkward to attach gear over the rear cylindrical pockets, it is doable. In addition, there are four gear attachment loops on the seams along the front and back of the pack, and another four at the bottom of the pack, making 12 total. You’d need extra webbing or elastic cord, but you can attach all kinds of gear to the outside of the pack this way from tent bodies and sleeping pads to skis and snowshoes. In fact, the Scream 55 could make a good winter ski pack with its closed double barrel pockets and some webbing to lash gear to the outside of the pack. There’s also a single daisy chain running between the two rear pockets with an ice axe loop at the bottom and an elastic shaft holder at the top that could also be used to carry trekking poles. Kudos for including a shaft holder. A lot of backpack manufacturers leave it off. 
Backpack Frame and SuspensionThe original version of the Mountainsmith Scream 55 had a thin foam pad for a frame, but has been augmented with a center aluminum stay to increase the maximum weight that the pack can carry. The pad and the stay are both stored in compartment located behind the hydration reservoir pocket. While you can open this compartment and pull out the stay rather easily to bend it and personalize the fit, the foam pad is very difficult to remove because it’s packed away so tightly. If you do manage to get it out, you’ll never get it back in again. Since it holds the stay in position, you should just leave it alone. 
One of my favorite parts of the Scream 55 is the hip belt. Mountainsmith’s pack hip belts are always very well-engineered and the Scream’s hip belt is pretty exceptional. While padded, the hip belt does not have too much padding, ensuring a good wrap around your hip bones. The rear of the hip belt has a mesh-covered lumbar pad for extra grip, but it’s rather assertive out of the box. You can relieve that pressure by removing the aluminum stay and bending it over your knee if your back needs more space. (See how to bend frame stays) Wide, pre-curved hip belts wings are sewn to the back of the pack for added stability and have oversized hip belt pockets made so you can conveniently carry a lot of gear close at hand. Rear hip belt stabilizers behind the hip belt pockets let you pull the base of the pack closer to your hips, improving load transfer and weight control, while a pull-forward cinch makes it easy to adjust hip belt tightness. 
The shoulder pads have the same breathable mesh as the hip belt, hydration hose keeper loops and an adjustable sternum strap. The Scream comes with load lifters, but they’re attached the pack bag and not the framesheet, so less effective than a pack with a perimeter wire frame. The addition of a single aluminum stay has increased the load carrying capacity of the Scream 55 and I’d rate it max comfortable weight capacity at 35-40 pounds based on my experience hiking and backpacking with it. AssessmentThe Mountainsmith Scream 55 is multi-day backpack that provides the carrying capacity and creature comforts of heavier packs in a lighter weight but durable form factor. Weighing just 2 pounds 15.6 ounces (actual), the Scream has features including large external pockets, a high-end hip belt, and an internal aluminum stay, that make it good choice for hikers who want to transition to a lighter backpack without giving up the functionality of their older packs or breaking the bank. While the Scream 55 lacks the front mesh stuff pocket popular on most of today’s popular backpacks, the double barrel pockets will appeal to hikers who still prefer closed pockets for the organizational and weather protection benefits they provide. If you’re shopping for a Mountainsmith Scream 55, many online retailers currently carry the old, lighter weight version of the pack in addition to the new, heavier weight version reviewed here (but don’t differentiate between the two or identify them as such). The old pack is a solid dark grey with blue highlights, while the new pack is a grey grid with the lime highlights, shown above. Comparable BackpacksIf you prefer a backpack with closed storage and like the durability of the Scream 55, I’d recommend taking a look at the Sierra Designs Flex Capacitor, which has a unique top lid that simplifies gear access. It’s also durable, lightweight, and quite affordable. Check out my review. I also think the Flex Capacitor is one of the 10 best multi-day backpacks available today. Compare 2 Prices
Last updated: 2018-05-20 16:57:29
Disclosure: The author purchased this backpack. SectionHiker.com receives affiliate compensation from retailers that we link to if you make a purchase through them, at no additional cost to you. This helps to keep our content free and pays for our website hosting costs. Thank you for your support.The post Mountainsmith Scream 55 Backpack Review appeared first on Section Hikers Backpacking Blog. from https://sectionhiker.com/mountainsmith-scream-55-backpack-review-2018/
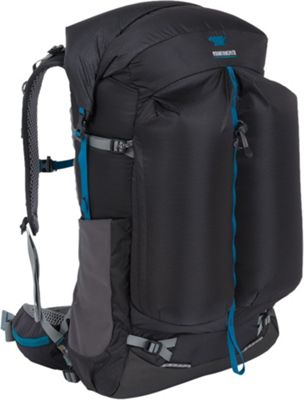
The Marmot Gravitron 58 is a ventilated, internal frame backpack that weighs 2 lbs 15 ounces. It is a combination top loader and panel loader, good for backpacking, as well as travel, because you can quickly access gear deep in the pack without having to pull everything out. The Gravitron is loaded with features including a removable top lid pocket, sleeping pad straps, trekking pole/ice axe holders, and external mesh pockets, that provide a myriad of organizational and storage options. While the Gravitron 58 can hold a ton of gear, heavier loads do result in a noticeable backward pull, characteristic of many ventilated backpacks. However, the pack remains comfortable if you can keep your load under 25 pounds. Specs at a Glance
Backpack Organization and StorageThe Gravitron 58 is an alpine-style, top-loading backpack with a twist, because it also has a front panel opening which is convenient for pulling out deeply buried gear, without having to unpack it and pull it out from the top. The top lid is also what’s called a floating lid, that’s attached to the pack with 4 webbing straps instead of being sewn on. This makes it possible to sandwich bulky gear between the bottom of the lid and the main pack bag, an attractive option of long treks. It also means that the lid can be completely removed from the backpack to save weight. 
The top lid has a large zippered pocket with lots of space for hats, gloves, and navigation gear. It has an interior mesh pocket, good for storing travel documents or personal effects as well. Unfortunately, this top pocket and the lid flops down over front of the backpack unless the main compartment is stuffed to the gills. It’s awkward and will exert a backward pull if you put too much heavy gear into the top lid. 
The Graviton has a front stretch pocket with mesh side panels and side mesh water bottle pockets, which are easily reachable when you’re wearing the backpack. While the pockets are large enough to store two water bottles at once, they’re not very durable and I’d expect them to get ripped up pretty quick. The main compartment closes with a drawstring, but does not have a speed lid covering to block rain or dust if you choose to remove the top lid. It has a large hydration pocket inside and a single hang loop for attaching a reservoir. A single hydration port is routed between the shoulder straps to run a drinking hose. 
The Gravitron also has two hip belt pockets that are large enough to store maps. They’re both mesh faced however and not ideal for storing electronics or other valuables that must remain dry. External Attachment and Compression SystemThe Gravitron has an excellent external attachment and compression system, which is ideal if you need to carry bulky objects that won’t fit inside the pack’s main compartment, like fishing rods, paddles, or PFDs. 
The pack has two tiers of compression straps with very long webbing straps. These close with buckles, which are easier to use, for attaching and releasing large objects, like snowshoes. The lower tier of compression straps can be routed through or over the side water bottle pockets, which is handy if you want to use them to store bottles and provide compression at the same time. 
The pack has a pair sleeping pad straps, permanently attached to the base of the pack for attaching a foam sleeping pad or tent body. This is a feature missing from many backpacks, but a very useful one. In addition, there are a pair of trekking pole/ice axe loops, including top shaft holders, which many packs inexplicably fail to include. There are 4 extra gear loops around the front mesh pockets and 4 more on the top of the floating lid, providing lots of customization options if you want to attach additional items with your own cord or webbing straps. Backpack Frame and SuspensionThe Marmot Gravitron 58 is a ventilated frame pack with a suspended mesh back panel. The frame is a 360 degree aluminum tube, augmented with a HDPE framesheet that provides excellent stiffness. The cavity formed by the ventilated frame is not excessively deep, but the pack does pull backward when heavily loaded, more so than other ventilated frame backpacks. 
The hip belt is sewn onto the pack and provides good load transfer to the hips. The frame terminates in a soft lumbar pad at the base of the pad which is barely noticeable, but helps keep the pack from slipping down your back. While pre-curved, the wings of the hip belt are not heavily padded, something I prefer because I feel they provide a better hip-bone wrap than heavily padded ones. The foam padding is covered with a lightweight mesh with ventilation slits cut into it to help promote ventilation. The hip belt closes with a single buckle, using a pull forward closure . While there are long hip belt pockets sewn to both sides of the hip belt, they’re faced with mesh, so of limited utility for storing electronics if you hike in a wet climate. Stay on trail with this pack…mesh hip belt pockets are often the first things to get destroyed if you push through waist-high brush and vegetation. 
The Gravitron 58 has load lifter straps which are handy for pulling the frame closer to your back if you feel a backward pull. The shoulder straps have a moderate curve, instead of being straight J-straps, so they’ll be more bosom friendly or if you have a well-developed chest. The sternum strap can also be raised or lowered easily on a rail, but this also limits the ease in which you can add accessory pockets to the shoulder straps. AssessmentThe Marmot Gravitron 58 is a ventilated backpack with the added convenience of front panel access. It has a particularly well-developed external attachment and compression system, with long webbing straps, numerous attachment points, and a floating lid, enabling you to carry bulky gear on the exterior of the backpack. However, the curious thing about the Gravitron 58, is that it you can quickly fill it up beyond its ability to comfortably carry a heavy load, over 25 lbs. The size and depth of the main compartment causes the pack to pull backwards, beyond the normal backward pull typically found on ventilated backpacks. If you still want a ventilated backpack in the ball park of 60L, we recommend you check out the similar ventilated backpacks list below, particularly the Gregory Optic 58 and Osprey Exos 58, which have much better load control than the Marmot Gravitron 58. Disclosure: The author purchased this backpack. Similar Ventilated Backpacks
Compare 2 Prices
Last updated: 2018-05-17 19:57:49
The post Marmot Gravitron 58 Backpack Review appeared first on Section Hikers Backpacking Blog. from https://sectionhiker.com/marmot-gravitron-58-backpack-review/ |

ABOUT MEHello my pleaseure to introduce myself, I am Jose Johnson. I am 26 years old from Monroe, LA. I love to got for hikings with my friends on holidays. Archives
April 2019
Categories |


 RSS Feed
