The Lifestraw Flex is a screw-on style backcountry water filter that is compatible with a wide range of soda-sized water bottles and reservoirs. While it comes with its own 22 oz soft-bottle, you can also screw it onto standard-sized soda bottles, Platypus or Evernew reservoirs, integrate it into a hose-based hydration system, use it in a gravity filter configuration, or even as a hand-held filter to drink directly out of a stream if you don’t mind crawling on your belly to do it. Specs at a Glance:
The Flex is a two-stage filter, a microbiological hollow fiber filter (blue) that filters out bacteria and parasites, with an optional activated carbon capsule that reduces chlorine, odors, organic chemical matter and bad tastes. The microbiological filter has a 500 gallon lifetime while the carbon capsule only lasts 25 gallons, necessitating frequent replacement if you use the two together frequently. The replacement capsules cost $10 per pair. But you don’t have to use an activated carbon capsule if you don’t want to. It can be removed from the cap and the unit reassembled without it. While the taste of natural waters sources doesn’t bother me, I can see the benefit of using the carbon capsule to remove additional contaminants or odors, especially if you drink water from sources near agricultural activity where herbicides and pesticides are used. The Flex also includes a 22 oz soft bottle. It can be combined in a number of different ways with the other components of the system depending on your needs. If you just want to use it as a bottle and not a filter, you can screw the grey pour top onto it as a cap. If you want to add in the blue microbiological filter, it screws into the interior of the pour spot, which then screws onto the soft bottle. And so on, like a Russian nesting doll. While you can fill the Flex bottle from a stream and filter water, the real utility of this product is its ability to interoperate with other bottles and containers. For instance, you can screw the filter element onto the top of a soda bottle, or a higher capacity Platypus or Evernew soft bottle, or plug it inline with a hydration system. My preferred configuration is to use the Flex filter with a Platypus reservoir to squeeze filtered into a separate SmartWater bottle. The one weakness of the Flex system is the system’s flow rate, which is comparable to a Sawyer Mini, but slower than the large Sawyer filter included with the Sawyer Squeeze System. It’s also slower than the Katadyn BeFree water filter. The advantage of using the Lifestraw Flex over the Katadyn BeFree, is its compatibility with soda bottles, Platypus/Evernew reservoirs, and the ability to mate it with hoses in an inline or gravity filter setup. The Katadyn BeFree Filter is only compatible with Katadyn or Hydrapack soft bottles, which is a pretty limited universe. The format and compatibility of the Lifestraw Flex reminds me of the AquaMira Frontier Pro Filter (see review), which is also compatible with regular soda bottle sizes, Platypus/Evernew Reservoirs, and can be used as an inline or gravity filter when connected to hoses. The Frontier Pro however, has a limit 50 gallon lifespan. The only other filter that can be used on all of these configurations is the Sawyer Mini, which is rated for 100,000 gallons (probably exaggerated), but has a pore size that’s 0.1 micron compared to the Flex’s 0.2 (microns). Net net, if you want a water filter that is widely deployable in different configurations and reduces chlorine, odors, organic chemical matter and bad tastes, then the Lifestraw Flex with its activated carbon capsule is really the best alternative compared to the Sawyer Mini, Squeeze, Katadyn BeFree, and AquaMira Filters.
Disclosure: The author purchased this product with his own funds. The post Lifestraw Flex Water Filter Review appeared first on Section Hikers Backpacking Blog. from https://sectionhiker.com/lifestraw-flex-water-filter-bottle-review/
0 Comments
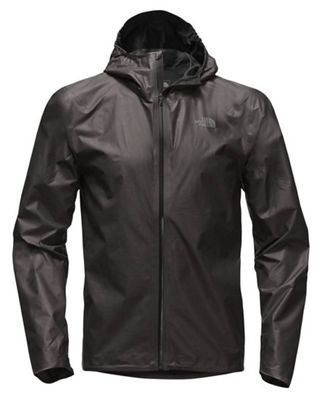
The North Face HyperAir GTX Trail Jacket is an ultralight, breathable rain jacket that only weighs 5.0 oz in a size XL and compresses down to the size of a sandwich bag. This jacket is even lighter weight and more minimal than the first generation HyperAir GTX Rain Jacket (note missing “Trail” in product name) that preceded it. The HyperAir GTX Trail Jacket is different from most Gore-tex Jackets because the breathable layer is on the outside of the jacket, not sandwiched between additional layers of protective fabric. While this makes the Hyper GTX Trail very breathable, it does significantly cut down on durability, so much so, that The North Face recommends NOT using the HyperAir GTX jacket with backpack shoulder straps, lest they rub away the thin external Gore-tex layer. I guess they want backpackers to carry their gear in baskets on their head. Minimal FeaturesThat said, the HyperAir GTX Trail Jacket looks super cool. It has a slick, shiny exterior like a high-gloss leather jacket that everyone wants to touch when they first see it. Rain also beads up on it and rolls off easily. Feature-wise, the jacket has a waterproof main zipper, taped seams, a volume adjuster on the hood as well as a soft front visor, hem adjuster, and a rear stuff pocket with its own waterproof zipper. But being a minimalist jacket, it’s outfitted more like a windbreaker than a rain jacket. BreathabilityThe breathability of the HyperAir GTX Trail jacket feels flat-out better than any of the other the many Gore-tex jackets I’ve owned or reviewed. I’ve worn it in all-day rain storms and my clothes have stayed drier inside while wearing it. That’s drier, not dry. My clothes still get damp inside, but I guess that’s to be expected when you cover any waterproof breathable jacket with a backpack and hip belt, effectively reducing its breathable surface area by 50%. AssessmentDespite it’s good breathability, I still consider the HyperAir GTX Trail Jacket to be a fail as a backpacking rain jacket for a host of reasons:
The North Face HyperAir GTX Trail Jacket can be a great trail running jacket when you’re unencumbered by a backpack, you’re cranking out vast amounts of body heat, and really just want a waterproof windbreaker. But I’d give it a pass if you’re a backpacker and want a jacket that’s more durable, has pockets, and a more adjustable hood. Despite the HyperAir’s GTX Trail’s impressive breathability, I still prefer the highly durable, non-breathable Lightheart Gear Silnylon Rain Jacket, which has pit-zips for moisture evaporation and temperature regulation, pockets, and a fully adjustable hood. Priced under $100, it’s still a great value that has withstood the test of time. Published 2018. Disclosure: The North Face provided the author with a jacket for this review.
The post The North Face HyperAir GTX Trail Rain Jacket Review appeared first on Section Hikers Backpacking Blog. from https://sectionhiker.com/the-north-face-hyperair-gtx-trail-rain-jacket-review/ Sleeping bags are still the most popular nighttime insulation option with backpackers because they’re warmer in cold, damp, or drafty weather, especially below freezing. While mummy sleeping bag designs still prevail, there’s a lot more variety in the types of sleeping bags that have become available in the past five years, including women’s specific sleeping bags. Is it worth buying a women’s specific bag? You betcha, but they’re not as widely available as sleeping bags for men. Women require more insulation than men because they have less body mass to generate body heat. Add another 10 degrees if you’re female and decide to buy a “unisex” sleeping bag instead of a women’s specific bag. Women also tend to have colder extremities, like feet, hands, and heads, and require more insulation in those areas. They also have narrower shoulders and are predominantly shorter, requiring sleeping bags that are cut differently than their male counterparts. When choosing a sleeping bag for backpacking, you want one that’s warm, lightweight, and highly compressible since you’re going to have to haul it in a backpack. Sleeping bags insulated with 800, 850, 900, and 950 goose or duck down are the best in terms of warmth by weight, but you’ll pay a premium at the top end. Fit is also important, both width and length, especially if you’re a short women or have a smaller build. If a bag is too large, it will feel colder than one that fits closely, since your body needs to work harder to fill the extra space with hot air. Here are our top 6 sleeping bag picks for 2018 made especially for women. 1. Feathered Friends Egret UL 20 – Women’s
The Feathered Friends Egret UL 20 is top-shelf technical sleeping bag tailored for the female form that features extra fill in the footbox and around the chest. It also provides more room in the elbows including space to draw your knees up in the bag if you like to sleep that way. The contoured hood opens wide in warmer weather and makes it easy for side sleepers to use, while a two-way zipper makes the bag easy to vent. The Egret has a draft collar to help seal in the heat around your shoulders, with a trapezoidal footbox allows your feet to fall in a natural pose without compressing the sides.
Available in two lengths: 5′ 3″ and 5′ 9″, the Egret UL 20 is insulated with 950+ fill power goose down and weighs just 27 oz. Check out the latest price at: 2. REI Magma 17 – Women’s
The REI Magma 17 is a women’s-specific sleeping bag designed around the female form with increased knee and foot space that deliver a high warmth-to-weight ration. An insulated draft collar fills the neck and shoulder gap to seal in the heat and prevent heat loss when you move around at night, while an a hybrid zipper path provides easy access along shoulders and torso. The hood has space for a low-profile pillow and includes two different hood drawcords for a finely tuned fit.
The Magma 17 is insulated with 850+ fill power, water- resistant, goose down with a 15 denier Pertex lining to provide a super soft feel. Variable baffling keeps the down from shifting, while reducing weight. The Magma is available in a 72 or 66 inch length weighing 36 or 38 oz. Check out the latest price at: 3. Marmot Phase 20 – Women’s
The Marmot Phase 20 (Women’s) is a female sleeping bag with more insulation in key areas where women experience heat loss. A tapered cut provides a narrower fit at the shoulders and a wider flare at the hips to insure a comfortable fit and maximum thermal efficiency. A shorter 5′ 6″ length helps to avoid cold spots and make certain that your body isn’t working unnecessarily to heat uninhabited areas of the bag.
The Phase 20 is insulated with 850+ fill power goose down that’s been treated with a water-repellant coating. Weighing 29 oz, the Phase 20 is ideal for women who want to slash pack weight without compromising on sleeping comfort. 4. REI Joule 21 – Women’s
The REI Joule 21 is designed to fit a woman’s body, with increased room at hips, decreased room at shoulders, and extra insulation in critical heat-loss areas such as the feet and hood. It features a double-protection design that combines treated, water-resistant down with waterproof/breathable fabric at the hood, sides and footbox, all areas that are likely to touch a damp tent wall. A contoured hood, insulated face muffler, and full-length draft tube all work to seal in the warmth so it doesn’t escape when you move around in the bag at night.
The Joule is insulated with 700 fill power duck down. It weighs 35 ounces and is available in 5′ 6″ and 6′ lengths. A wider size is also available. Check out the latest price at: 5. NEMO Jam 30 – Women’s
The NEMO Jam 30 is a spoon-shaped women’s sleeping bag with extra insulation in the feet and torso to keep you warm. Ideal for side sleepers, the Jam has front vents, called Thermo-Gills, that let you vent excess heat in warmer weather. A full-length double-slider zipper with snag guard helps to further regulate warmth. A blanket fold at the base of the hood tucks around you neck and helps seal in the heat in colder temperatures, while the hood is large enough to hold a pillow in place when you don’t need to pull it closed in cold weather.
Weighing 35 oz, the Jam 30 is available in two lengths, 5′ 6″ and 6′. It is insulated with 800+ fill power Nikwax water-resistant down. 6. Marmot Xenon 15 – Women’s
The Marmot Xenon 15 is made specifically for women with increased room at the hips, decreased room at the shoulders, and extra insulation in female heat-loss areas. An anatomically shaped footbox with wraparound construction eliminates seams and has extra insulation to keep your feet toasty. The ergonomic hood has extra baffles to reduce heat loss and keep your head warm and comfortable. A “fold down” second zipper lets you to fold down the front of the bag to vent excess heat and makes it easier to get in and out of the bag.
The Xenon 15 is insulated with 800 fill power, water-resistant goose down. It weighs 38 ounces and comes in a 5′ 6″ length. How to ChooseWomen’s Sleeping BagsHere is a list of the most important factor to consider when purchasing a sleeping bag for backpacking, so it fits your needs and preferences. TEMPERATURE RATINGS: The introduction of standardized sleeping bag temperature ratings by the outdoor industry substantially improved their reliability. Bags tested with the European Norm (EN) 13537 get two ratings: a Comfort rating and Lower limit rating. The Comfort rating is the lowest temperature at which the bag will keep the average woman (or “cold sleeper”) comfortable, and the Lower Limit rating is the lowest temperature at which the bag will keep an average man (or “warm sleeper”) comfortable. The difference in the Comfort and Lower Limit ratings is usually about 10 degrees, since women feel colder than men when sleeping. If you’re a woman and decide to buy a men’s or unisex bag, get one that’s 10 degrees warmer than you need so you’re comfortable at night. SIZING: The fit of a sleeping bag is usually measured in terms of length and girth. Girth measures the maximum internal circumference of the bag, usually at the shoulders, hips, and feet. Measure yourself at these points and compare them to the girth to see if the bag will fit tightly or loosely. People with bigger shoulders or sides sleepers tend to feel more comfortable in bags with higher shoulder girths, while women typically need a shorter length bag and a smaller shoulder girth because they have narrower shoulders than men. It’s important to get a bag that minimizes the amount of unoccupied interior space relative to your measurements, so your body has less air to heat up to stay warm. INSULATION and COMPRESSIBILITY: High quality goose and duck down with fill powers of 800, 850, 900, and 950 provide excellent insulation by weight and are widely preferred by backpackers and base campers because they’re so lightweight. Some manufacturers only offer down that’s been treated with a water-repellent coating, while others prefer to offer it unadulterated. Down is naturally water-resistant so the jury is still out on whether “treated” down makes a difference in the long-term, since it’s easy to keep your sleeping bag dry with a little care. WEIGHT: While gear weight is important, be careful not to sacrifice your comfort by selecting a sleeping bag that won’t keep you warm or dry in the conditions you need it to. When choosing between bags with different outer shell fabrics, consider their breathability, so they will vent perspiration that can degrade your insulation, and whether they have a DWR coating, which can be important if the foot of your quilt gets wet regularly. FEATURES: Most sleeping bags are pretty similar when it comes right down to it, but there are some features that set premium sleeping bags better than non premium bags. These include draft collars, continuous baffles, very high fill-power goose down, non-snagging zippers, draft tubes positioned behind zippers to seal out the cold, ventable foot boxes, and full length zippers that help extend the range of a bag in warmer weather. Check out SectionHiker’s Gear Guides
Written 2018. Disclosure: SectionHiker.com receives affiliate compensation from retailers that sell the products we recommend or link to if you make a purchase through them. When reviewing products, we test each thoroughly and give high marks to only the very best. Our reputation for honesty is important to us, which is why we only review products that we've tested hands-on. Our mission is to help people, which is why we encourage readers to comment, ask questions, and share their experiences on our posts. We are independently owned and the opinions expressed here are our own.The post 6 Best Women’s Sleeping Bags of 2018 appeared first on Section Hikers Backpacking Blog. from https://sectionhiker.com/6-best-womens-sleeping-bags-of-2018/ If you’ve been reading SectionHiker for a while, you know that I raffle a lot of the gear I review to readers (click to see a list of past winners.) Unfortunately, a lot of this gear piles up faster than I can give it away, so every few years I give away a LOT of it all at once to make more space in my house. This is one of those times. READ THIS If you want one of the items listed below, I will send it to you if you pay for the postage. If multiple people want the same item, I’ll pick one randomly and give it to them. Do not request more than one item. Please do not request an item if you simply want to sell it. This gear is for readers to use and benefit from. QUESTIONS ABOUT THE ITEMS Most questions can be answered if you read the hyperlinked review or look up the item on a manufacturer’s or retailer’s website. If you still have a question about it, leave a comment with your question below. Please don’t send me email about it. CONUS/USPS ONLY I can only send gear to addresses in the continental United States (lower 48). I will only send items via USPS (United States Postal Service) Parcel Select Ground Service (2-9 days) with tracking. Once sent, I cannot be responsible for the item or whether it reaches your address, although I will send you a tracking number so you can trace your delivery. COST OF SHIPPING I’ll notify you if you’re the person who’s been selected to receive the item and send you a Paypal invoice for the cost of the shipping. I can only accept credit card or Paypal payments through the Paypal invoice I send you. No exceptions. You’ll have 24 hours to pay that invoice. Otherwise, I’ll give the item to the next person “in line.” TO REQUEST AN ITEMFill out this form (click here). Please only request one item. Don’t ask for several items. That’s just greedy. You’ll have until midnight tonight (PST – 4/26) to request an item, so don’t delay. 1. Gregory Alpinisto 50 Backpack
2. Crescent Moon EVA Snowshoes
3. Thule Versant 50 Backpack
4. Superior Insulated Hammock
5. Elemental Horizons Kalais XT Backpack
6. Gregory Paragon 48 Backpack
7. MassDrop Klymit Ultralight V Sleeping Pad
8. Superior Wilderness Designs Long Haul 50 Backpack
9. Supai Matkat Packraft
10. REI Flash Sleeping Pad
11. Kelty Redwing 50 Backpack
12. Exped Traverse Backpack
13. REI Camp Dome Tent
14. Klymit Lightwater Dinghy
15. NEMO Tetrapod Hammock
16. CamelBak 14-er (2018)
The post Section Hiker’s Massive Gear Closet Giveaway appeared first on Section Hikers Backpacking Blog. from https://sectionhiker.com/section-hikers-gear-closet-giveaway/ The White Mountain landscape is defined by its mountain passes (called Notches), perhaps even more than its peaks. Crawford Notch, Pinkham Notch, and Franconia Notch are just a few of the great valleys that channel visitors from one region of the White Mountain National Forest to the next. This 2 day route runs through Mad River Notch, a lightly travelled mountain pass that links Mt Tecumseh with East Osceola and Mt Osceola and runs past interesting geologic formations, an old logging camp, and two pristine mountain ponds. Rating/Difficulty*****/3 out of 5 Distance/Elevation Gain22 miles w/6000′ of cumulative elevation gain White Mountain 4000 Footers
Recommended Duration2 days SeasonJune thru October Permits RequiredNone. RegulationsBackcountry Camping Regulations for the White Mountain National Forest. No Camping in Greeley Ponds Scenic Area
New to the White Mountains? Read this Quick and Dirty Guide to Backpacking in the White Mountains for information about camping regulations, road access, trail shuttles, lodging, dangerous wildlife, weather, etc.
Trailhead Directions
Trail SequenceThe route follows the following trails in sequence. Refer to the AMC White Mountain Trail Map 2 – Franconia-Pemigewasset (2017 ed), which is the best waterproof map available for this region, although I’d recommend buying the complete AMC White Mountain Waterproof Map Set (2017 ed) rather than one map at a time. More detailed trail descriptions can be found in the AMC White Mountain Guide (2017 ed), which is considered the hiking bible for the region. Take photos of the pages using your phone for easy reference, instead of carrying the entire book with you on hikes.
Scenic HighlightsThe following list provides cumulate distances on the route to each view or landmark
Camping Shelter Options
WaterNatural water sources are plentiful in the White Mountains although you may need to descend to them from ridgelines along side trails if you run short. In any case, carry a detailed topographic map with you and don’t rely on the overview map provided with this trip description to find water sources. I also recommend purchasing the WMNF Sandwich Range Map in Guthook Guide’s New England Hiker Smartphone App (IOS, Android) which is a GPS guide to all of the trails, trailhead, shelters, campsites, views, and water sources in the White Mountains National Forest. I use it all the time and it is much more complete and current than using the maps bundled with the Gaia Smartphone App. On the TrailLeave the Mt Osceola Trail parking area and turn right onto Tripoli Rd (FR 30), hiking 1.9 miles until you see the Tecumseh Trail on the left. There is roadside camping along Tripoli Rd (west) of this point if you’re looking for a nearby place to camp before or after the trip. This short road walk up front eliminates the need for a soul crushing walk at the end of this magnificent route, so you finish on a high note, descending from Mt Osceola Trail back to your car. At the Tecumseh trailhead turn left and cross a small stream. There’s no easy water for the next 6 miles or so, so be sure you have enough for the climb to Mt Tecumseh and back down again. This western portion of the trail is climbed less frequently, so it has a wilder aspect. Begin climbing through dense forest, eventually passing a false summit at 3700′. Continue through dense forest to 4000′, where you’ll emerge at the Tecumseh summit viewpoint. There is a loop trail around the Tecumseh summit which can be confusing, so make sure you hike in the correct direction when leaving the summit area. From the top of Tecumseh, you can see the Tripyramids almost due east, a set of three adjacent peaks. North and Middle Tripramid are also 4000 footers, but South Tripyramid isn’t. The three peaks are fun to climb (at another time) on a loop hike via the Tripyramid Trail, which climbs up an avalanche slide (short for landslide) up the north peak, along the adjoining ridge to the Middle and South summits, and back down from the south peak on another avalanche slide. From the Tecumseh summit viewpoint, there’s a short side path called the Sosman Trail that heads south for 0.6 miles to the top of the adjacent Waterville Valley Ski Area. It follows a nice woodland path and provides an excellent view of Mt Osceola from the top of the slopes. To return to the trip route, reverse directions and follow the Sosman Trail back to the Tecumseh summit area, this time descending down (to your right) the Tecumseh Trail headed east. Tecumseh is a popular peak because is the “shortest” 4000 footer, with an elevation of just 4003′. The trail is also usually well packed out in winter, when skiers and snowboarders hike up it and ski down the adjacent ski slopes. In recent years, this section of the trail has been virtually rebuilt with numerous stone staircases to prevent erosion. Descend the Tecumseh Trail for 2.2 miles. There are two small stream crossings on the trail which are normally easy to cross except after a heavy rain. The bottom of the trail ends at the Waterville Valley Ski Area parking lot. Bear left and follow the edge of the lot a short distance to the Pipeline XC trail. Turn left onto the trail and follow it until you reach Tripoli Road. Make a right onto the road and a left at the next paved road. Cross over a short bridge and you’ll see the Livermore Trail Head Parking Sign. Turn left at the sign and follow the logging road that leaves from the rightmost side of the lot. This area can be a little confusing because the ski resort has put up their own signs and their trail names differ from those used by the Forest Service. There are maps of the ski trail system posted at most of the trail junctions, so you should still be able to find your way if you get turned around. The Forest Service Trail Signs are always engraved in wood, which is one way to tell them apart from the Ski Resort’s XC Trail names. From Livermore Road parking area, the trail passes a kiosk, before turning left and becoming a wide gravel road called the Livermore Trail. Follow it, passing through an open field and crossing a wooden bridge over the Mad River, before turning left onto the Greeley Pond Trail in 0.3 miles. This trail was severely damaged by Hurricane Irene when a wall of water poured down the Mad River, which runs beside the trail. The entire trail has only been recently reopened after being closed for several years while repair efforts were underway. While the section shown here is well-graded gravel, the trail takes on a more natural and weathered appearance after it passes the Timber Camp and Kancamagus Brook Ski trails further up the Mad River valley. Portions of the Greeley Pond Trail coincide and intersect with backcountry cross-country ski trails in this area. When following trails, note that hiking trails are blazed in yellow, while the cross-country ski trails are generally marked with blue diamonds. At 1.2 miles, the Goodrich Rock Trail climbs the west side of the valley, weaving through a “boulder field” of huge glacial erratics called the Davis Boulders. The trail ends at the largest erratic, a huge boulder named Goodrich Rock, that you can climb via a wooden ladder. The top of the boulder has views of Mt Tecumseh and other Sandwich area peaks. If you’re running short on time, you can skip this side trip to Goodrich Rock and continue to a campsite on the nearby Timber Camp Trail, returning to this point the next morning. Retrace your steps back to the Greeley Pond Trail and turn left. The Timber Camp Trail branches to the left in 0.8 miles. Turn left onto it and begin climbing gradually. The trail leads to a clearing with a large cairn in about 0.9 miles and is the best place to camp in the area, with easy access to the adjacent Greeley Brook. The site of an old lumber camp, the Timber Camp Trail leads to the area below Painted Rock, a huge cliff face that towers over the trail and the Mad River Valley. While the trail ends at 2544′ at a cairn next to some old lumber artifacts, there is a herd path that continues up the slope beyond it. Steve Smith, editor of the White Mountain Guide, has written about his adventures on the Timber Camp Trail, in this trip report. Hike back down to the Greeley Pond Trail, and turn left for the Lower and Upper Greeley Ponds, which lie below the southern cliffs of giant Mt Kancamagus. Situated in the Greeley Ponds Scenic Area, camping is not permitted in the area surrounding the ponds. Both Ponds are stocked with trout, however, and fishing is permitted with a New Hampshire fishing license. Hike for 2.6 miles past the ponds, until you reach the Mt Osceola Trail Junction. Turn left and begin climbing to East Osceola Mountain. While the climb is gradual to start, it soon becomes very steep, crossing an avalanche slide at one point. The wooded summit of East Osceola is viewless and marked by a small cairn. East Osceola and the main peak, Mt Osceola are connected by a narrow ridge. Partway across, there’s a narrow 20′ chimney that you must climb, although there’s now an easy bypass route to the side that provides surer footing. After the chimney, climb gradually to a large open ledge at the top of Mt Osceola, which has expansive views of the Tripyramids and peaks in the Sandwich and Pemigewasset Wilderness Areas. The site of a former firetower, this ledge is an excellent place to eat lunch and hang out in the sun. From the Osceola summit ledge, turn southwest and follow the rocky Mt Osceola Trail down Breadtray Ridge for 3.2 miles back to the Osceola Trailhead on Tripoli Road, where your car is parked.
About Philip Werner: Philip is the 36th person to finish hiking and backpacking all of the trails in the White Mountain Guide. He's also finished hiking many of the region's peakbagging lists including the White Mountain 4000 footers, the 4000 footers in Winter, the Terrifying 25, the RMC 100, and the Trailwrights 72. Philip is a 4 season backpacking leader for the Appalachian Mountain Club, a member of the executive committee for the Random Hikers, a Long Trail Mentor for Vermont's Green Mountain Club, and a Leave No Trace Master Educator. He also teaches several compass, GPS, and off-trail navigation courses each year, listed on Outdoors.org.
Safety DisclaimerThis trip plan can not alert you to every hazard, anticipate your experience, or limitations. Therefore, the descriptions of roads, trails, routes, shelters, tent sites, and natural features in this trip plan are not representations that a particular place or excursion will be safe for you or members of your party. When you follow any of the routes described on SectionHiker.com, you assume responsibility for your own safety. Under normal conditions, such excursions require the usual attention to traffic, road and trail conditions, weather, terrain, the capabilities of your party, and other factors. Always check for current conditions, obey posted signs, and Backcountry Camping and Wilderness Area Regulations. Hike Safe and follow the Hiker responsibility code. Disclosure: SectionHiker.com receives affiliate compensation from retailers that sell the products we recommend or link to if you make a purchase through them. When reviewing products, we test each thoroughly and give high marks to only the very best. Our reputation for honesty is important to us, which is why we only review products that we've tested hands-on. Our mission is to help people, which is why we encourage readers to comment, ask questions, and share their experiences on our posts. We are independently owned and the opinions expressed here are our own.The post A Mad River Notch Loop Trip Plan: Backpacking the White Mountain 4000 Footers Guidebook appeared first on Section Hikers Backpacking Blog. from https://sectionhiker.com/a-mad-river-notch-loop-trip-plan-backpacking-the-white-mountain-4000-footers-guidebook/ Backpacking gear is super expensive, but you can save a bundle of money if you buy it used. Most backpackers have bought or sold used gear at some point in their backpacking careers. I’ve done both myself. It’s good way to try new gear without taking a huge financial risk or to recoup some money from your old gear if you want to upgrade. Buying used backpacking gear is also a good way to:
Here is a list of suggestions for finding and buying used backpacking gear: Buying from FriendsBuying used backpacking gear from a friend is often the best option because you know exactly what you’re getting. Chances are you’ve seen the item being used on a trip and have a good understanding of its pros and cons before you buy it. Plus, you can go back to your friend if there’s a problem with the gear after purchase. What if you don’t have a friend selling gear you want to buy? Where can you go to find used gear? National RetailersThere are surprisingly few national retailers who sell used gear, including REI, Patagonia, Geartrade.com. REI has by far the best selection of used gear. Their two main used gear venues are the REI Garage Sales held at local stores and REI’s USED GEAR Beta, a new online section of their website that sells used gear, not to be confused with the online REI Garage, which mainly sells NEW gear from the previous year and overstock. REI Garage SalesREI Garage Sales are a great place to buy used gear that’s been returned by customers but can’t be put back on shelves because it’s been used or has some sort of defect. Garage Sale discounts typically run between 50% to 90% and you can buy boots, shoes, tents, clothing, backpacks, even electronics. However, REI Garage sales are only open to Co-Op members, so join up if you haven’t already. Some REI Garage Sales are held outdoors in the store parking lot while others are held indoors. Most have lines to get in. Some limit the number of people who can shop at once, while others limit the time you can spend looking before they let other people enter. It all depends on the store. All of the items offered at an REI Garage sale have a tag which explains what’s wrong with it so you can decide if it’s worth buying. There’s usually a LOT of gear for sale at a Garage Sale event, so it helps to come to the store with a specific objective in mind like “I want a 20 degree down sleeping bag,” so you can focus and not get distracted. It also helps to bring a smartphone, so you can look up reviews for items on sale to see if they’re worth buying. Just remember: you can’t return anything after you’ve bought it. All REI Garage sales are final! REI Used Gear (Beta)The REI Used Gear Beta is a new section of the REI website that’s an online virtual REI Garage Sale, but one that only has gear in excellent condition. All of the clothing and gear is stuff that customers purchased and then returned to REI. The gear is typically 50% off or more and there’s a wide selection with lots of different brands represented. The selection is constantly being refreshed and there is a lot of choice available. While the Used Gear Beta lacks the spontaneity of a real-world Garage Sale, you can find a lot of good deals there. You also don’t have to be an REI Co-op member to make a purchase. Gear TradeGear Trade is an internet storefront where people can buy and sell outdoor gear. It’s free to list your gear for sale there, but they take a 13% cut of the final purchase price as a commission. You also hang onto your gear until its sold and then ship it to the buyer. The selection is pretty good with a wide range of brands available including Tarptent, Zpacks, Hyperlite Mountain Gear, among others. The discounts range from 20-75% off and you can find some good deals if you’re patient and pounce on them. Some of the gear listed at GearTrade.com is also from online retailers who want to liquidate their returns and overstock. You can subscribe to RSS feeds of Gear Trade’s new gear listings so you can grab stuff when it becomes available. Patagonia Worn WearPatagonia Worn Wear resells used Patagonia Clothing that customers have traded in for a credit towards the purchase of new items. All of the items have to be in excellent condition and you can earn $10-$100 for items your trade in, although you have to go to a physical Patagonia store (see finder) to do it. The nice thing about the Worn Wear store is that you can find a lot of vintage clothing in it. The selection of clothing and gear is pretty limited and you don’t know how much you’ve actually saved because they don’t tell you what the original price was. Forums and Bulletin BoardsThere are a couple good backpacking forums where you can find good deals on used backpacking gear. Some of the more trustworthy ones, include: What makes them trustworthy? The people who post on these boards all backpackers and you can usually find out a little about them by looking up their posts on the forum. Most of these forums also require that you become a member and log in, which cuts down on the riff raff. Reddit and Facebook groups can also be good places to find gear for sale. Thrift StoresThrift stores look Goodwill are great for buying used clothing like wool sweaters, shirts, synthetic pants, hats, running shorts, fleece jackets, rain jackets, and insulated jackets. The items sold there are clean and in excellent condition. Goodwill is also a good place to shop for children who outgrow their clothing quickly. I also donate a lot of the samples that manufacturers send me to review to Goodwill, Who knows. maybe you’ll pick up a piece of gear I donated at some point. Craigslist and eBayYou can find a lot of good backpacking gear on Craigslist and eBay and save a bundle, but I’d caution you to stick to well-known brands of tents, backpacks, and sleeping bags if you’re a beginner and seek the advice of a more experienced friend before buying anything. On Craigslist, you’re more likely to be buying from someone who’s used the gear than on eBay, where the sellers are often companies liquidating overstock rather than individuals. Where do you shop for used backpacking gear?Published 2018. Disclosure: SectionHiker.com receives affiliate compensation from retailers that sell the products we recommend or link to if you make a purchase through them. When reviewing products, we test each thoroughly and give high marks to only the very best. Our reputation for honesty is important to us, which is why we only review products that we've tested hands-on. Our mission is to help people, which is why we encourage readers to comment, ask questions, and share their experiences on our posts. We are independently owned and the opinions expressed here are our own.The post Used Backpacking Gear and Clothing – Where to Buy appeared first on Section Hikers Backpacking Blog. from https://sectionhiker.com/used-backpacking-gear-and-clothing-where-to-buy/ The Gregory Baltoro 65 is a high-volume internal-frame backpack that’s designed to carry heavy loads up to 50 pounds in comfort. It’s ideal for off-the-grid trips, multi-sport adventures, and international travel when you want a backpack that’s loaded with features, but can be easily modified and adapted for different needs. If you need to carry a heavy pack and prefer the organizational style of a top loader, the Baltoro has an incredibly refined feature set and suspension system that’s a marvel to use. Specs at a Glance
Backpack Storage and OrganizationThe 65L Baltoro can hold an enormous amount of gear, far more than you’d expect in a 65L backpack. I checked with Gregory about this and they don’t include the extension collar volume in their pack volume computations, which explains why the Baltoro can swallow so much gear (about 5-7 liters more than spec). In addition to the main compartment, the Baltoro also has 10 external pockets for storing gear: 3 pockets in the top lid, 3 pockets on the front of the pack, a side water bottle holster, a side mesh pocket, and 2 hip belt pockets. These pockets make it easy to pack and organize your gear, particularly smaller items that you want frequent and easy access to. Main compartmentWhile the Baltoro is configured as a top loading backpack with a floating lid pocket, there are several different ways you can access gear stored in the pack without having to pop the lid and grope around blindly inside to find it. These extra openings can be a real convenience on high volume packs, so you can access gear without having to unpack it all. The front of the pack can be opened with a large U-shaped zipper, panel-style, so you can pull out gear buried deep inside. There’s also a sleeping bag hatch that opens the bottom of the pack. There’s also an optional fabric “shelf” that you can attach to toggles inside the pack to create a separate sleeping bag compartment, but you get better space utilization if you remove it. Hydration pocket/Day packThe Baltoro comes with a removable hydration pocket in the main compartment that can serve double duty as a frameless day pack, complete with shoulder straps, but no hip belt. It weighs 4.2 ounces and can be removed to save weight, although it’s quite handy if you’re traveling and don’t want to lug your Baltoro with you when sightseeing. If you decide to remove it, there is a central webbing loop anchored to the top of the frame where you can hang a hydration reservoir, with two hydration ports that over the shoulder pads for routing a hose. Top lidThe lid has 2 “double-barrel” pockets in the top lid that split it down the middle, with zippers that run from front to back, instead of side by side. This forms two deep compartments that are handy for separating different gear types, like gloves and hats, from say, navigation equipment like a GPS, Satellite Messenger, map, and compass. It’s a great organizational feature that quickly becomes second nature to use. The top lid has a third pocket on the underside which has a key fob inside and makes a handy place to store the included rain cover, at least when it’s dry. Front Panel PocketsThe front panel flap has three pockets built into it, an open mesh stuff-it pocket, and two more double-barrel pockets underneath it. The mesh pocket is good for storing wet gear like a water filter, rain layers, or snacks for fast access. The mesh is very durable, with small holes that resist snagging or tearing. The double-barrel pockets under the mesh pocket are long and tall, with enough capacity to hold an extra pair of shoes or sandals, one on each side. You can also easily fit a small tent body or a hammock and tarp in these pockets, so you can set them up in the rain without having to open your pack up and expose the contents. Side pocketsThe Baltoro is unusual because it doesn’t have symmetric side pockets. While there is a side mesh pocket on the left side of the pack, it’s not large enough to store a water bottle and is best used to capture the bottom of long skinny objects, like tent poles, glacier wants, or a collapsible fishing rod. You can however store a water bottle on the right side of the pack in a water bottle holster, sized for a 1 liter Nalgene bottle, making it easy to reach back and grab or replace the water bottle while wearing the Baltoro. If you don’t want to use the holster, it folds away under a protective flap on the side of the pack. If you prefer carrying more water than that 1 liter, you have to use a hydration reservoir w/hose or pack extra bottles elsewhere on the pack. Not great for me personally, since I’m not a big fan of putting a hydration reservoir in my pack (for fear of leaks), but it’s not an issue if that’s your preference anyway. Hip belt pocketsThe hip belt comes with two pockets, one a water-resistant hip belt pocket with a waterproof zipper for quick access to your phone or camera and the other with a mesh front, that’s good for storing wet items or snacks. I wouldn’t count on the water-resistant pocket for hiking in all-day rain without wrapping my phone or camera in a ziploc bag, but the pocket is a good extra layer of defense. Backpack Compression and External Attachment SystemThe Baltoro come with two tiers of side compression (webbing) straps that close with side-release buckles, making it easier to attach gear to the sides of the pack. The compression straps themselves are extra long, so they can be looped and connected around the front of the backpack, for example, if you want to attach snowshoes or a snowboard over the rear mesh pocket. It’s a clever capability you only find on the best backpacks. Sleeping Pad StrapsThe Baltoro also comes with sleeping pad straps that can be used to attach a foam sleeping pad or tent body to the underside of the backpack. These are girth-hitched to gear loops at the base of the pack and can be easily removed if they’re not needed. They can also be girth-hitched to loops on the optional Hydration pocket/Day pack to form a webbing hip belt because they have different male and female buckles at the ends. Ice/Axe and Trekking Pole HoldersWebbing loops at the front corners make it easy to attach ice axes or trekking poles in transit, with separate elastic shaft holders, a detail which is left off many backpacks. While the elastic cord on the shaft holders isn’t long enough to stretch over a very long walking axe over 65cm, the cord is easily replaceable if you want to length it. Extra Gear LoopsThere are 12 gear loops sewn into the seams and distributed around key areas of the Baltoro for attaching additional gear to the outside of the pack. In addition to the 4 gear loops for sleeping pad straps at the base of the pack, there are 4 gear loops on the top lid which can be used for attaching a solar recharging panel, and 4 gear loops around the perimeter for attaching gear to the front of the pack. You can really load up the exterior of this pack if you have to go heavy or haul extra gear to a base camp. Backpack Frame and SuspensionIf the storage, organizational, compression, and external attachment features on the Baltoro haven’t wowed you, the backpack frame and suspension system surely will. This really is an internal-frame backpack designed for comfortably carrying heavy loads and dynamically adapting to a wide range of different body shapes. The Baltoro frame is a wishbone-shaped aluminum hoop that channels the load to the center of the hip belt. It also has an additional horizontal stay for stiffness and is bolted to a TPU sheet sewn into the back of the pack. The combination is lightweight and flexible, but quite strong and won’t barrel into your back if you overstuff the main compartment. The shoulder pads and hip belt are available in different sizes and replaceable, so you can dial a custom fit. The shoulder pads are also S-shaped, not J-shaped, so they can be used by women and men, including those with well-developed or broad chests. The shoulder pads slot into one of two positions on the pack, providing an additional 2 cm of vertical adjustment within each torso size to help dial in the torso length. The top of the shoulder straps and the hip belt both are designed to dynamically pivot as your torso angle changes (Gregory calls it “automatic angle adjustment”), so the pack moves with you for scrambling or climbing and you don’t have to fight against its inertia. The pivot mechanism also provides an important fit benefit, even when you’re not moving, since the shoulder straps and hip belt will adapt to your body shape and curves. It’s an innovative way to address individual fit differences across a wide range of different body shapes. The Baltoro’s hip belt has a pronounced lumbar pad which some people may find uncomfortable, especially since the wishbone frame concentrates the load at this point. But the lumbar pad has a padded shim that can be removed to reduce its intrusiveness and greatly relieves any lumbar discomfort. Equally innovative, is the textured silicon coating on the outside of the lumbar pad where it comes in contact with your waist. This coating prevents slippage down your back when the pack is heavily loaded. While the back panel of the Baltoro isn’t a suspended mesh frame like the ones found on Osprey’s Anti-Gravity packs, it’s still quite comfortable and provides good ventilation with a mesh backing that wicks sweat away from your clothing. Cushy, wicking padding on the inside of the shoulder straps and hip belt also helps to channel moisture away from your clothing and body for increased comfort, while still maintaining moderate stiffness. What’s the Baltoro feel like when it’s and bursting with gear? Surprisingly lightweight. The hip belt and frame do such a great job of transferring the load to your hips and keeping the center of gravity close to your spine/core muscles, that heavy loads really feel lighter. It’s an illusion of course, but one that makes hauling a heavy pack much more natural and comfortable. RecommendationThe Gregory Baltoro 65 is a highly configurable, high-volume backpack designed for carrying heavy loads. It’s loaded with features that make it easy to pack and organize your gear, with an innovative frame and suspension system that lets you dial in a custom fit. While carrying a heavy load with the Baltoro is exceptionally comfortable, the pack is definitely on the chunky side in terms of gear weight at 5 lbs 6.7 oz, fully loaded. While you can lower that to 4 lbs 13 ounces by removing all of the optional components, the Baltoro is still comparatively hefty compared to the Osprey Atmos AG 65 (4 lbs 9 oz), the REI Flash 65 (3 lbs 10 oz), and the Gregory Paragon 68 (3 lbs 10 oz). But the advantage of the Baltoro over these other packs really boils down to the fit, especially the fit of the contoured hip belt and the shoulder straps, which are available in multiple sizes (look for the Gregory A3 QuickAwap Hip Belt and the A3 QuickSwap Harness which are available in 15 different sizing combinations, including men’s and women’s models. These coupled with the dynamically pivoting angles of the hip belt are much more sophisticated and personalized than adjustable length hip belts that you can lengthen or shorten in a single plane (like on the Atmos AG or Paragon). I was skeptical about the difference they made when I started testing out this pack, but they really are a marvel to use, one that makes heavy loads feel much lighter and more comfortable than you can imagine. Disclosure: Gregory provided the author with a sample backpack for this review. Compare 5 Prices
Last updated: 2018-04-23 02:30:09
Published 2018. Disclosure: SectionHiker.com receives affiliate compensation from retailers that sell the products we recommend or link to if you make a purchase through them. When reviewing products, we test each thoroughly and give high marks to only the very best. Our reputation for honesty is important to us, which is why we only review products that we've tested hands-on. Our mission is to help people, which is why we encourage readers to comment, ask questions, and share their experiences on our posts. We are independently owned and the opinions expressed here are our own.The post Gregory Baltoro 65 Backpack Review appeared first on Section Hikers Backpacking Blog. from https://sectionhiker.com/gregory-baltoro-65-backpack-review/ Mt Isolation is a remote 4000 footer located south of Mt Washington with impressive views of the Southern Presidentials and the “rock pile”, as Washington is often referred to locally. This 2-3 day route follows trails seldom hiked by day hikers and is ideal for backpackers who want to experience the wilder side of the White Mountain National Forest. It visits several open summits and viewpoints en route, including Mt Crawford, Mt Resolution, Mt Davis, the Giant Stairs, which have equally impressive views. Small stream fisherman will also appreciate hiking along the avalanche-scarred Rocky Branch River, a steep-gradient mountain stream with excellent trout habitat. Rating/Difficulty*****/3 out of 5 Distance/Elevation Gain25.5 miles w/6000′ of cumulative elevation gain White Mountain 4000 Footers
Recommended Duration2-3 days SeasonJune thru October Permits RequiredNone. RegulationsBackcountry Camping Regulations for the White Mountain National Forest. Most this route passes through the Presidential-Dry River Wilderness Area. Please observe all wilderness area restrictions.
New to the White Mountains? Read this Quick and Dirty Guide to Backpacking in the White Mountains for information about camping regulations, road access, trail shuttles, lodging, dangerous wildlife, weather, etc.
Trailhead DirectionsTrail SequenceThe route follows the following trails in sequence. Refer to the AMC White Mountain Trail Map 1 – Presidential Range (2017 ed), which is the best waterproof map available for this region, although I’d recommend buying the complete AMC White Mountain Waterproof Map Set (2017 ed) rather than one map at a time. More detailed trail descriptions can be found in the AMC White Mountain Guide (2017 ed), which is considered the hiking bible for the region. Take photos of the pages using your phone for easy reference, instead of carrying the entire book with you on hikes.
Scenic HighlightsThe following list provides cumulate distances on the route to each view or landmark
Camping Shelter Options
WaterNatural water sources are plentiful in the White Mountains although you may need to descend to them from ridgelines along side trails if you run short. In any case, carry a detailed topographic map with you and don’t rely on the overview map provided with this trip description to find water sources. I also recommend purchasing the WMNF Presidential Range Map in Guthook Guide’s New England Hiker Smartphone App (IOS, Android) which is a GPS guide to all of the trails, trailhead, shelters, campsites, views, and water sources in the White Mountains National Forest. I use it all the time and it is much more complete and current than using the maps bundled with the Gaia Smartphone App. There is one stretch along this route where it may be prudent to carry extra water.
Weather CautionsThis route is sensitive to seasonal and weather conditions which can make it hazardous. There are four water crossings of the Rocky Branch River on this route which may become difficult to cross in high water. The best way to avoid high water levels is to check the weather and postpone your hike if heavy precipitation is forecast during or a few days before your hike. Be sure to check the Weather.gov and Mt Washington Observatory Higher Summits forecasts before your hike. On the TrailAfter parking in the large Davis Path Trailhead, cross the Saco River over a wide suspension bridge, passing several private residences on your right, before arriving at the Davis Path sign. Built in 1845, the Davis Path is one of the oldest trails in the White Mountains, originally cut as a bridle path to bring sightseers to Mt Washington by horse. After passing this sign, the trail begins a steep 2100′ climb up a rocky trail to Mt Crawford, passing a wilderness campsite on the right, signed with a wooden post that has a small carved tent on it. There are several such sites along this route (see overview map for locations), but they can be easy to walk past because the wooden posts indicating their presence are below knee height and colored to blend into the forest. While the climb to Mt Crawford is admittedly steep, 1000′ per mile elevation gains are not unusual in the White Mountains trail system. Switchbacks, on the other hand are rare, so gird yourself for climbing straight uphill. When climbing, take your time and stop to rest when you need to catch your breath. Stop at level spots, as this will reduce the strain on your calf muscles. Using the rest step (read about the rest step), can also reduce leg fatigue by transferring load onto your skeletal structure and off your musculature. As you approach the top of the climb, the trail breaks out over open rock ledge, marked by faint painted blazes and rock cairns. Most of the cairns are quite small, just a few rocks stacked one on top of the other. These are called “ducks”. It’s worth lingering on the ledges which have many fine views and provide a nice place to sit on a warm day. Follow the indicated path to the Mt Crawford Spur Trail and hike out to the summit viewpoint, which has fantastic 360 views. This is one of the best peaks to climb in autumn when Crawford Notch is ablaze in autumn color. Return to the Davis Path (turning left) and continue toward Stairs Col until you reach the Mt Parker Trail on your right. Follow it for 0.5 miles over more open ledge to the summit area of Mt Resolution. While there is a summit cairn on Resolution (there are actually several), it can be hard to locate since the mountain summit is covered with short trees and shrubbery. Don’t worry about it too much. If you made the effort to get here, it still counts. :-) Reverse your route, hiking north along the Mt Parker Trail, to return to the Davis Path. Turn right and continue to Stairs Col. A col is a small mountain pass in the local vernacular, and Stairs is a wild one, with moss-covered trees and thick shrubbery. Hike east along the col to the top of the Stairs Col Trail, continuing straight, and descending down to its junction with the Rocky Branch Trail. There’s a lean-to and campsite on the river here, if you want to call it a day. Turn left onto the Rocky Branch Trail which follows the river north, crossing back and forth, several times. Most of these stream crossings are quite easy in normal conditions, provided you don’t mind getting your shoes and socks wet. The river is fairly wide though, and rock hopping is often not an option. Bring a pair of crocs or water shoes if you want to keep your shoes and socks dry. The Rocky Branch Trail was closed for several years after Hurricane Irene due to avalanches along the river bank which wiped out large sections of trail. The trail has since been repaired and in some cases rerouted. Following the trail north can still be challenging at points because this trail is in a lightly blazed Wilderness Area. The trail tread is usually easy to find and you’ll always be headed in the right direction if you remember that the trail follows the river upstream. If you’re a fisherman, especially a Tenkara fisherman, you’ll find that the Rocky Branch is a fun river to fish for trout. Being a mountain stream, the fish aren’t big, but they are feisty! Be sure to purchase a New Hampshire fishing license if you don’t already have one. The Rocky Branch Trail meets the Isolation Trail 4.1 miles north of the Rocky Branch Shelter #1. The trail junction is on the same side of the river. and loops around the north side Mt Isolation before joining the Davis Path, which leads you to the summit. There are several additional stream crossings north of this trail junction, as well. When the trail begins heading northwest, you’ll pass by two designated campsites. The first of these has easy access to water, while the second is northwest of a fairly reliable stream that crosses the trail. There are also numerous bootleg campsites along this stretch, although the two designated sites are much nicer, drier, and worth camping at if there’s space. Just before you reach the Isolation/Davis Trail junction you’ll pass through an area with many downed trees, probably caused by a microburst. The trail can be tricky to follow here, so use care. When you reach the Davis Path junction turn left (south) and follow the trail to the Mt Isolation spur trail, which climbs a short distance to an open summit. The summit of Mt Isolation is open rock ledge with wide-ranging views. The biggest mountain on the horizon is the rocky cone of Mt Washington and below it, the yawning chasm of Oakes Gulf, a deep glacial valley at the head of the Dry River. Mt Monroe is visible to Washington’s immediate left. Boott Spur is to its right, a 5000+ foot subsidiary summit of Washington, located atop the southern wall of Tuckerman Ravine. North Isolation, which is a very short bushwhack, is just a short distance away, also off the Davis Path Descend Isolation back to the Davis Path and continue south through lush forest and prime moose habitat. The next few miles of trail are seldom travelled by day hikers and quite remote. Continue south until you reach a short spur trail to Mt Davis on your left. Scramble up this trail a short distance to the summit cairn on Mt Davis. This peak, like Isolation, is an above-treeline and covered by low shrubbery called krummholz, german for twisted tree, to describe the short and gnarled trees. Reverse your route down from Mt Davis and turn left when you reach the Davis Path. Hike south for another 4.1 miles until you reach the Giant Stair Spur Path on your left. Follow it for 0.2 miles, past another designated campsite, to a cliff face with an imposing view. Don’t get too close to the edge: it really is a very steep drop! The campsite here is a very popular spot to spend the night and view the stars. Water is very limited however, so be sure to carry in what you need. Backtrack to the Davis Path and continue through Stairs Col toward Mt Crawford and eventually Rt 302 through Crawford Notch. This portion of the hike is identical to the beginning of the route, just in reverse. I’d still recommend hiking out to the Mt Crawford summit again. That view can’t be beat. Written 2018.
About Philip Werner: Philip is the 36th person to finish hiking and backpacking all of the trails in the White Mountain Guide. He's also finished hiking many of the region's peakbagging lists including the White Mountain 4000 footers, the 4000 footers in Winter, the Terrifying 25, the RMC 100, and the Trailwrights 72. Philip is a 4 season backpacking leader for the Appalachian Mountain Club, a member of the executive committee for the Random Hikers, a Long Trail Mentor for Vermont's Green Mountain Club, and a Leave No Trace Master Educator. He also teaches several compass, GPS, and off-trail navigation courses each year, listed on Outdoors.org.
Safety DisclaimerThis trip plan can not alert you to every hazard, anticipate your experience, or limitations. Therefore, the descriptions of roads, trails, routes, shelters, tent sites, and natural features in this trip plan are not representations that a particular place or excursion will be safe for you or members of your party. When you follow any of the routes described on SectionHiker.com, you assume responsibility for your own safety. Under normal conditions, such excursions require the usual attention to traffic, road and trail conditions, weather, terrain, the capabilities of your party, and other factors. Always check for current conditions, obey posted signs, and Backcountry Camping and Wilderness Area Regulations. Hike Safe and follow the Hiker responsibility code. Disclosure: SectionHiker.com receives affiliate compensation from retailers that sell the products we recommend or link to if you make a purchase through them. When reviewing products, we test each thoroughly and give high marks to only the very best. Our reputation for honesty is important to us, which is why we only review products that we've tested hands-on. Our mission is to help people, which is why we encourage readers to comment, ask questions, and share their experiences on our posts. We are independently owned and the opinions expressed here are our own.The post A Mt Isolation Loop Trip Plan: Backpacking the White Mountain 4000 Footers Guidebook appeared first on Section Hikers Backpacking Blog. from https://sectionhiker.com/a-mt-isolation-loop-backpacking-the-white-mountain-4000-footers-guidebook/ The Gossamer Gear Murmur 36 Hyperlight Backpack is 8.2 ounces of barely-there badassness. Made of 30 and 70 denier Robic nylon, and coated on both sides with silicone for weather protection, this is the impossibly light pack for that solo mission up Exum Ridge or a weekend summit bid for Mt. Humphreys in the Sierra. If you can weigh in your gear at around 15 pounds, this is your pack. Click to read the full SectionHiker Murmur 36 Backpack Review. Deadline to EnterThe deadline to enter this raffle is Sunday, April 22, 2017, at midnight PST. Rules
To EnterTo enter this random raffle for a chance to win a free Gossamer Gear Murmur 36 Hyperlight Backpack, answer the following questions in a comment below. One entry per person only. Brevity is appreciated.
Example ResponsesExample 1:
Example 2:
Example 3:
Answer all 3 questions to enter!The post Enter for a Chance to WIN a FREE Gossamer Gear Murmur 36 Ultralight Backpack appeared first on Section Hikers Backpacking Blog. from https://sectionhiker.com/enter-for-a-chance-to-win-a-free-gossamer-gear-murmur-36-ultralight-backpack/ Like a moth to the flame…my cabin fever gets so bad each April that I schedule Appalachian Trail section hikes for this time of year. Unfortunately, some unexpected family and domestic issues forced me to cut my trip short and return to New England after just a few days on the trail. It was important for me to be closer to home for a while. Unplanned, but my family needed me to be closer to home. I did finish the first 40 mile section of trail I wanted to hike on this trip to Pennsylvania from Rt 30 to Boiling Springs, but I’m going to have to head back down to hike the 130 mile section I’d hoped to finish, at a later date. On this trip, I drove my car down south to Pennsylvania instead of taking the train or a bus, because I hoped it would give me more flexibility and make resupply easier. That the added flexibility comes with a cost, since finding safe parking in rural areas is such a hassle. While driving yourself is easier for getting to the trail than taking a plane or train, it’s not a home run. This trip started with a 6.5 hour drive from Boston to Boiling Springs, PA. The plan was to park at the Regional HQ of the Appalachian Trail Conservancy (ATC) in Boiling Springs and grab a southbound shuttle to where I’d left off in 2016, on Rt 30, outside of Fayetteville, PA. This was a short 40 mile section, but I figured it’d be a good warm-up for the second 130 mile section I hoped to complete. Pennsylvania is a nice state to hike the AT in, but I really do want to be finished with it so I can hike father south. I called the ATC and arranged to park in the Boiling Springs municipal lot, which they issue permits for and is adjacent to the town pond. The local police patrol it and I was told it was a safe spot to leave a car for a few days. All good. I planned to arrive in the early afternoon, meet a shuttle that would take me to Rt 30, and hike into a shelter a few miles up the trail. I called the shuttle guy from the road and he wasn’t available, so I changed my plan. I’d park in Boiling Springs and head south instead of north and grab a shuttle back to my car. Not ideal, but I wanted to get on the trail. I got to Boiling Springs, but the town pond and the adjacent the municipal lot were mobbed by four-year olds and their parents. It was the first day of trout season and they were all fishing the stocked pond. There were no parking spaces available for miles and I didn’t want to park illegally for a few days. I decided to flip my section and drove down to Caledonia State Park, off RT 30. They let AT hikers park long-term for free (register at the office) so I left my car there. It wasn’t a super secure lot, just off RT 30 at the front of the park, but I hoped for the best. I really had no choice. I got started hiking around 4:00 pm and hiked a few miles in to the Quarry Gap Shelters, a pair of small two-person shelters joined by a porch. Hung my hammock. Ate dinner and socialized with the hikers there. It was Easter eve. Slept well. Windy but I used my hammock winter sock so stayed warm. As I lay there the next morning, I listened to the turkeys gobbling just before sunrise. Dale, another section hiker I’d met at the shelter, and I left at the same time, headed north. He’d just started a section at Pen Mar, a few days south, and hoped to get to Maine. He’d hiked from Georgia to Damascus last year, starting Feb 1, before having to get off because of foot issues. Dale is from Indiana, recently retired, and a few years my senior. He told me he’d taken a Greyhound from his home to Harrisburg and described it as an EXPERIENCE not to be repeated. Said it was the worst trip of his life, with crazy rude people on the bus, including the driver. We took off together and hiked about the same pace for 7.6 miles to the Birch Run shelter in intermittent rain. Gorgeous shelter. Snow was forecast for that night, 4 to 6 inches, and he wanted the option of taking a zero there if trail conditions were bad the next day. I’ll hike in the rain, but I only had trail runners, and wasn’t up for hiking in wet slushy snow. I decided to chance the next shelter, and continued to Tom’s Run, another 6.3 miles north. It was pouring rain by then, but I was in the trees, so somewhat protected from blowing rain. Tom’s Run was an old shelter, but there was a new picnic pavilion, and I thought about hanging my hammock underneath it for the night to avoid having to carry a wet tarp the next morning. I sat down and checked the AT Guide and saw that the Pine Grove Furnace State park was just 3.1 miles farther on. I figured it would be good to get in shuttle range if the snow was deep and I wanted to take a zero day the next morning to avoid hiking in snow. The park has camping, so I could spend the night there and make up my mind the next morning if I wanted to shuttle out for a day. I know, I know. Thru-hikers would probably suck it up and hike thorough slush, but I’m just not as motivated. This was supposed to be a vacation, after all. There’s also a hostel at the entrance to the park called the Ironmasters Mansion Hostel which looked like it would be even better than camping. I called them but they were booked solid for a wedding that night and weren’t taking guests. It was Easter Day. I hoofed it towards the state park, passing the old AT midpoint on the way, and arrived after a brief road walk. I passed the mansion, which is at the park entrance, and walked past the park store next door, which has the famous half-gallon challenge. The store was closed this early in the season, so I guess I’ll never get a chance to try eating that much ice cream in one sitting. I kept walking to the AT Museum, which is just next door. It was open on that Sunday so I could sit down inside and figure out what I wanted to do. Options, options. Lots of options. I thought about calling a shuttle to see if I could get back to my car. I could then move it back to the campground here or find a room at a nearby motel and sleep dry if it snowed a lot. I decided to call a shuttle to return to my car. But I didn’t have cell phone service, so I asked to use the phone at the museum. Then one of the staff offered to drive me back to my car for free. Guy named Angry Bird. Trail Magic! Got back to my car. Searched around with Google maps. Found a cheap motel near Boiling Springs and drove there. Figured I’d spend the night off trail. If it snowed a lot, I could decide whether I wanted to take a zero the next day and wait until most of it melted so I wouldn’t have to hike in snow. I’ve been hiking in snow all winter, but then again, I’ve been wearing insulated waterproof boots to do it. Doing it in trail runner was unappealing. Woke up at 4:00 am and the snow was coming down heavy. Woke up at 6:00 am and there was a good 4 inches of slushy snow on my car. I decided to wait it out and take a zero. Found a supermarket and bought some oven roasting bags for my feet in case I had to hike in snow further on. Did some laundry. Hung out and booked a shuttle for the next day from Boiling Springs to Pine Grove Furnace State Park so I could resume where I left off and hike back to my car as originally planned. I doubted the Boiling Springs municipal lot would be full the next morning because heavy rain was forecast all day. The next morning, I got picked up at 8:00am for my shuttle from Boiling Springs to Pine Grove Furnace State Park. It was raining on the drive down there, so I had the shuttle driver drop me off at a building with a front awning so I could change into my rain gear. The trail was awash in cold water and there was still plenty of snow in the trees. Still it could have been worse. I was able to avoid most of the big puddles by using the rock hopping skills I’d developed to avoid mud on the Long Trail in 2008. My shoes didn’t exactly stay dry, but I avoided full submersion and they stayed reasonably warm. The first few miles through the park were on gravel road and I made great time. It was raining heavily and cool out so I was wearing a base layer and fleece under my rain jacket and long pants under my rain pants. I also had on a pair of rain mittens I bought last year from REI and hadn’t had a chance to use on an extended hike in the rain. They wet out quickly, but still kept my hands warm. I wondered if I’d catch up with Dale or if he was still behind me. “I have to stop scheduling section hikes at the beginning of April”, I thought to myself. The plan for the day was to hike about 15 miles, camp out, and finish the section on the following day. Despite the rain, I was hiking at a steady 2 mile per hour pace. It was 7 miles to the first shelter, and another 8 miles to the next. I blew by both without even hiking up the spur trails to look at them. I wasn’t that tired and I still had plenty of daylight, so I kept going. I hadn’t expected to finish the section that day, but it sure looked like I could. I haven’t done a 20 mile day in a while, but it sure was shaping up that way. I hiked past another Appalachian Trail mid-point monument before descending to open farm fields just outside of Boiling Springs. The ground was really wet in those fields and I can’t say I enjoyed hiking through them. Give me woods and rain any day, instead of rain and flat farm fields. And just like that, I sauntered up to my car and finished the section a lot earlier than expected. I guess my winter workout schedule has kept me in better shape than I thought, because I was able to put some pretty big days in without much difficulty. Couple of lessons learned for next time:
Written 2018. Disclosure: SectionHiker.com receives affiliate compensation from retailers that sell the products we recommend or link to if you make a purchase through them. When reviewing products, we test each thoroughly and give high marks to only the very best. Our reputation for honesty is important to us, which is why we only review products that we've tested hands-on. Our mission is to help people, which is why we encourage readers to comment, ask questions, and share their experiences on our posts. We are independently owned and the opinions expressed here are our own.The post Pennsylvania AT Section Hike: Fayetteville to Boiling Springs appeared first on Section Hikers Backpacking Blog. from https://sectionhiker.com/pennsylvania-at-fayetteville-to-boiling-springs/ |
ABOUT MEHello my pleaseure to introduce myself, I am Jose Johnson. I am 26 years old from Monroe, LA. I love to got for hikings with my friends on holidays. Archives
April 2019
Categories |