
Located in the North Atlantic about halfway between Norway and Iceland, the Faroe Islands are like towering abraded emeralds jutting out of the sea. It may seem unexpected to compare a travel destination to a precious gem, but for the Faroe Islands it is fitting. With precipitous cliffs falling into the ocean, vast treeless expanses, abounding bird colonies, and unparalleled ocean views, my travel companion, Justin, and I had hit the jackpot. 
Traveling in the Faroe Islands can be summarized with one statement: expect the unexpected. With 18 islands, unpredictable maritime weather, countless sheep, and numerous winding one lane roads every day holds something new. In our 11 days, we had a cancelled helicopter flight, close encounter with a bus on a steep one lane mountain switch back road (in a manual car!), and much more. However, this unpredictably only added to the trip. 
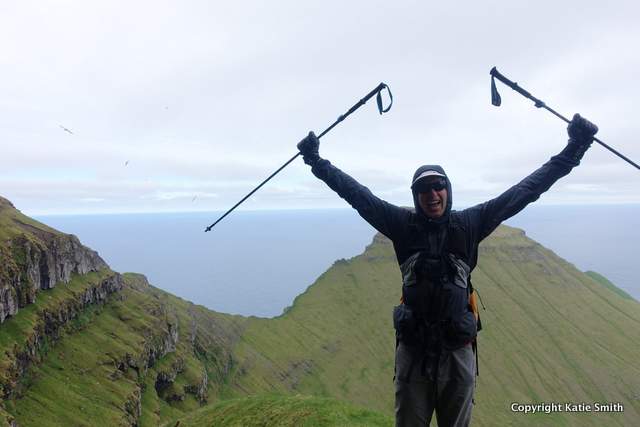
During our stay, we enjoyed countless stunning hikes. However, the clear highlight was joining the guide Pól Sundskarð and his assistant Olaf for two hikes. Pól is infamous for his hiking feats in the Faroe Islands—in 2015 him and his wife became the first couple to summit all 340 peaks in the Faroe Islands. Hiking without a guide is easily possible here, but even with off trail experience, Justin and I agreed that we could not have gone on hikes of the same caliber without Pól. 
First Guided Hike: KalsoyGetting to the start of this hike was an adventure. Step one take a car ferry. Step two navigate a tiny, unlit one way tunnel and turn off into an obscure even tinier tunnel. Needless to say, I was relieved that our guide was the one doing the driving. 
This hike started off as most do in the Faroe Islands—grassy and with a steep incline. The steepness reminded me of trails in the northeast United States, except with soft grass instead of knee jarring rocks. After this brisk and calf burning climb we summited 2 peaks—one just over 1,800 feet and the second just over 2,500 feet. The views from both summits were stunning, but with no trees the views while hiking could only be described in levels of stunning. 
And then came the best part—threading across a steep hill directly above a cliff using a sheep trail. I will admit, looking at this section from a distance I approached it with some trepidation. Hiking primarily in the northeastern United States, I do not get this type of exposure frequently. But once we were hiking across it wasn’t bad at all. 
All the hard hiking done, we finished with a lighthouse and statue of the Seal Woman. I encourage everyone to read the story behind this statue at this address: http://old.visitfaroeislands.com/en/be-inspired/in-depth-articles/legend-of-kopakonan-(seal-woman)/ 
Total distance hiked: 6.6 miles Second Guided Hike: SaksunJustin and I had previously hiked the beginning portion of this route, but short on time we had to turn around at the top of the first ridge. We were excited to get back, sure that Pól would outshine the route we would have followed. 
After cresting the ridge Justin and I had previously hiked, we made a beeline for the peaks—5 in total all around 2,000 feet tall. However, getting to these peaks was easier said than done. This was the territory of the skua, a ground nesting bird. As would be expected these birds aggressively protect their nests—dive bombing anyone that gets too close. However, luckily Justin and I had learned a trick from a young Danish traveler earlier in our trip: hold a hiking pole above your head. Since skuas go for the highest part of your body they are easily tricked into going for the pole instead of you. 
During this hike Justin came up with a nickname for hiking in the Faroe Islands: grass mountaineering. Where we had thought the inclines were steep on the previous day’s hike, they seemed even steeper today. We both wished we had brought hiking shoes with more support—we almost felt like we were hiking on the sides of our feet side hilling on the steep inclines in trail runners. Total distance hiked: 13.7 miles How to make a trip to the Faroe Islands happen
About Justin LaFranceCaptivated by travel and adventure since childhood, Justin LaFrance has travelled to over 40 countries and all of the continents. Justin, who hails from Canada, is attracted to off-the-beaten-path locations and the resulting authentic travel experience. Favorite outdoor activities include trekking, biking, and mountaineering. You can visit his travel blog at www.eatingsnow.ca. About Katie SmithKatie Smith has been hiking since she could walk. While the difficulty of the hikes has increased, the curiosity to discover what is around the next bend continues to drive her. Currently living in the Boston area, Katie most frequently hikes in Maine, New Hampshire, and Vermont. from http://sectionhiker.com/hiking-in-the-faroe-islands-by-justin-lafrance-and-katie-smith/
0 Comments
Have you ever tried to use the cheap jack that comes with your car to change a flat tire? If it won’t raise you car high enough to get your tire off, try digging a hole under it with your LNT trowel. We were 3 miles from the US/Canada border on a backcountry gravel road in northern New Hampshire and about 10 miles from the nearest paved road when my buddy Ken got a flat. We didn’t have any cell phone service and the only way we were going to get out of there was to put Ken’s spare tire on. But first we had to get the flat tire off the car. Ken got out the jack that came with his car and started cranking it up to lift the car, but the jack wouldn’t go high enough. Then Ken had the brilliant idea of digging a hole under the tire to get the required amount of clearance. It worked and his orange trowel saved the day. Ken is a mountaineering guide with Redline Guiding in North Conway, NH and we’ve had many adventures together over the years. This latest bikepacking trip to Northern New Hampshire reminded us of how uncertain off-the-grid travel can be when the maps you have are out of date and lack important detail, you’re off the cell phone grid, and your car breaks down far from help. from http://sectionhiker.com/how-to-change-a-flat-tire-with-a-leave-no-trace-trowel/ 
The Diamondback Haanjo Trail is a 22-speed aluminum bike designed for riding on unpaved gravel and packed dirt roads. It’s a cross between a road bike and a mountain bike with low pressure knobby tires for traction, hydraulic brakes, and drop handlebars. I got the Haanjo Trail for bikepacking in the backcountry areas of Northern New Hampshire which are crisscrossed by unpaved logging company roads, ATV, and snowmobile trails. There aren’t many hiking trails in the “North Country” but there is a lot of “wild”. What better way to explore it than by bike? There are a wide range of bikes that can be used for gravel riding and bikepacking, from mountain bikes to modified road bike frames, which is how I’d classify the Haanjo Trail. Each type of bike, make, model, and component configuration is going to have its pluses and minuses, with implications that you won’t be able to anticipate before you spend some time riding them on gravel and packing all of your camping gear/food and water for bikepacking off the grid. In the review that follows, I’ll explain the pluses and minus of the Haanjo Trail from a gravel biking and bikepacking perspective and the implications for use that the bike’s build entails. Specs at a glance
Frame and Carbon ForkThe Haanjo Trail is a lightweight aluminum bike (21.8 pounds) with a stiff frame, allowing a good transfer of power to forward momentum. But the properties that make aluminum frames stiff also propagate road vibrations to the rider, especially on pitted gravel roads covered with stones ranging from fist-sized chunks of rock to small pebbles and stone dust. While carbon frames are known to dampen road vibration, they’re also quite expensive. As a compromise, the Haanjo Trail has a carbon fork which helps reduce the transfer of vibration up into the arms and torso. 
The Haanjo Trail also has a taller head tube than a traditional road bike so you can comfortably sit upright when riding on unpaved gravel roads. I mostly ride with my hands on the brake hoods or handlebar tops when riding on gravel and the combination of the carbon fork and the relaxed angle results in very little arm or shoulder fatigue. 
In addition to the carbon fork, the Haanjo Trail sports front and rear 12 mm quick-release thru-axles. Thru-axles are better than traditional quick release axles because wheels can’t pop out of them and they don’t break in rough conditions, something that can occur on mountain bikes. They also improve steering, handling, and disc brake efficiency by pinning the sides of the front carbon fork together. However, thru-axles don’t work with bicycle roof racks that require a quick release mechanism to lock the front fork of a bike to the rack. Hopefully the rack manufacturers will address this problem as front thru-axles become more popular. 
Drop BarsDrop bars can be a blessing or a curse depending on your personal preferences. I happen to like them because I find it easier to move my hands into different positions while riding to eliminate hand numbness and prevent chronic rotator cuff overuse issues. They’re also nice to have if you decide you want to swap in a different set of wheels to use the Haanjo Trail as a road bike on pavement, one of the benefits of getting this bike. The drop bars on the Haanjo Trail are best described as neutral and not too deep, keeping with the bike’s upright posture bias. They also don’t have very little added flair in the handles and are well padded, which helps further reduce road vibration into the arms and shoulders. However, drops bars can limit the volume of a handlebar bag when bikepacking since the bag has to fit between the drops vs a flat bar, where the handlebar bag can run its entire length. For example, if you want to hang a bikepacking handlebar bag on the Haanjo Trail, your best bet is to try a Salsa EXP Anything Cradle with a short third-party stuff sack and not the Salsa EXP Anything Cradle with Dry Bag because the latter won’t fit between the drops. 
Shimano ComponentsThe Haanjo Trail comes with a very nice set of race-ready components including hydraulic disc brakes, Ultegra derailleurs, an 11-speed cassette, and dual control shifters.

TiresThe Haanjo Trail comes with a pair of lower pressure (30-50 psi) Kenda Flintridge Pro (700x40c) tires. These tires have a hard and fast rolling center tread good for pavement, transitioning to a softer, tackier rubber for grip, and then shoulder knobs for traction on loose rock and mud. When buying a gravel bike, it’s important to realize that you’ll be riding on pavement at least 50% of the time and these tires do a good job on both gravel and asphalt. 
The lower pressure tires noticeable help absorb shock and vibration like a mountain or fat tire bike, but you’ll want to fully inflate them to 50 psi when carrying heavier bikepacking gear. RecommendationThe Diamondback Haanjo Trail is an excellent beginner gravel bike, one that may well be more sophisticated and advanced than you feel you have a right to own, but that’s easy to grow into if you’re just getting back into biking after a hiatus or want to rapidly leapfrog into the sport. It’s also a dual purpose bike, that you can turn into a road bike by putting a different tire on your rims by buying a second rims/wheel set to swap in when you want to ride on pavement. Featuring excellent Shimano components, the Haanjo Trail is tricked out for performance including Ultegra derailleurs, dual control shifters and hydraulic disc brakes with a comfortable frame geometry that won’t exhaust you on long gravel rides. I love flying down gravels roads with this bike, which is lightweight and easy to load with different types of bikepacking bags and accessories. Highly recommended! Likes:
Dislikes:
Disclosure: Diamondback provided the author with this product for review.
from http://sectionhiker.com/diamondback-haanjo-trail-gravel-bike-review/ 
The Katadyn BeFree Water Filter is now available with three different soft bottles capacities: 0.6L (20 oz.), 1.0L (33.8 oz.), and the latest, a 3.0L (101 oz.) bottle. I think the 3.0L size is perfect for backpacking because it can be used to haul additional water for camping or to get through an area where water is scarce. I always like to have a 5 liter maximum water carrying capacity when I backpack for this purpose. The smaller size bottles are better for trail running or day hiking when you don’t usually need to haul extra water or filter for a group. Specs at a Glance
If you’re not familiar with the BeFree Water Filter, it’s a 0.1 micron hollow-fiber style filter that filters up to 2 liters per minute, over twise as fast as the Sawyer Squeeze. It also doesn’t require backflushing with a syringe to clean. Instead, you just shake it while attached to a partially filled soft bottle. While it does have a proprietary-sized soft bottle that can only be used with the BeFree Filter, the speed of the filtering makes that an easy limitation to ignore. 
The new 3.0L soft bottle included with the Gravity Filter version has graduated markings printed on the outside of the bag as well as a plastic grey handle at the threaded end which makes it easy to scoop water from a stream or pond. The other end of the bag has a blue handle, as well as holes, so you can attach cord if you want to hang it from a tree. When not needed, the entire unit rolls up and is easy to tuck away, and won’t leak in your pack if the flip top cap. If you ever lose that cap or it breaks, a regular soda bottle cap fits the same threads and will seal the top. 
While Katadyn calls the 3.0L BeFree a gravity filter, I think it’s more convenient to hold horizontally and squeeze to force water through the filter, like the Sawyer Squeeze. While you could suspend the bottle from a tree with cord, the BeFree filters water so fast that there’s simply no need to do this. You’ll also have a hard time controlling the flow if you do hang it since there’s no stopcock mechanism to regulate the flow of water, a feature found on other gravity filter products like the 10L Katadyn Base Camp Pro or the 12L Lifestraw Mission Gravity Filter, which are designed for filtering water in basecamp for larger groups of people. There’s also no way to add water to the top of the BeFree 3.0L bottle (when it’s hanging), so you don’t have to take it down each time you want to refill it. 
Whichever way you do decide to orient it, vertically or sideways, there’s no denying that the 3.0L version of the BeFree Water Filter system is super fast and convenient to use. Capable of filtering up to 1000 liters of water, it filters out particles down to .1 microns in size with a protozoa removal rate of 99.99% and a bacteria removal rate of 99.9999% when tested with EPAs water filter standards. This one is a keeper. Highly recommended. Disclosure: Katadyn provided the author with a sample product for this review.
from http://sectionhiker.com/katadyn-befree-gravity-water-filter-system-3-liter-review/ 
If you’re tired of drinking sickingly sweet electrolyte replacement powders or mucking up your hydration pack with flavored electrolyte mixes, you need to try Elete Electrolyte Drops. Made from natural salt water from Utah’s Great Salt Lake, they’re tasteless and odor free. They don’t contain any sugars or flavoring, and have no calories, carbohydrates or artificial ingredients. You can also add them to your water bottles or hydration reservoir and not have bears be attracted to it, especially on overnight trips, because the ingredients don’t have any odor and are not a food product. One serving of Elete electrolyte drops contains the following electrolytes to support hydration and muscle function.
The drops come in a little stopper bottle capable of making 10 x 32 oz servings. The bottle cap acts as a measuring cup for dosing sport bottles, water bottles, and hydration packs. Simply add one capful (2.46 ml) for each quart of water that you want to treat or 2 drops for every ounce of liquid, if dosing water from a different dispensing container. You can also buy Elete in bulk in larger sizes. I mainly use Elete drops on backpacking trips and biking trips to prevent muscle cramps. While I try to replace my electrolytes by eating food instead of using liquid supplements, the drops are far more convenient when I’m active during the day and don’t want to stop and pull out food from my food bag. The benefit of drinking electrolytes is that they are much faster and easier to absorb than food. Adding Elete Electrolyte Drops to my water during the day and over dinner has eliminated the painful hamstring and quad cramps I often get in my tent at night. I also rest easy knowing that my water bottle or hydration reservoir doesn’t smell like gatorade or other powdered electrolyte mixes and won’t attract an unwanted nighttime guest (bear.) Disclosure: The author purchased this product with his own funds
from http://sectionhiker.com/elete-electrolyte-drops-review/ 
A moose trotted through my camp while I was eating dinner. Startled the hell out of me and him. I’d heard some commotion on the river below the embankment where I’d hung my hammock, but ignored it while I sat there cooking dinner. The moose popped out of the forest and ran about 20 feet in front of me. Our eyes locked in mutual recognition as he passed, and then he galloped off. I was half expecting something like this to happen on this trip. I was up in the remote Kilkenny section of the White Mountain National Forest, part of the North Country. Things are just a bit wilder north of Rt 2, where fisherman and hunters, and ATVs and pickup trucks, far outnumber hikers and hybrid cars. While the mountains are not quite as high, getting around is much more difficult because paved roads are few and far between. That opens up a lot of interesting options for exploration by foot, bikes, boats, ATVs, and snowmobiles, which have a big following in the north country. 
On this trip, I was bikepacking Bog Dam Road, a 15 mile gravel road I’d scouted the previous summer near the Berlin Fish Hatchery. Officially National Forest Road 15, it loops around the headwaters of the Upper Ammonoosuc River in a section of dense forest that was once the site of numerous logging camps. The topography of this area is also interesting. It’s a small valley bounded by tree-covered slopes. The river is quite small here, but it has a relatively wide flood plain that extends past the river banks. Bog Dam Road loops around the top rim of the valley. The road only comes down to the river at its the northeast end where the riverbed widens and there’s good fishing access. I’d parked outside the gate to the Hatchery and ridden down its paved access road to the Road 15 gate. I passed the gate and crossed the West Branch of the Upper Ammonoosuc, which looks like it has very nice trout habitat: not too wide and lots of boulder gardens for fish to hide in and feed. I kind of wished I’d brought a Tenkara rod, but I’d purposely left it at home because I wanted to just ride my bike, scout the area for future bushwhacks, and camp. I knew the biking would tire me out and I wanted to catch up on my sleep after a hard week dealing with family stuff.
Most of Bog Dam Road’s elevation occurs in the first four miles of the road. It’s gradual but you can see and feel the horizon rising. Luckily, it wasn’t too warm, (despite being mid-August) but I was loaded down pretty heavily with gear, food and water and stated sweating pretty quickly. The surface at this end of road was fairly loose and sandy, which also made the climb more challenging. There’d been some recent bridge work and the Forest Service must have reinforced the road with more gravel to bring in heavy equipment. But there was a payoff. After I’d reached the top of that first big slope, the next 10 miles of Bog Dam Road were smooth sailing and downhill most of the way. I picked up speed and flew through the forest, stopping occasionally to scout the streams and note the logging roads that intersected the road. I was having fun tearing down that road, the wind in my hair (so to speak). I’d picked up a new gravel bike a few weeks ago, a Diamondback Haanjo Trail, and it’s been a real joy to ride, with shock absorbing low pressure tires and a lightweight frame. 
Riding a gravel bike is hard to describe. It’s just like riding a road bike with drop bars, but with knobby tires like a mountain bike. The tires provide traction and some cushion, but your experience on any given day will depend on the type of surface you ride on, and whether it’s loose and granular or densely packed. Why gravel? Thirty percent of the roads in the United States are unpaved and many of them run through pristine wild areas. While you could explore them in a honkin 4×4 truck, riding a bike provides a more intimate experience with more frequent animal sightings because you make less noise. Add in the element of camping and there’s an enormous amount of overlap with backpacking, although you can cover a lot of ground much faster. Add in a fishing rod or a packraft…well you get the idea. I’m still a backpacker in my bones, but there are lot of unpaved logging roads in northern New Hampshire that you wouldn’t want to hike on foot, but that a gravel bike makes accessible. 
I rode to the end of Bog Dam Road and then looped around its north end back to the other gate. It’d only take me a few hours to ride, but I was done for the day, having driven up from Boston that morning. I found a nice campsite and settled in for the night. This wasn’t a big adventure, but seeing that moose up close was a nice flourish. This was also my first solo bikepacking trip and a confidence builder for longer trips to come. 
from http://sectionhiker.com/bikepacking-the-bog-dam-loop/
But if you do get “sapped”, the stuff is easier to remove than you might realize. Hand sanitizer containing alcohol dissolves the sap and eliminates the stickiness. Make sure to use the unscented variety. It also works if you want to get the sap off your hands. If I’ve gotten sap onto my tree straps and tarp guy lines, I segregate them from my other hammock components as quickly as possible and pack them separately. When I get home, I let the sap dry a bit so it gets flakey and is scrape as much of it off with a fingernail as possible. That doesn’t get rid of all of the invisible sticky coating though. Next, I smear hand sanitizer over areas that have come in contact with tree sap and are still tacky to the touch. This dissolves the remaining sap and neutralizes the sticky areas so they return to normal. Any residual by-products left in the straps aren’t sticky and don’t affect the function of the straps at all. they might even make it last longer. :-) 
I’ve seen reports on the internet of people who use WD40, HEAT gasoline additive, and Goof Off Remover to get sap off hammock tree straps and huggers, but I’d be wary of using those because of the damage they might do to your synthetic straps or silnylon hammocks and tarps.
from http://sectionhiker.com/how-to-remove-tree-sap-from-hammock-straps/
You’re hiking along a trail and you suddenly realize you’ve lost it. Stop where you are and try to remember how you got where you are. Can you remember any landmarks that you passed that you know were on the trail? When was the last time you saw a trail marker or evidence of trail maintenance activity like a sawn log end along the side of the trail? Turn around slowly and look around you. Trail blazes and markers are set up bi-directionally on trails and you may be able to see one headed in the opposite direction that you walked past unknowingly. This is a useful trick on heavily blazed trails like the Appalachian Trail. If you see a trail marker or landmark you recognize, walk back to it to get back on the trail, turn around facing the direction you planned to travel, and resume your journey. If you’re on a trail, but you don’t know which one, stay on it, pick a direction and keep going. Trails are marked with signs at trail junctions, which can help you determine your location. You’re also more likely to meet other people who can point you in the right direction. If the trail you’re following takes you to a dead-end, turn around and follow it back to its start. If you can have no idea where you are, you’re not on a trail, and can’t see any trail markers or landmarks, the best advice is to stay put and wait for someone to find you. If you have a cell phone and network access, call the state police and ask for assistance. They can determine your location from you rcell phone signal. If you have a satellite locator or personal locator beacon, activating its emergency SOS beacon will also notify search and rescue services that you require assistance. If you don’t have any way to alert authorities yourself, the person you left a trip plan with should contact the authorities to look for you when you become overdue. If you don’t habitually leave hiking trip plans with someone you can trust to contact 911 if you’re overdue, maybe you should reconsider doing that. Wandering around without a plan will only make you harder to locate and can be quite dangerous if you wander into hazardous terrain. Some people recommend following streams or rivers if you get hopelessly lost under the assumption that they’ll eventually lead to roads. This is a bad idea because the roughest terrain and vegetation you’re likely to encounter in backcountry areas is along the sides of streams and rivers. Your best bet is to stay put and wait for the authorities to find you. See also:from http://sectionhiker.com/what-to-do-if-you-get-lost-hiking/ 
The MSR TrailShot Water Filter is a highly compact and portable water filter that lets you drink directly from natural water sources like streams, rivers, lakes and ponds. It has an unusual design that’s a lot like a water fountain (with a built-in water filter) so you can hydrate on the go without having to carry a water bottle or hydration reservoir. Users who can benefit the most from the TrailShot include trail runners, ultralight backpackers, fishermen, and boaters. The TrailShot has three components
When you want to drink some water, you stick the pre-filter end of the hose in the water and start squeezing the transparent bulb. This draws water up the hose to a comfortable height and pumps it through the filter. If you want to sip from the drink spout directly, simply remove the cap and aim the water at your mouth or slurp it like a water fountain. I’d caution you against touching your mouth to the drink spout because there is the potential for of cross-contamination if the drink spout gets wet from the hose or pre-filter when the unit is folded up and stuffed in a pocket. You can also use the TrailShot to fill water bottles, or reservoirs directly without removing them from your pack if your hose diameter fits into the TrailShot’s drink spout. 
The TrailShot uses the fast-flowing hollow-fiber water filter technology that has revolutionized water filers over the past several years and is used in other filters such as the Katadyn BeFree and the Sawyer Squeeze. The TrailShot is rated to remove 99.99999% of bacteria and 99.9% or protozoa (giardia and cryptosporidium.) It has a flow rate of 1 liter per minute in ideal circumstances, if you can keep squeezing your hand fast enough without tiring. The weight of the unit is 5.2 ounces and it’s easy to stuff it into a small pocket if you don’t mind the residual water in the filter dripping over stuff. To clean the pre-filter, simply unscrew it and rinse out the tiny screen inside. To clean the filter inside the squeeze bulb section, pump it full of water and shake it vigorously. Then remove the hose and let the water pour out. This is easy to quickly do in the field, without the need to carry a separate syringe for backflushing. I’ve been using the TrailShot for over 6 months, primarily when I go fly fishing on streams and small rivers. I like the freedom of drinking directly from a stream using the TrailShot without having to carry any additional containers. I’m literally standing in the water for hours at a time, so it seems silly to lug around bottles of the stuff or a hydration pack. If you’re a hiker, there’s always a trade-off between the convenience of carrying water and resupplying more frequently. Personally, I’d rather stop once every 4 hours to filter or purify water, than every 30 minutes with the TrailShot. But if you’re obsessed with moving as fast as possible and only carrying what you need, I’d encourage you try the MSR TrailShot Water Filter. It’s a very different way to think about water resupply for highly mobile activities. Disclosure: The author received a sample of this product for review.
from http://sectionhiker.com/msr-trailshot-water-filter-review/ 
The Arkel Seatpacker 15 is a waterproof seat bag that has plenty of space to store camping gear for bikepacking trips. It slides on and off a clever aluminum frame that clamps to your saddle’s rails and holds it securely in place without any bouncing or tail wag. The frame has a simple quick release mechanism that’s easy to remove from the bike to prevent theft. It also has a plastic cuff that wraps part way around your seat post for support, but it’s not firmly attached, and therefore dropper post compatible. Check out the Arkel video below to see how the frame works and how easy it is to use. 
The Seatpacker bag itself is made with XPac Fabric, a lightweight laminate that’s similar to cuben fiber. The inside of the bag is coated with a waterproof liner making the bag a good place to store items you really want to keep dry like clothing or a sleeping bag. When packing the bag, it’s best to use items that stuff well since the bag is shaped, narrow on front the front end with a noticeable flare to the rear. In addition to the roll top, side straps provide additional compression if needed, but you also have the option to route them over the top of the bag to secure additional gear there. 
In addition to the main compartment, there’s a pocket with a waterproof zipper on the top of the bag that’s very handy for storing a smartphone or wallet for easy access while you ride. There is also a short section of daisy chain that’s great for strapping items to the outside of the bag, like a fishing rod. Putting daisy chains on the outside of bikepacking bags makes a lot of sense and more manufacturers should do it. 
When riding on gravel and paved roads, you quickly forget that the Seatpacker is attached to the bike behind you. There’s no bouncing or noise, even when you ride over washboard. The balance of the bike isn’t changed a bit either, even when the bag is stuffed to the gills with heavier items including food. I think the Arkel Seatpacker 15L is a keeper, although I think the seat bag itself is rather overbuilt and could really be made with lighter weight material. When I go bikepacking, I hang a 19 g waterproof cuben fiber stuff sack on my front handlebars and the contrast between the two bags couldn’t be greater. Still, the advantages of the Arkel Seatpacker 15L bikepacking bag far outweigh my minor quibbles with it and it’s a real pleasure to use on trips. Weight of seat bag: 440 g / .95 lbs Disclosure: Arkel provided the author with this product for review.
from http://sectionhiker.com/arkel-seatpacker-15l-bikepacking-bag-review/ |

ABOUT MEHello my pleaseure to introduce myself, I am Jose Johnson. I am 26 years old from Monroe, LA. I love to got for hikings with my friends on holidays. Archives
April 2019
Categories |


 RSS Feed
