|
While there are thousands of outdoor rain jackets and hard shells available, most backpackers choose from a small set of common makes and models. If you’re in the market for a new backpacking rain jacket, here are the 10 most popular rain jackets that backpackers actually use today and recommend. 2018 Rain Jacket SurveyWe been running surveys on SectionHiker.com for many years to find out about our readers’ gear-selection preferences because we feel that many manufacturers ignore their needs in order to court the higher-volume consumer market. Backpacking is a remarkably simple hobby, but it’s easy to think otherwise if you pay too much attention to the hype put out by the outdoor news sites and printed magazines competing for gear manufacturers’ and retailers’ advertising revenue. Our reader surveys help us keep SectionHiker’s gear reviews and educational articles real and grounded in reality, rather than focused on the latest bright and shiny object or technology. In this recent survey, we asked over 700 backpackers to answer the following questions:
Most Popular Backpacking Rain JacketsWe found that the 40% of the backpackers we surveyed use the following three rain jackets. They’re far and away the most popular choices. We list the complete list of top ten rain jacket rankings below, including whether they’re available in distinct men’s or women’s models.
The top 10 rain jackets are used by 56.5% of the backpackers in our survey. The remaining 43.5% of those surveyed use a total of 153 other rain jackets from many different manufacturers. As an indication of product loyalty and satisfaction, we asked backpackers if they would recommend their jacket to their best friend. Rain Jacket Replacement RateWe also asked backpackers how often they purchase new backpacking rain jackets to replace the ones they currently own. We found that
Our results show that 47.3% of the backpackers we surveyed, or nearly half, replace their rain jackets within 3 years. While that’s good news for rain jacket manufacturers and land fill owners, you have to wonder why the replacement rate is so high. We discuss some possible reasons for this below. DiscussionThere are a few conclusions that one can infer from these survey results. Low Cost PreferenceThere’s a notable absence of premium makes and models from manufacturers like Arc’teryx in the top 10 backpacking rain jackets. The 10 most popular rain jackets are predominantly under $200 at retail prices, although you can often purchase them for far less during sales. Backpackers are either highly cost conscious or they have a healthy disregard for the performance claims of premium jacket manufacturers. I think both of these factors are in play in rain jacket product selection. For example, backpacking brings out the worst in more expensive waterproof/breathable jackets. Shoulder strap and hip belt abrasion causes rapid deterioration of the DWR coatings in those jackets that incorporate a waterproof/breathable membrane. When you add in the fact that wearing a backpack blocks about 50% of the breathable area of a jacket, it’s no wonder that most backpackers perspire heavily when they hike in the rain. Carrying 20+ pounds on your back is exercise, after all. So I’m not surprised that many of the top 10 jackets use proprietary waterproof membranes with lackluster breathability performance, or none at all, since there’s little benefit in paying for more expensive ones. Recommendation ScoresThe backpacking community is closely knit and people commonly take the advice of friends or people whose opinions they trust when making purchase decisions. A common way of measuring brand or product loyalty and customer satisfaction is to ask people whether they’d be willing to recommend and promote it. A score between 90% and 100% is considered very high and favorable, which helps explain why people keep buying the same top three jackets year over year. It also explains why savvy manufacturers (should) avoid retiring successful product lines or names, even when they significantly alter the design of existing models. A good name is a terrible thing to waste, even if it makes product changes less transparent for consumers. Replacement FrequencyClose to half of the backpackers we surveyed replace their rain jackets every three years. There are a great many reasons to replace a rain jacket ranging from normal wear and tear to deterioration of DWR coatings. We didn’t collect data about the reasons why backpackers buy new ones so frequently, but it’s interesting to see how frequently they do. We plan to delve into this more in future surveys. Consistency with 2017 Rain Jacket SurveyThe results of the 2018 rain jacket survey (n= 728) are consistent with our findings in the 2017 survey (n=322), although more reliable because we had over twice as many respondents. We also screened out respondents who said they did do not backpack, something we did not do as carefully in the 2017 survey. While the percentages of products used differ, the top three jackets: the Marmot Precip, Outdoor Research Helium II, and Frogg Toggs Ultralight 2, are the same in both years.
About this SurveyThis survey was conducted on the SectionHiker.com website which has over 300,000 unique readers per month, so a large pool of potential respondents. Readers were incented to participate in the survey in exchange for a chance to win a raffle for a piece of backpacking gear. While we’re confident that the results are fairly representative of the general backpacking population based on the size of the survey results where n=728 people, we can’t claim that the results are statistically significant because backpackers were not randomly selected to participate from a pre-screened population. There are also a number of ways in which the results could be biased including: backpackers who read SectionHiker.com might not be representative of all backpackers, backpacker who read Internet content might not be representative of all backpackers, backpackers who respond to raffle incentives might not be representative of all backpackers, our methods for formulating questions and recording responses might have been unconsciously biased, and so on. The author is an expert in statistical analysis, survey, and experimental design and is sensitive to these issues. However, given the size of the respondent pool and the very strong consensus among user responses, we believe that the survey results published here will be useful to backpackers who are interested in learning about the most popular rain jackets carried by backpackers. If you’d like to notified of future surveys and gear raffles, sign up for our weekly newsletter in order to be notified when they occur. Not sure you want to subscribe? Check out some recent newsletter issues to see what they’re like. See Also:
The post Top 10 Backpacking Rain Jackets: 2018 Annual Survey Results appeared first on Section Hikers Backpacking Blog. from https://sectionhiker.com/top-10-backpacking-rain-jackets-2018-annual-survey-results/
0 Comments

The trout fishing season is almost over in New Hampshire and this year been a watershed in my development as a fly fisherman. Despite the insufferable summer heat, the fishing was unexpectedly great, and I spent many a late afternoon or early evening by a riverside or stream with a fly rod. While I caught a lot of trout, I really benefited from the repetition of fishing many streams and rivers. I’ve been fishing for a few years, but this was the first year I really dedicated myself to integrating fishing into my daily routine and hiking trips. FliesMy best performing flies this year were ants, bead head bugs, flymphs, and most recently, bead head prince nymphs. These are wet flies fished below the surface in the water column or bouncing along the river bottom. Most the rivers and streams I fish are less than 8 feet deep and often as shallow as a 1-2 feet. When I fish with a Tenkara rod, I can usually see the fly in the water, so I can adjust its depth. I’ve found that this can make a big difference on its attractiveness to feeding trout. 
I tie most of my own flies and while I watch fly tying videos on YouTube and read books that have lots of different patterns in them, I largely make up my own fly patterns with whatever materials I have hand on my fly tying bench. New Hampshire trout are not very choosy. At least not the ones in our smaller rivers and streams. Lake trout may be a different story, but I don’t do that kind of fishing because I like to hike along the streams and rivers I fish. I experimented with a number of fly-tying ingredients this year including:
I wouldn’t be surprised if I spent as much time tying flies as I did fishing this year. It’s kind of hard to explain the pleasure I get from tying a nice looking fly and then using it on a river later in the day. I guess I’m hooked. RodsMy faithful Tenkara USA Iwana remains my favorite rod to fish with, although I picked up a very sweet multi-piece 9′ Orvis Clearwater Frequent Flyer late in the season which is a better instrument for larger rivers, where more reach is required. I frequently carry both on hikes. However, I am looking for a much shorter Tenkara rod (with a cork handle) for fishing small streams that have a lot of tree and bush cover. If you have a suggestion, let me know. I’d like a rod that’s as short as 6′ to 8′ in length. 
RiversIn previous years, I ranged far and wide looking for good trout fishing rivers, but this year I stayed surprisingly close to my New Hampshire digs, fishing the Ellis, the Wildcat River, the Peabody, and the Swift repeatedly, working different sections of the river to find the best fishing spots. This involved a surprising amount of bushwhacking, scrambling, and some wading, which doubled the fun. 
I also started carrying at least one Tenkara rod on all of my hikes and backpacking trips, sampling a growing number of smaller streams to identify other good fishing destinations. This really opened up my eyes to the potential of New Hampshire fly fishing. Every river and stream has trout in it, from Smarts Brook and Nancy Brook to Synder Brook on Mount Madison. The tiny brook trout might not be monsters, but they’re fun to find, catch, and release. I still sampled many rivers and smaller streams, almost too many to count, since it’s so easy to stop and fish for a while with a Tenkara Rod when you happen to pass by a nice section of trouty-looking water. Here’s a list of my many ramblings. They all have trout. The trick is to learn how to read trout water to identify the places where they’re most likely to lie.

The New Hampshire trout season starts shutting down between September 30th to October 15th, depending on the river. There are a few that remain open later in the season and year round, which I might give a go before it gets too cold to fish. The New Hampshire Freshwater Fishing Digest lists the seasons for each species and the special rules governing different rivers. There are a surprising number of rivers with extended seasons, including rivers that are open year-round, which is worth knowing about if you want to ease into the off-season. I might just…
But until next spring, I guess I’m going to be tying a lot of flies. Help support this site by making your next gear purchase through one of the links above. Click a link, buy what you need, and the seller will contribute a portion of the purchase price to support SectionHiker's unsponsored gear reviews, articles, and hiking guides.The post 2018 Tenkara Fly Fishing Diary appeared first on Section Hikers Backpacking Blog. from https://sectionhiker.com/2018-tenkara-fly-fishing-diary/
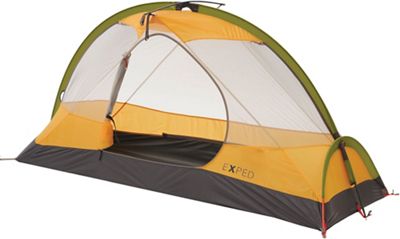
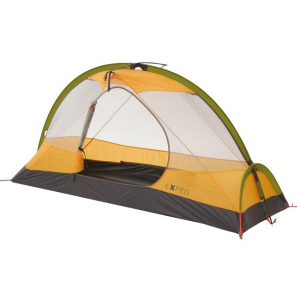
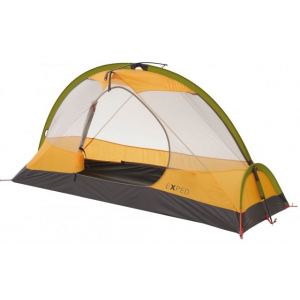
The Exped Mira HL 1 is a surprisingly lightweight and comfortable one person tent weighing just 35 oz. It has two vestibules, one for gear storage, and a second for easy access and exit. A long arched ridge-pole provides lots of head room, making it easy to change clothes and move around inside the tent. Color-coded tent poles and a clip-on rain fly make set up easy, while the inner tent’s mesh netting provides excellent ventilation and insect protection. Specs at a Glance
The Exped Mira 1 HL Tent is a one person, double-wall tent that than can fit into narrow spaces, making it ideal for forested pitches or anywhere where there’s not a lot of room to set up a tent. It’s designed to be highly livable, with lots of head room, interior room to change and move around in, and covered storage space that doesn’t interfere with the tent’s entrance. Tent Pole architectureThe Mira 1 has three tent poles: a long ridge pole that spans the length of the inner tent, a horizontal pole positioned at the head end of the tent to create more head room, and a second horizontal pole that is use to maintain the width of the inner tent closer to the ceiling. The first two poles slide into sleeves sewn into the inner tent and slot into grommets in the tents guy-out points. 
Poles sleeves are a common feature on many tents made by European tent manufacturers. While they make setting up and taking down a little more involved than the clips used by American tent manufacturers to attach inner tent bodies to poles, they produce a much stronger tent structure, one where the inner tent isn’t as buffeted by winds. Some manufacturers even let you slide a second pole into the sleeve, to increase the tent’s strength to counter extreme winds or heavy snow loads. While having three separate poles makes setting up the Mira’s inner tent a little more complicated, you quickly get the hang of it after doing in a few times. The poles are color coded which helps, although you need to be careful when you break down the tent to make sure you pack all of them away. If there’s an advantage to the interconnected, hubbed poles you find on tents made by US tent manufacturers, it’s that they’re much harder to misplace or lose. The Mira 1’s inner tent requires a minimum of four stakes (in the corners) to set up, while the fly requires a minimum of two. The fly connects to the four corners of the inner tent with colored coded clips, which makes it very fast to deploy, a good thing if its raining, since this is a double wall tent. There aren’t any extra guy-out points along the top of the ridge line or vestibules however, which could be used to make the tent more wind resistant in a gale. 
Dual VestibulesThe resulting structure is a one person tent with two vestibules, a large front vestibule and a narrower rear one for gear storage. The rear vestibule is best though of as a gear closet rather than a full vestibule. It is about as deep as a full backpack and can be accessed from the inner tent with a zipper that runs horizontally atop the bathtub floor, so rain can’t leak into the inner tent. The opening isn’t big enough to pass a fully loaded backpack through, so it’s best to lift up the rear rain fly and pop the pack in from that direction. However, once under cover, there’s plenty of room to remove items from the pack or put them away for safekeeping. The rear vestibule area is also a great place to store your shoes/boots or other wet items, so that don’t leak over your dry gear. The front vestibule is positioned on the long side of the tent, so you can use half of the tent width for more gear storage without blocking access. This vestibule has a two-way zipper, so you can vent the tent from the top or the bottom without fully opening it. There’s also a flap over the top of the zipper so you’re not drenched when you open it in the rain Interior livabilityThe interior of the Mira 1 is spacious for a one person tent. It has a truly rectangular bathtub floor that does not taper from head to foot, so you can use a rectangular sleeping pad instead of a mummy shaped one (the tent is compatible with Exped M and LW sized pads). The inner tent has one side pocket inside for gear storage and numerous gear loops so you can hang items or lighting from the ceiling. There is also an abundant amount of mesh for ventilation as well as solid breathable panels for extra privacy. The long arched ridge pole maximizes headroom overhead, so you can sit up and change comfortably in the tent. This is relatively rare in most one person tents, which have slightly more head room than a bivy sack. For example, I can kneel on an inflatable sleeping pad inside the Mira 1 HL, which isn’t something I can do in a lot of the other one person tents I use regularly. The added height also makes getting in and out if the front vestibule easier, without having to crawl on your belly to enter or exit the tent. 
RecommendationThe Exped Mira 1 HL is a comfortable one person tent that’s well suited for three season weather. While it is narrow enough to fit into tight spaces, the interior of the tent has spacious dimensions with vertical side walls and a high ceiling so you can sit up and move around easily inside. Livability is further enhanced by the rear gear closet and front vestibule which provide additional gear storage space and ease of access. The near-freestanding inner tent (staking is still recommended) can also be used as a standalone screen shelter in mild and dry weather. Weighing 2 lbs and 3 oz, the Mira 1, provides a good balance between light weight and durability. Compare 4 Prices
Last updated: 2018-09-26 11:09:06
Disclosure: Exped provided the author with a sample tent for this review. Help support this site by making your next gear purchase through one of the links above. Click a link, buy what you need, and the seller will contribute a portion of the purchase price to support SectionHiker's unsponsored gear reviews, articles, and hiking guides.The post Exped Mira 1 HL Tent Review appeared first on Section Hikers Backpacking Blog. from https://sectionhiker.com/exped-mira-1-hl-tent-review/ 
Most of my backpacking trips this year have turned into guidebook chapters for Backpacking the White Mountain 4000 footers, instead of personal trip reports. But my latest backpacking trip through the Caribou-Speckled Wilderness doesn’t have what it takes to be a guidebook chapter. While scenic and wild, the route passes through some areas of logging activity that are pretty unattractive. There are also sections of trail that are very hard to follow, essentially bushwhacking, that I really wouldn’t want to recommend to the uninitiated. I had fun, but this isn’t the type of backpacking trip most people have in mind when they follow guidebook routes. This trip started at Brickett Place in Evans Notch, a historic home and landmark, that serves as the Bickford Brook Trail parking area and trailhead. It’s just a few feet north of the Maine/New Hampshire border: this entire trip took place in the Maine portion of the White Mountains. The first part of my route climbed Speckled Mountain, the site of an old fire tower, which has a great view of Mt Washington and the Maine peaks on a clear day. From there, I followed the Red Rock Ridge Trail east to Miles Notch, then north to the West Pleasant River, and then west back to Rt 113, which is the road that runs through the center of Evans Notch. Speckled Mountain Haystack Notch Backpacking LoopHere’s the trail sequence:
It was a cool day as I started hiking up the Bickford Brook Trail, dressed in a wool sweater. Temperatures have already dropped into the 30’s at night. The autumn leaves are just starting to turn in Evans Notch, but they’re still not far along, with some yellow, but still mostly green. After months of weather in the high 90’s, it felt weird to be hiking again in cool and dry weather. I like it, but I do wish we had a few more warm days left before the deep freeze closes in. 
I reached Speckled Mountain in about 2.5 hours (4.3 miles) and had a snack, sitting down among the summit rocks to get out of the brisk wind. The sky was a deep blue and I could see the weather towers on Mt Washington, probably 30 or 40 miles away. I’d hoped to top off my water bottles at the spring below the summit, but it was full of nasty looking stagnant water and not running. I still had a liter left and decided to hold off on refilling until the Great Brook Trail, about 2 miles farther along the ridge, which has a stream just below the trail junction. From Speckled Mountain, I descended the Red Rock Trail which runs for 5.6 miles to Miles Notch. It’s a roller coaster of a hike, up and down, through scrappy woods and across a few open alpine areas. When I arrived at the Great Brook Trail junction, I turned and descended the trail a short way to filter some water. 
That done, I hiked another 3.4 miles to Miles Notch turning north onto the Miles Notch Trail. This trail has two parts, a woods part, and a stroll down a logging road that’s marked with pink flagging tape. It’s in a pretty remote part of the Whites, and this being last September, I was a bit wary about running into a bull moose. The big males get very territorial during mating season So I was singing loudly as I hiked, ditties from the 60’s, in my terrible singing voice. Just then an enormous bull moose crashed through the trail about 100 yards ahead of me. He had a big rack from what I could see as he crossed the trail, before he disappeared up the hill and into the forest. Well, you better believe I kept singing after that! I soon met another hiker, Peter, who was also out redlining. He carried a heavy camera and got all excited when I told him about my moose encounter. We chatted for a while and then parted ways. I reminded him that it was moose mating season. The forested part of the Miles Notch ended and the logging road portion began. It is covered in grass with a barrier of bushes and trees on either side. Not the best place for a while animal encounter, I thought. I kept singing. I followed the flagging, but also knew where I was, since I’d been down this trail before a few years ago. 
If you follow the flagging through this portion you’ll be fine. It leads to a big field, also the site of logging activity, and ends at a T junction. There’s normally a sign there pointing to the beginning of the Haystock Notch Trail, but the pole holding it up was broken and the sign was on the ground, pointing in a random direction. I had a fairly good idea of where I was from past experience, but I whipped out my phone and checked my position in Gaia GPSphone app. It’s an easy way to double-check your current position and make sure you’re headed in the right direction. I turned left and continued following the flagging until I was on the Haystack Notch Trail proper. This trail can be a little tricky to follow. The east and west ends are easy to navigate because they run along two streams (so you know exactly where you are), but the middle part is a very lightly blazed and travelled foot trail. The only people I know who hike it regularly are White Mountain Redliners and there still aren’t many of those around. 
I hiked about a mile down the Haystack Notch Trail (headed west) and then set up camp for the night. I could have kept going and finished the route in one day, but I was looking forward to sleeping outside (where I sleep the best.) I set up camp, cooked some dinner and was asleep by 9:00. I broke camp 12 hours later and started hiking west following the West Pleasant River. The trail became harder to follow the farther west I got, although there were periodic blazes. Those completely disappear as you approach the height of land near Haystack Mountain. The trail follows old logging roads most of its length, but there are many intersecting logging roads and herd paths in places, that make it very confusing to follow. The tread is also very lightly trampled, so following the beaten path is often not possible and ill-advised. 
There were times when I know I lost the footpath and had to bushwhack through hobblebush, but I found it again soon enough. You just have to pay close attention to the topo map and your compass to follow the trail, although a GPS app can come in handy too. I have a feeling hiking the Haystack Notch Trail west to east is a lot easier to navigate, something that’s been confirmed by other Redliners. This is the second time I’ve hiked it in a westerly direction. Maybe next time, I’ll hike my loop counterclockwise. Once past Haystack Mountain, the trail becomes trivial to follow. It’s well marked and much more heavily used. I reached the unnamed stream at the west end and it was a short walk to the road. I stuck out my thumb and the first vehicle to pass me stopped and gave me a ride. That’s how I spent my Autumn equinox 2018. Total distance: 18 miles w/ 4300 feet of elevation gain. Recommended Guidebooks and Maps:
The post Backpacking a Speckled Mountain – Haystack Notch Loop appeared first on Section Hikers Backpacking Blog. from https://sectionhiker.com/backpacking-a-speckled-mountain-haystack-notch-loop/
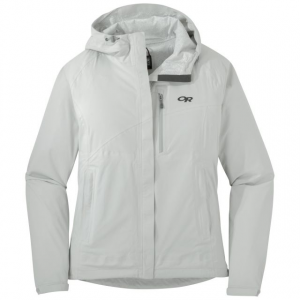
The Outdoor Research Panorama Point is a lightweight rain jacket that can be used year-round for hiking, backpacking, and all of your recreational pursuits. That’s actually harder to come by than you think. While there are lots of lightweight rain jackets that you can use for three season wear, few have the additional venting and temperature regulation features required for serious winter hiking and backpacking. This jacket’s outer shell also has some stretch to it which makes it very comfortable to wear and surprisingly quiet. If you can only afford to buy one jacket for year-round use, you’ll be hard pressed to find one that’s this fully featured and affordable. Specs at a Glance
While the Panorama Point is made with OR’s proprietary waterproof/breathable laminate, I wouldn’t get too excited about that aspect of this jacket. Most Gore-tex knock-offs have pretty lackluster performance (and OR doesn’t publish specs for theirs.) Companies use them to reduce the cost of jackets and because a breathable layer is considered a check-box feature with consumers, regardless of its effectiveness. What I like about Outdoor Research rain jackets and winter hard shells, which I’m been using for over a decade, is that they usually put pit-zips or even longer torso-zips on their rain jackets, even when they have a breathable membrane. Venting is the most effective way to dump the excess body heat that leads to perspiration, as well as the built-up water vapor that’s generated when you sweat. I’ve never had much faith in the laboratory-tested breathability claims made by any manufacturer and their applicability for field use. All of the rain jackets and winter shells I use when I’m not testing gear have pit zips and torso-zips for that reason. Your mileage in 100% humidity may vary. Jacket FeaturesThe Panorama Point Jacket is loaded with all of the features that are you want on a jacket that can span four-season use.
Fully Adjustable HoodThe Panorama Point’s hood has neck toggles and a rear volume reducer so you can cinch the front to prevent heat loss, block wind, and reduce the volume to fit your head. I consider these must-have features on any rain jacket that you intend to use for hiking and backpacking. Your head generates a lot of heat when you hike and it’s important to retain it when you’re cold or vent it when you’re two warm. You can’t do that if you can’t cinch it down tight and prevent the wind from whistling through, or if the hood is sized for a helmet, which is a common problem on winter shells, and too big for your head. 
Wire brimHoods with wire brims are great because you can reshape them easily. They also help prevent rain from dripping onto your face or glasses. If you have a jacket without a brim or one with just a fabric brim, you’ll probably need to carry a ball cap to keep rain off your face, which is just added weight to carry. Pit ZipsThe Panorama Point has 11″ long pit zips under the arms with two-way zippers. They’re easy to reach and adjust while wearing the jacket and do a good job at dumping excess heat without letting in additional moisture when it’s raining. Velcro wrist cuffsThe arms have velcro wrist cuffs that you can cinch closed to prevent heat loss. You have a lot of blood flowing through the wrist that’s close to the surface of your skin, so preventing cold air from reaching it is an important way to keep your hands warm. They also prevent cold rain from dripping down your arm and wetting your mid-layer. 
PocketsThe jacket has three zippered pockets, all lined with mesh. The chest pocket is large enough to hold a smartphone (or GPS). In fact, it has an interior sleeve to hold a phone, so it won’t fall out when you open the pocket (awesome feature!). There are also two huge side pockets and the left pocket has a key fob w/ clip sewn into the seam. Unfortunately, the side pockets are not hip belt compatible and will be covered if you’re wearing a backpack. Hem cinchThe jacket has an elastic hem cinch which is good for trapping heat in cold and windy weather, and to help prevent spindrift from blowing up under your jacket in powder. 
Two-way ZipperA two-way zipper is another highly desirable feature, particularly on a winter shell, because it give you the ability to rapidly vent excess heat and even wear your jacket like a cape, for maximum ventilation. External Fabric, DWR, and WaterproofingThe OR Panorama Point is made with a 40 denier ripstop that has some stretch built into in, making the jacket very quiet and comfortable when you need to scramble. The external fabric has a very soft hand but still has a very good DWR coating on it to shed rain. However, if you wear it with a backpack, you should expect the DWR coating to rub off rather quickly around the shoulders and waist due to shoulder strap and hip belt abrasion. You have two options, you can restore the DWR coating periodically (every 30-60 uses) with a product like Nikwax TX Direct Spray-on. It’s good to wash jackets like these periodically, like every 3-6 months, which is a convenient time to reapply the DWR. You can even wash it in, in the washing machine, with Nikwax TX-Direct Wash-in, which is even more effective and more convenient. What’s DWR? It stands for durable water-repellent and is a chemical coating they cover the outside of waterproof/breathable rain jackets with to make rain bead up when it hits the jacket and roll off. This prevents the outer fabric from getting soaked through, which in turn, blocks the breathable membrane from releasing water vapor. If the outer fabric of the jacket becomes soaked and you’ll probably experience more internal condensation build-up inside the jacket than you would normally. But the breathable membrane in the Panorama Point is waterproof, so rain water won’t seep into the jacket even if if the external fabric is saturated in normal circumstances. If you get a rain jacket that’s permanently waterproof and made with silnylon or polyurethane, you still have to deal with internal condensation buildup, so there’s ultimately no way around the issue. RecommendationThe Outdoor Research Panorama Point Jacket is a comfortable and well featured rain jacket that can serve double duty as a winter shell. It is full featured with all of the capabilities that you’d expect in a technical shell but at a fraction of the price because it uses OR’s proprietary breathable layer and not more expensive Gore-tex. If you believe in manufacturer’s breathability claims, go buy a more expensive jacket. But if you’ve never been able to detect any noticeable difference, or you beat the crap out of your rain jackets by wearing shoulder straps and hip belts (ie backpacks), the Panorama Point will provide as much value as a more expensive jacket. Outdoor Research makes the best hiking rain gear in my experience and the Panorama Point is another good one. See Also:
Compare 6 Prices
Last updated: 2018-09-24 16:42:21
Disclosure: OR provided the author with a jacket for this review. Help support this site by making your next gear purchase through one of the links above. Click a link, buy what you need, and the seller will contribute a portion of the purchase price to support SectionHiker's unsponsored gear reviews, articles, and hiking guides.The post Outdoor Research Panorama Point Rain Jacket Review appeared first on Section Hikers Backpacking Blog. from https://sectionhiker.com/outdoor-research-panorama-point-rain-jacket-shell-review/
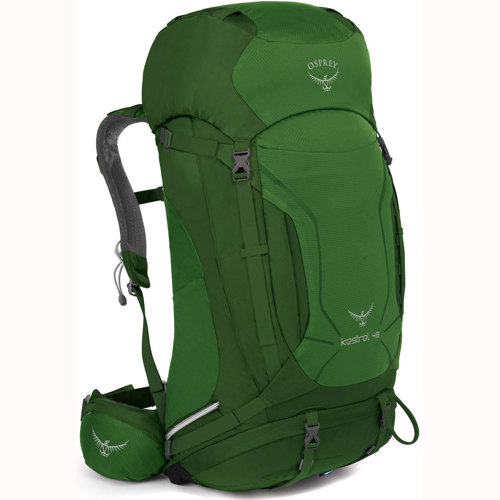
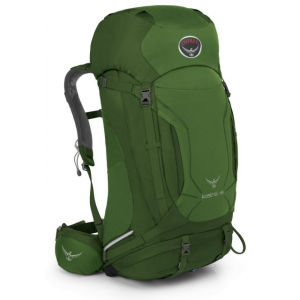
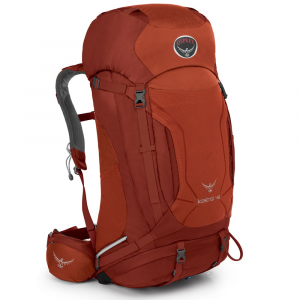
The Osprey Kestrel 48 is a lightweight backpack that’s well-sized for thru-hiking and weekend backpacking trips with moderate loads. Weighing 3 lbs and 5.3 ounces (size M/L), the Kestrel has many of the features you find on higher volume backpacks without the overhead of more weight. The 48L Kestrel is also great pack to use if you’ve switched to lower volume ultralight backpacking gear but still want a pack that has a lot of pockets and organization options. Specs at a Glance
Backpack Storage and OrganizationThe Osprey Kestrel 48 has a top lid, main compartment, sleeping bag pocket, front mesh pocket, and side water bottle pockets. The top lid is sewn to the front of the pack and has two pockets, one on top, and an internal mesh pocket facing the top of the main compartment. The main compartment closes with a drawstring, but does not have a hydration pocket. Instead, there’s a gap behind the shoulder straps for storing a reservoir, so you don’t have to unpack and repack your backpack every time you need to refill it. It’s super easy to use and a key differentiator, if you’re comparing merits of the Kestrel 48 to other backpacks. 
There are two full length zippers on the sides of the pack. The right side zipper opens into the main compartment so you can reach in and pull gear out without having to stop, open it from the top, and unpack. The left hand zipper opens to a full length pocket that’s ideal for stowing a rain coat, sweater, or hats and gloves that you want to keep in covered storage but easily accessible. There’s also a separate sleeping bag compartment at the base of the pack at the bottom of the main compartment. The top of the sleeping bag pocket is really a fold away shelf, that you can release if you’d rather pack the man compartment as one large space. An optional rain cover is also housed underneath the sleeping bag pocket in a small zippered pocket at the bottom of the backpack. 
There’s a mesh shove-it pocket on the front of the pack, but it’s not that large. I put my Sawyer water filter, squeeze bag, snacks, and wet gear into it, but it’s not quite large enough for a wet 2 person tent. The side water bottle pockets are also mesh and are sized to hold 1 liter Nalgene bottles. I can’t reach them when I’m wearing the pack. If you normally use a hydration system, this won’t be an issue. But if you prefer using water bottles, this could be a showstopper if you don’t like to stop every time you want a drink. 
Backpack FrameThe Kestrel is an adjustable frame backpack, which means you can change the torso length by raising or lowering the shoulder pads. For example, raising the shoulder pads will the length between them and your hips, while lowering them will decrease it. The shoulder pads are connected to the backpack by velcro so to raise and lower them, you simply release and reposition them where you want. The pack has a lightweight wire frame that runs around the perimeter of the pack. The back area behind your shoulder blades isn’t ventilated like a trampoline pack, but it is covered with die-cut foam and mesh to help cool your back and keep it drier. 
The Kestrel’s hip belt is sewn the back of the pack. The hip belt wings are padded with wicking mesh and the hip belt has two solid-faced, zippered pockets, one on each side. They’re well sized and I can store my iPhone and some bars or a point and shoot camera in them. 
Compression and External Attachment SystemThe Kestrel 48 has two tiers of compression straps on the sides of the pack. Both straps open and close with buckles, making it easy to lash snowshoes or even skis to the sides of the pack. The front of the pack also comes with sleeping pad straps, so you can secure a pad or tent to the bottom of the pack if you need extra storage. The straps hang down behind you, but are removable if you don’t want to use them. There are also gear loops all over the pack that you can attach more gear to, including loops on the top pocket (4), and 8 loops on the sides of the front mesh pocket, that can act like daisy chains if you prefer to lash gear there. The Kestrel also has Osprey’s Stow-on-the-Go trekking pole retainer. 
RecommendationThe Osprey Kestrel 48 is loaded with features that make it really easy to use for thru-hiking, weekend backpacking and more technical hikes. Despite its small volume and light weight, it has a lot of organizational features normally found on larger and heavier backpacks. With an adjustable length frame and torso range of 16″ to 23″, it’s also available for smaller men and ones with much longer torsos, who can have problems finding a well-sized backpack. Compare 6 Prices
Last updated: 2018-09-24 02:33:07
Disclosure: The author purchased this backpack. Help support this site by making your next gear purchase through one of the links above. Click a link, buy what you need, and the seller will contribute a portion of the purchase price to support SectionHiker's unsponsored gear reviews, articles, and hiking guides.The post Osprey Kestrel 48 Backpack Review appeared first on Section Hikers Backpacking Blog. from https://sectionhiker.com/osprey-kestrel-48-backpack-review-mens/
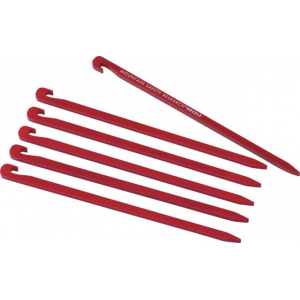
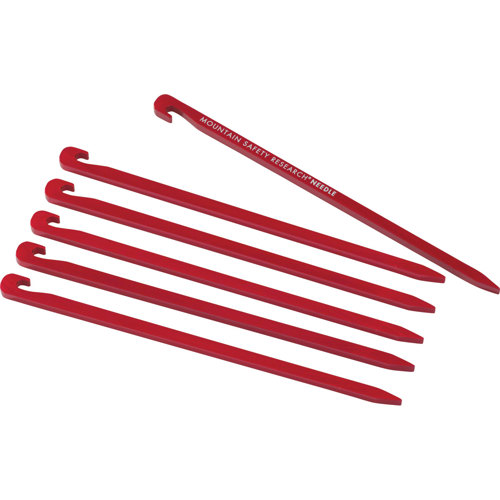
MSR Needle Stakes are lightweight aluminum tent stakes with square-shaped shafts, a wedge tip, and a hook at the top. Weighing 9.6 grams each and 6 and 3/8″ long, they’re ideal for staking out tents and tarps that use cords as guy-lines. You can also use them to stake out webbing, of course, but there’s nothing better for staking out cord. The square stake shafts hold best in packed earth or mineral soil, but won’t break if you hit a rock when you pound them in. They’re not good for use in sand or snow, which require a wider stake or deadman for more purchase. I’ve been using these Needle Stakes since 2016. For a while, they were hard to come by and you could only get them if you bought an MSR tent, which is where I got my first set. But they’re more widely available again and are usually sold in packages of 4 or 6 stakes. I never use the tent stakes that come with the tents I buy or manufacturers send me to review because they deform to easily, they’re too heavy, or the heads have sharp edges that tear my hands when I try to pull them out of the ground. 
I’ve never broken one of these MSR Needle Stakes, although I have bent a few, by stepping on them accidentally. The soil where I backpack is usually soft enough that I can insert them into the ground by hand since the points are thin enough that they slide in with a little pressure. I have hit them with a rock in denser mineral soil, but they’ve stood up to the abuse without any issues. However, you don’t want to push them (or any other tent stakes) into the ground with your foot. That’s a good way to bend a metal tent stake. If you need extra force, find a flat rock and pound them in at a 45 degree angle instead. To pull them out, simple grab the guy-line and pull it out by the cord. That usually does the trick. 
I’ve probably used every tent stake you can name at one time or another including MSR’s ground hogs and mini ground hogs. but these MSR Needle stakes have stood the test of time. Most of the ultralight tents and tarps I use have cord for their guy-lines and the hooks built into these stakes are great for anchoring them down. Compare 5 Prices
Last updated: 2018-09-20 19:51:58
Disclosure: MSR gave me these stakes long ago when I reviewed one of their tents. SectionHiker.com receives affiliate compensation from retailers that we link to if you make a purchase through them, at no additional cost to you. This helps to keep our content free and pays for our website hosting costs. Thank you for your support.The post MSR Needle Stake Review appeared first on Section Hikers Backpacking Blog. from https://sectionhiker.com/msr-needle-tent-stake-review/
Sawyer Pond is a picturesque backcountry pond on the east side of the White Mountain National Forest, near Crawford Notch and Bartlett, NH. It’s easy to hike into, making it an ideal destination for families, small groups, or couples who want a quiet place to camp without undertaking a huge backpacking trip. The pond is 40 acres in size and quite scenic with a great view of nearby Mt Tremont and a smaller peak called Owls Cliff. The pond has 6 large campsites (max 8 people per site), fire rings, two outhouses, and nearby lean-to shelter that can sleep another 6 people. Camping is free, but the campsites are first-come, first-serve. The pond is stocked with trout and fishing is permitted with a New Hampshire fishing license. You can also swim or mountain bike on nearby forest roads, XC, and snowmobile trails. On the clear nights, the star-gazing from Sawyer Pond can’t be beat. There’s no light pollution and the large open space above the pond provides an unobstructed view of the heavens. Fall foliage is a particularly beautiful time to visit when the trees and surrounding hillsides have turned a golden yellow, orange, and red.
Rating/DifficultyEasy Distance/Elevation Gain1.5 miles with 150 ft of elevation gain. Recommended Duration2 days/1 night SeasonJune thru October Permits RequiredNone. RegulationsBackcountry Camping Regulations for the White Mountain National Forest. No Fires or Camping except at Designated Campsites in the Sawyer Pond Scenic Area
New to the White Mountains? Read this Quick and Dirty Guide to Backpacking in the White Mountains for information about camping regulations, road access, trail shuttles, lodging, dangerous wildlife, weather, etc.
Trailhead Directions
Trail SequenceThe route follows the following trails in sequence. Refer to the AMC White Mountains Trail Map 3: Crawford Notch-Sandwich Range (2017 ed), although I’d recommend buying the complete AMC White Mountain Waterproof Map Set (2017 ed) rather than one map at a time, because it’s less expensive that way. Detailed trail descriptions can also be found in the AMC White Mountain Guide (2017 ed), which is considered the hiking bible for the region. Take photos of the relevant pages using your phone for easy reference, instead of carrying the entire book with you on hikes.
Camping and Shelter Options
Sawyer Pond has 6 campsite platforms capable of holding multiple tents. There is a maximum of 8 people per campsite. An adjacent lean-to can house an additional 6 people. Campsites are first come, first serve. Each campsite has a fire ring. There are two outhouses. If the campsites are full, you must hike a quarter-mile away before camping at a dispersed site. Fires are prohibited in the Sawyer Pond Scenic Area except at designated fire rings. Please observe all White Mountains Backcountry Camping Regulations and leave no trace. WaterWater is plentiful on this route which parallels a small mountain stream before it arrives at Sawyer Pond. The use of a backcountry water filter or purification device is strongly recommended. On the TrailThere’s a kiosk next to the trailhead parking lot, which has room for about 10 cars. Pass the kiosk and turn left onto the small pedestrian bridge across the Sawyer River to begin hiking up the Sawyer Pond Trail. 
The trail enters forest and climbs gently over assorted rocks and tree roots, in other words, a typical White Mountain trail. The trail is well beaten down and very easy follow, with intermittent yellow blazes painted on trees. The 1.5 miles to the pond should take you anywhere from one to two hours to hike, depending on your pace and how much pack weight you’re carrying. There’s no need to load up with too much water for this short stretch and carrying one liter should be sufficient, provided you have a filter or purifier with you to process more water when you reach the pond and the campsite. 
You’ll soon hear a brook on your right as it flows through the forest. It runs along the trail for most of the way to the campsite and drains into the Sawyer River, near the bridge you crossed earlier. Just before you reach the campsite, you’ll take a right hand turn at a well-marked sign that has a diagram of the campsite locations.
When you reach a small stream fed by the adjacent pond, turn left 270 degrees, before crossing it. After you’ve turned, the pond will be on your right, and you’ll soon see Mt Tremont and Owls Cliff beyond its far shore. They’re two round knobs with distinctive profiles. 
The lean-to shelter is another .15 miles down the spur trail. It’s in remarkably good condition and perfectly suitable for sleeping in. 
The best time to visit the Sawyer Pond campsites is during the week when there are few people around and there’s little competition for campsites. The campsites become busier on weekends because they’re such a short hike in from the road. Access to the pond becomes much more difficult in late fall and winter because Sawyer River Road is closed to vehicles in winter and usually only opens in late spring.
About Philip Werner: Philip is the 36th person to finish hiking and backpacking all of the trails in the White Mountain Guide (1440 miles). He's also finished hiking many of the region's peakbagging lists including the White Mountain 4000 footers, the 4000 footers in Winter, the Terrifying 25, the RMC 100, and the Trailwrights 72. Philip is a 4 season backpacking leader for the Appalachian Mountain Club, a member of the executive committee for the Random Hikers, a Long Trail Mentor for Vermont's Green Mountain Club, and a Leave No Trace Master Educator. He also teaches several compass, GPS, and off-trail navigation courses each year, listed on Outdoors.org.
Safety DisclaimerThis trip plan can not alert you to every hazard, anticipate your experience, or limitations. Therefore, the descriptions of roads, trails, routes, shelters, tent sites, and natural features in this trip plan are not representations that a particular place or excursion will be safe for you or members of your party. When you follow any of the routes described on SectionHiker.com, you assume responsibility for your own safety. Under normal conditions, such excursions require the usual attention to traffic, road and trail conditions, weather, terrain, the capabilities of your party, and other factors. Always check for current conditions, obey posted signs, and Backcountry Camping and Wilderness Area Regulations. Hike Safe and follow the Hiker responsibility code.Published 2018. SectionHiker.com receives affiliate compensation from retailers that we link to if you make a purchase through them, at no additional cost to you. This helps to keep our content free and pays for our website hosting costs. Thank you for your support.The post Backpacking to Sawyer Pond Trip Plan appeared first on Section Hikers Backpacking Blog. from https://sectionhiker.com/backpacking-to-sawyer-pond-trip-plan/
The Montane Yupik 50 is an adjustable-length backpack with a top lid weighing just over 3 lbs. It’s the successor of the Montane Grand Tour 55 Backpack (see our review) which is no longer available. The Yupik 50 is well-sized for overnight and multi-day trips, with pre-curved hip belt wings that provide good purchase around the hip bones. Crescent-shaped mesh pockets on the front of the pack are provided to store wet gear while a sleeping bag zipper provides access to the base of the pack. A 65 liter version of the Yupik is also available, as well as women’s-specific version named theMontane Sirenik 65. Specs at a Glance
Backpack Storage and OrganizationThe Yupik 50 is a conventional alpine style backpack with a top lid and sleeping back compartment. The rear of the top lid is sewn to the pack on the 50L model, but is a floating lid on the higher volume 65L version. The top lid has three zippered pockets: a large front-facing facing buddy pocket, a small pocket to store the optional rain cover, and a pocket on the underside of the lid. The buddy pocket opens on the front side of the pack, facing your hiking partner, and not your back like most conventional backpacks. The idea is that a hiking buddy can easily unzip your pack while you’re still wearing it to retrieve your map, bug dope, or other gear you need. Cute, but no thanks. I rarely hike with a buddy, and I wouldn’t want them rifling through my gear anyway. Not a deal killer, though. 
The Yupik has two front, zippered mesh pockets on the front (instead of a shovel style pocket) which are good for storing wet objects or gear you want easy access to like a water filter, rain jacket, or snacks. There are two side mesh water bottle pockets, sized for 1L Nalgene bottles, which are both reachable while wearing the pack, and can be pulled out or replaced easily. Unfortunately, the mesh used isn’t tightly woven and I have concerns about its long term durability. You definitely want to avoid any serious bushwhacking with this pack. A sleeping bag pocket is located near the base of the pack, with a zipper that is protected from abrasion and moisture by a large overhanging fabric flap. The inner sleeping bag compartment is formed by an interior zippered shelf. You can release and fold it down if you want to use the main compartment as one large storage space. The main compartment has a top extension collar and closes with a drawstring. It has an internal hydration pocket with a single velcro tab to hang a reservoir, with a single hydration port located between the shoulder straps. Both hip belt pockets are large enough to store a smart phone or point-and-shoot camera. While the front of the pockets is solid fabric, the bottom and rear border are made with same mesh as the side or front crescent pockets. A questionable design for a wet climate. 
External Attachments and CompressionThe Yupik 50 has two tiers of side webbing straps which are threaded through side buckles, as opposed to buckles that can be opened or clicked closed. The top strap runs all the way around the side and front of the pack, even through the front crescent mesh pockets so you can get compression if you overstuff the top of the main compartment. The top lid has four external gear loops with small daisy chains running down the sides of the lid. There are four additional gear loops on the bottom of the pack that you could also attach items to with webbing straps, ski straps, or elastic cord. The higher volume Yupik 65L comes with two additional sleeping bag straps for that purpose, but you can roll your own on the 50L pack. 
The Yupik 50 has a single yellow ice axe/trekking pole holder on the front of the pack (the Yupik 65L has two). There’s no good way to secure the tops of your poles or axe however with something like a conventional elastic or velcro shaft holder. If your poles or axe shaft are short enough, you could loosen the top compression strap to capture the shaft, but that’s really not too feasible. Instead, I’ve rerouted the rope strap that normally runs over the main compartment (common on this style of pack) to hold my poles in place above, although an elastic shaft holder would have been a more graceful solution (and easy to add by yourself). Backpack Frame and SuspensionThe Yupik 50 has an adjustable frame that lets you adjust the pack’s torso length to match your body measurements, so you can dial in a great fit. To my knowledge, this is the first adjustable frame backpack shipped by Montane, which was my motivation for wanting to try it. The adjustment mechanism is quite straightforward and relatively lightweight. The way it works is by moving the shoulder strap yoke up or down the back of the pack to make the torso length longer or shorter. The yoke is attached to the pack with a velcro patch and rides along on two side rails which are part of the pack’s frame. The rails help keep the yoke and shoulder straps level and secure. The side rails are joined by a cross-piece that runs along the top of the pack. There’s also an internal framesheet sewn into the back of the main compartment for added stiffness. 
While there are small, medium, and large size markings on the back of the yoke, it’s not obvious what torso lengths they relate to, so you’ll need to experiment with different positions to dial in one that fits your torso length. This is best done with a pack that’s about 75% full. Put on the pack and close the hip belt.
The padded hip belt is sewn to the base of the frame (and not attached by velcro, for instance) providing provides excellent load transfer to the hips. It has padded and pre-curved wings which grip the hip bones well and don’t slip. The hip belt closes with pull-forward webbing straps and a single buckle. The webbing passes under the hip belt pockets and connects to the bottom corners of the pack bag, just like a hip control strap, only it’s tied into the hip belt system instead of being independent of it. 
The back of the pack is covered with mesh, over die-cut foam. It’d be a stretch to say that they pack is ventilated, but the mesh does help increase air flow to your back. The back-panel is slightly curved outwards above the hips, with a very modest lumbar bulge. The padded hip belt is pre-curved with plastic inserts located behind the pockets to prevent the belt from buckling under load. RecommendationThe Montane Yupik 50 has all of the features you’d want in a reasonably lightweight weekend or multi-day backpack. The adjustable frame is easy to use and resize so you can dial in a perfect fit, making it a great pack for backpacking beginners or people who fall between conventional sizes. The pack has a lot of pockets making it easy to organize your gear and separate wet items from dry ones. The side bottle pockets are easy to use and reach and there are plenty of external attachment points to secure gear to the outside of the pack if needed. My only real concern is the durability of the side mesh bottle pockets, which are not as heavy-duty as I’d prefer. See Also:
Compare 2 Prices
Last updated: 2018-09-18 16:32:37
Disclosure: The author received a pack from the manufacturer for this review. SectionHiker.com receives affiliate compensation from retailers that we link to if you make a purchase through them, at no additional cost to you. This helps to keep our content free and pays for our website hosting costs. Thank you for your support.The post Montane Yupik 50 Backpack Review appeared first on Section Hikers Backpacking Blog. from https://sectionhiker.com/montane-yupik-50-backpack-mens-review/
The Paria Recharge UL Sleeping Pad is an inflatable insulated sleeping pad suitable for backpacking and camping. Weighing 20 ounces, it’s on the heavy side compared to popular three-season sleeping pads, but it is inexpensive, making it a good option for cost-minded backpackers. Specs at a Glance
InflationThe ReCharge UL Sleeping Pad has a flat valve, like those found on Klymit, Exped, and Sea-to-Summit Sleeping Pads. These are more reliable than most stick valves because they’re flush with the surface of the pad and have no moving parts. Inflation by mouth is more cumbersome though, because you have to press your mouth flat over the valve. It has an inner flap however, which prevents air from escaping when you remove your mouth to take another breath. Blowing up the pad by mouth takes 24 SectionHiker breaths. Paria sells a pump bag separately ($15) which can double as a dry sack and is worth consideration. Deflation is a little trickier than you’d expect through. Most flat valve caps have an extra long tab that you can use to prop open the inner flap during deflation so air can escape when you roll the pad up. However, the tab on the cap isn’t quite long enough to stay securely in the opening and prop the inner flap open. I discovered a more reliable workaround however. If you reach under the pad behind the valve, you can push the inner flap up inside the valve so that remains open during the entire deflation process. 
ComfortWhen fully inflated the ReCharge UL is quite a firm pad to sleep on, much like the Therm-a-Rest NeoAir XLite or XTherm which share the same horizontal baffles. It is a quiet pad however, that doesn’t make any crinkly sounds when you move around at night, because it is not insulated with reflective material. If you prefer a softer mattress, the air sprung cells in the Big Agnes AXL Insulated Air Sleeping Pad and Sea-to-Summit Ultralight Insulated Sleeping Pad are far more comfortable. The ReCharge UL pad has a mummy shape and is 20″ wide at the head end, tapering gradually to 14″ wide at the foot end. It is spec-ed at 2.5″ (I measure 3″), but your knee will hit the hard ground when you kneel on the pad, even if the pad is fully inflated. The surface of the pad is a lightly textured and durable 40 Denier TPU diamond rip-stop nylon which is not slippery, so you won’t slide off the pad at night. The pad is pre-scored lengthwise to make it easy to fold into thirds, lengthwise, and rolls up to the size of a 1L Nalgene bottle for each store. A stuff sack is included. 
AssessmentThe Paria ReCharge UL Sleeping Pad is an inflatable insulated sleeping pad that’s comparable to much more expensive sleeping pads, but available at about half of the price ($70). It’s a perfectly good sleeping pad to use, but is probably better for camping rather than backpacking, since it weighs close to a half-pound more than comparable, but more expensive sleeping pads like the market leading Thermarest NeoAir XLite. If gear weight and cost are important to you, I’d encourage you to take a close look at two other insulated sleeping pads, the MassDrop Klymit Ultralight V Sleeping Pad which retails for about $60, has an R-vale of 4.4, and weighs 17.7 oz or the REI Flash Air Insulated Sleeping Pad which retails for $100, has an R-value of 3.7, and weighs 15 oz. Both of these pads have dual flat valves, which makes the deflation process much smoother. They also have air sprung cells which I find more comfortable to sleep on than horizontal baffles. While not reviewed here, the ReCharge UL is also available in a short (48″ x 22″) and double width size (76″ x 48″), with higher R-Values and the same reduced pricing model. The value of those models is actually more interesting and worthy of consideration if you’re shopping for a lower cost, non-standard size insulated sleeping pad. See Also:
Disclosure: The author received a sleeping pad from Paria Outdoors for this review. SectionHiker.com receives affiliate compensation from retailers that we link to if you make a purchase through them, at no additional cost to you. This helps to keep our content free and pays for our website hosting costs. Thank you for your support.The post Paria ReCharge UL Sleeping Pad Review appeared first on Section Hikers Backpacking Blog. from https://sectionhiker.com/paria-recharge-ul-sleeping-pad-review/ |

ABOUT MEHello my pleaseure to introduce myself, I am Jose Johnson. I am 26 years old from Monroe, LA. I love to got for hikings with my friends on holidays. Archives
April 2019
Categories |


 RSS Feed
