|
I set out to hike 100 “new” trails in the White Mountains, this past July. It was a crazy thing to do, but fun. I had to overcome a variety of travel, health, and work issues, but I did it. People who know me, know I’m a goal-oriented guy. Goals keep me motivated, they get me up in the morning, and out the door. I feel lost without them, so I often make my own. I’ve always been like this. But, when I finished Redlining the White Mountain Guide last year (608 trails / 1440.1 miles) I felt rudderless. My big goal for the previous 2 years had been to finish the Redlining Spreadsheet. Once it was done, I had problems finding anything remotely as challenging or satisfying to tackle. Redlining is arguably the hardest hiking “list” in the White Mountains Region, because it requires hiking over 600 trails (now 640). The trails are scattered all over central New Hampshire and western Maine, as far north as the US/Canada Border, and all the way to the Vermont-New Hampshire State line. So late last year, I decided to hike another Redlining round. That decision re-energized me. I can’t think of any thing I’d rather do than hike in the White Mountains. People are always inviting me to hike out west, but I’d rather stay right where I am. There are plenty of mountains, challenging trails, and a huge and vibrant hiking community. Plus you don’t need a permit to backpack or camp, there are no fires, no smoke, no altitude issues, no poisonous snakes, and no grizzly bears to ruin your day. Why 100 new trails? Honestly, I pulled the number out of the air. But that quantity forced me to concentrate on short trails, equal to or less than 2 miles in length. There over 340 of these on the Redlining list and they make up over 50% of the trails that Redliners need to hike. The hard part isn’t hiking them; that’s relatively easy. The challenge is finding them, driving to each trailhead, and hiking them in a reasonably time-efficient way. That takes a lot of planning to pull off since you have to factor in winter road closures, weather, driving times, the availability of daylight, spring trail conditions, not to mention your other non-hiking responsibilities and commitments. Hiking 100 trails also equates to about 16% of a complete Redlining round. Finishing it in a month lets me leap ahead in the overall list. Most Redliners hike less than 16% of the trails on the Redliner’s spreadsheet per year, so doing them all in a month is a big shot in the arm.
The key to hiking a lot of short trails in a month is to focus on the local trail networks that have the highest density of short trails like the Randolph Community Forest, Evans Notch, Waterville Valley, The Rattlesnakes, Ferncroft, Pinkham Notch, and Crawford Notch, among others. To finish my 100 trails, I’d literally hike 6-10 trails a day, driving from trailhead to trailhead and bagging groups of 2, 3, 4, 5, or 6 trails at each stop. When added up, the total mileage hiked was about 160 miles, so there was still a lot of hiking despite the fact that I was targeting short trails. I was tired at the end of each hiking day. Getting to 100 trails would have been easier if I’d started from a blank Redlining spreadsheet. But I’d already hiked 127 trails on my round two spreadsheet before starting this goal, which limited my options since I wanted to complete 100 new trails end-to-end, not repeat existing trails I’d already hiked. You don’t have to be a macho Redliner to hike a 100 trails in a month and I’d encourage you to give this challenge a go sometime. It’s perfect for spring when the higher peaks are still covered or in summer when you want to avoid the crowds on the 4K’s. You just need to have a flexible schedule and a singular focus on the goal. But if you’re a Redliner, you’re probably already “cracked” that way. See also:
The post Redlining: A 100 Trail Challenge appeared first on Section Hikers Backpacking Blog. from https://sectionhiker.com/redlining-a-100-trail-challenge/
0 Comments
The Six Moon Designs Minimalist Backpack is a adjustable-length 60 liter backpack available with regular shoulder straps or a vest-style ones (the raffle winner will get one of each). Weighing 34 ounces, the Minimalist is a versatile ultralight-style backpack that can be configured in a variety ways for long distance backpacking, lightweight backpacking, fast and light running trips, and even backcountry fly fishing. For full details, see my Minimalist Backpack Review from earlier this year. Deadline to EnterThis is a three-day raffle. The deadline to enter this raffle is August 2, 2018, at midnight PST. Rules
To EnterTo enter this random raffle for a chance to win a free Six Moon Designs Minimalist Backpack, click through to answer the following short questionnaire about hiking leg and foot ailments. One entry per person only.
Thanks for Entering.
The post Gear Raffle: Enter for a Chance to Win a FREE Six Moon Designs Minimalist Backpack appeared first on Section Hikers Backpacking Blog. from https://sectionhiker.com/gear-raffle-enter-for-a-chance-to-win-a-free-six-moon-designs-minimalist-backpack/
I have a bad blister on my foot that’s taking a long time to heal. Technically, it’s not a blister but a wound, because the skin covering it was ripped off and the deeper tissue exposed. To make matters worse, I continued to hike and walk quite a lot with it, covering it up with gauze and Leukotape, despite considerable pain and bleeding. Yes, I am an idiot. But I need to be reminded of that every couple of years. Fast forward to the solution. Band-Aid Hydro-Seal Blister Bandages. These are hydrocolloid gel bandages which are the state-of-the-art for modern wound care. They’re very sticky and waterproof, so you leave them on until they fall off, usually after 3-5 days. You can even shower with them on or do a stream crossing. They’re designed to be used by themselves, without the use of extra antibiotic ointment. They work by completely sealing off the wound area from germs and letting your body’s immune system heal the wound. The aim of these hydrocolloid gel bandages is to provide a moist healing environment while using the body’s own moisture and enzymes to keep the wound hydrated for proper wound healing. They don’t adhere to the wound, only the surrounding skin, thereby keeping healed skin intact. They also stay on for days at a time, minimizing any disruption to the healing tissue, caused by frequent bandage changes. While blister prevention (see Leukotape) is always preferable, these Hydro-Seal Bandages are the ticket for SHTF wound care when the damage has been done. They’re available in multiple sizes and intended for use as-is, without any additional shaping or trimming. Each bandage is sterile and latex-free, making them good for people who have a latex allergy. They’re also surprisingly inexpensive and you might even consider carry one or two in your first-aid kit.
To use a Hydro-Seal Bandage, clean and dry the affected area of your foot (or body part). It is important that they wound be uninfected and sterile before covering it with the bandage because it forms an air-tight seal over it. Apply the bandage to the blister or wound, being careful to keep the adhesive edges off the afflicted area. Rub your thumb around the edges to seal ensure a tight waterproof seal. After 24 hours, the center of the bandage will plump up a bit, which indicates that the healing process has begun. 
You can use a Band-Aid Hydro-Seal Bandage on popped or un-popped blisters. If a blister is painful, I usually pop a blister with a sterile needle and drain the fluid inside, being careful to keep the skin on top intact because it prevents infection and accelerates healing. The fluid build-up is often the source of the pain and removing it can make you more comfortable, especially if you plan to keep walking on it. You can also cushion the bandages more by building a moleskin ring around them, but you need to be careful to keep the moleskin off the bandage to prevent tearing it off the wound when you remove it. The exterior of these Hydro-Seal Bandages is very slick, which cuts down on friction inside your shoes if you plan to keep walking with your blister. The marvelous thing about these bandages is you can continue hiking, even if you have a bad blister, after applying them. The gel in the bandage absorbs the fluid that leaks out of a wound or blister (called “exudate”) as it heals. This keeps the wound moist and pliable, which helps to dramatically reduce the pain of walking. Band-Aid Hydro-Seal Bandages are not recommended for use over stitches, burns, fragile skin, deep puncture wounds, or infected area. Diabetics and people with poor circulation should also consult a medical authority before use. But for hiking and backpacking blisters, I have to say that these blister bandages are the BEES KNEES! Highly recommended. The author purchased this product with his own funds. SectionHiker.com receives affiliate compensation from retailers that we link to if you make a purchase through them, at no additional cost to you. This helps to keep our content free and pays for our website hosting costs. Thank you for your support.The post Band-Aid Hydro-Seal Blister Bandages Review appeared first on Section Hikers Backpacking Blog. from https://sectionhiker.com/band-aid-hydro-seal-blister-bandages-review/
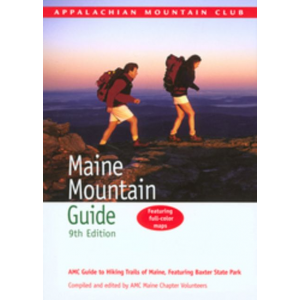
The Maine Mountain Guide is the hiker’s bible for the mountains and hiking trails of Maine. It provides detailed descriptions of more than 625 trails, on 300 mountains, totaling close to 1500 trail miles in length, ranging from easy woodland strolls to strenuous mountain traverses. Now in its 11 edition, it’s been 6 years since the guide was last updated and reflects the trail expansion boom that’s come to Maine in the intervening period. With 450 updates to existing trails, and 175 new trails on 50 new mountains, the guide provides a wide variety of hiking opportunities for every interest and fitness level. The Maine Mountain Guide (MMG) splits Maine’s hiking trails into 12 separate regions, providing a vast range of hiking opportunities no matter where you’re in the state, along the coast, near the lakes of central Maine, or along the border with Canada or New Hampshire.
Planning Information and MapsThe MMG includes a list of suggested hikes for each region, sorted by effort level, with easy to read icons that help you find ones that are dog-friendly, are kid-friendly, have waterfalls, firetowers, whether they’re good cross-country ski trails, and so on. Each trail is then described in turn-by-turn detail, including its length, elevation gain, and the distance to each major trail junction or landmark along its length. While this information is very helpful for selection a trail and planning hikes, it’s unlikely that you’ll to carry the entire book in your backpack when you go hiking. When hiking, it’s best to carry a map, so you can check landmarks as you pass them to verify your position. The MMG includes two of these, but they’re made of paper, which is far less durable than waterproof maps made of Tyvek, which can survive hundreds of uses. Frequent hikers will probably want to upgrade to the waterproof versions of these maps: Maine Mountains Trail Map 1-2 and Maine Mountains Trail Map 3-6. Detailed Driving DirectionsWhile all of the Mountain Guides published by the Appalachian Mountain Club include detailed driving directions to each of the trail heads they cover, no where is this more important than in Maine, since so many of the roads are unpaved and only open seasonally. Forget trying to find them using Google Maps or your car’s GPS system. Updated and verified, these “analog” style directions are one of the most valuable sources of information in the MMG and something you’d be hard-pressed to replicate on your own. About the EditorThe current edition of the Maine Mountain Guide was compiled and edited by Carey Kish, a retired newspaperman, and lifelong hiker who’s hiked the Appalachian Trail twice, once in 1977 and again in 2015. A longtime Maine resident, he’s a friendly and rambunctious character, who’s highly accessible on social media, is an active trail maintainer for the Maine Appalachian Trail Club, and guest speaker who makes frequent guest appearances around the state. RecommendationIf you love Maine hiking and want to expand your horizons or love the adventure of exploring Maine’s wilderness areas, be sure to pick up a copy of the new Appalachian Mountain Club’s Maine Mountain Guide and its associated waterproof maps. Rich in detail and painstakingly edited, it provides an invaluable launch pad for exploring what the great State of Maine has to offer for hikers and backpackers, alike. The author received a free copy of this book for review, but would have gladly purchased this exhaustive trail reference for his New England hiking guide and map collection. SectionHiker.com receives affiliate compensation from retailers that we link to if you make a purchase through them, at no additional cost to you. This helps to keep our content free and pays for our website hosting costs. Thank you for your support.The post The Maine Mountain Guide appeared first on Section Hikers Backpacking Blog. from https://sectionhiker.com/the-maine-mountain-guide/
Outdoor Retailer is a trade show held every summer where outdoor gear manufacturers come together and show off the gear they plan to bring to market in the upcoming year (2019). It’s a very social event where you get to catch up with old friends, drink a lot of beer, and try to figure out what the most promising new products will be. My focus at these shows is to look for new gear that I can use on my own trips and adventures and that I think my readers will benefit from knowing about. Editor’s ChoiceThere were hundreds and hundreds of outdoor gear manufacturers at the Outdoor Retailer trade show this year and I met with many of them to see their 2019 offerings. The following products are the cream of the crop in my opinion, representing a variety of needs and price points. You should expect to see many of them featured in SectionHiker’s detailed gear reviews in the coming year as they come to market. I won’t formally recommend them until I get to test them, but they all look very promising. Tents and SheltersKey Trends: Material science innovations continue to drive gear weights lower and lower in the tent and shelter category. Some brands have embraced the new materials, while others have been slower to adopt them until manufacturing costs fall or the real world durability of new fabrics and structural materials is better understood. 
Big Agnes made a splash with the introduction of the new ultralight “Carbon” line of tents made with Dyneema rain flies, nylon and mesh inner tents, and carbon fiber poles. While the weights of these tents is outstanding, you’ll probably need to tap into your trust fund to buy one.

Big Agnes also introduced ultralight bikepacking versions of the Fly Creek HV UL 1, Fly Creek HV UL 2, Copper Spur HV UL 1, and the Copper Spur HV UL2. The key innovation in this series are tent poles that have a maximum segment length of 12 inches, making them easier to pack in bike frame bags or panniers. 
Eureka will be introducing a more durable version of the iconic Solitaire Tent ($99.95) that will include more durable aluminum poles instead of the fiberglass ones sold with the Solitaire today, which have a history of breaking. Weighing 2 lbs 10 ounces, the Solitaire AL is a spacious bivy style tent with a mesh roof that can be used for stargazing on cool nights. I reviewed the Solitaire 1P on SectionHiker.com a few years ago and think it will be an even better entry-level backpacking tent with the new aluminum poles. 
The NEMO Rocket 2 is a two person ultralight, single-wall tent for two people with dual vestibules. Abundant side mesh helps cut down on internal condensation while high sidewalls and a deep bathtub floor provide enhanced weather protection and increased head room. The tent is made using the same conventional Silnylon/PU 7d and 10d fabrics on the NEMO Hornet UL double-wall tents. 
The 2019 MSR Hubba Hubba NX will include Easton Syclone tent poles which are more durable and resilient than the aluminum poles previously included with the tent and less prone to breaking than carbon fiber poles. MSR has changed the way they sew the Hubba Hubba’s fabric seams, making them waterproof without the use of seam taping (which breaks down with use and exposure to sun), thereby increasing the tents effective lifespan. MSR also introduced a 10 oz mesh inner tent/bug bivy for use with a tarp, but it has an unusual door orientation, so I’m not sure whether it will be that convenient to use. But that’s why we test gear, to find out. 
Outdoor Research has overhauled their entire bivy product line while introducing two new waterproof/breathable bivy sacks called the Interstellar Bivy (19.9 oz, $275) and the Stargazer Bivy (18.5 oz, $259) that have U-shaped zippers for ease of access. The weight of the Helium Bivy ($179), originally introduced in 2014, has dropped from 18 oz to 16.8 oz, while the Alpine Bivy ($250) has dropped from 32 oz to an astounding 21.5 oz. BackpacksKey Trends: It’s amazing how many new backpacks are introduced every year or improved and updated. The availability of light weight packs continues to grow and more manufacturers, including Mountain Hardware and Exped, have started making packs with Dyneema DCF. But the biggest trend that stands out in the backpacking world is the widespread introduction of women’s-specific backpacks by many new manufacturers, including Mystery Ranch and Granite Gear. Take note: unisex backpack sizing is dead-on-arrival. 
Granite Gear unveiled an impressive upgrade of the Blaze AC 60 Backpack, with an entirely new injection molded framesheet that gives the pack an impressive 50 lb load rating. The pack has an adjustable length hip belt and adjustable torso length so you can dial in a perfect fit. It has a removable top lid than can be attached to the front of the pack and used as a large chest pocket, a rear zipper that provides full interior access, and large hip belt pockets. The new Blaze AC uses a custom 210 Robic Nylon UHMWPE triple gridstop in high wears areas, making it Granite Gear’s most durable backpack to date. The pack is available in multiple torso ranges raging from 15″ to 24″ for men and ranging from 15″ to 21″ for women, including women’s specific shoulder straps and hip belts. The Blaze AC 60 pack weight ranges from 2.9 to 3.1 lbs, depending on the size. 
In addition, Mountain Hardware and Exped announced two new Dyneema (DCF) climbing packs. The Mountain Hardware Alpine Light Backpack is a full-on climbing and winter sport backpack that will be competitively priced in 28L ($270), 35L ($330), and 50L ($350) sizes. Fit is unisex, but there will be multiple torso sizes available. Weights are currently unavailable. The Exped Whiteout is more of a minimalist alpine pack, with a roll-top, two external daisy chains, and a small zippered pocket. The Whiteout will be available in 35L, 45L, and 55L sizes weighing 24.5 oz, 28 oz, and 30 oz, respectively.
Mammut has a new adjustable-length backpack called the Trion Spine Pack, intended for trekking and mountaineering, which has dual pivot points at the hips and shoulders that can move independent of one another and helping you to climb or hike more efficiently. A stabilizing rod connecting the two ends of the frame dampens any excess movement, providing a very stable carry. The Trion Spine will be available this spring in men’s and women’s specific version in 35L, 50L, and 70L sizes. Sleeping Bags, Quilts, and PadsKey Trends: Sleep system components keep getting lighter and lighter, finally rivaling those made by the ultralight cottage manufacturers in the sleeping bag and quilt category. In addition, the first version of an industry-wide sleeping pad R-value measurement standard has been ratified and will soon be an ASTM International Standard. Participation by key retailers, including REI, will likely force major sleeping pad manufacturers such as NEMO and Big Agnes to start labelling their sleeping pads with R-values instead of temperature ratings by 2020, increasing consumer confidence, and providing a basis of comparison between sleeping pad brands. 
In sleeping pads, Therm-a-Rest introduced the new NeoAir Uberlite Air Mattress, which weighs 8.8 oz ($179.95) in a regular 72″ x 20″ size and just 6.0 oz ($139.95) in a small 48″ x 20″ size. The Uberlite has an R-value of 2.0, with 2.5 inches of cushioning. While the Uberlite retains the Triangular Core Matrix insulation used in other NeoAir mattresses, the crinkly (potato-chip) sounding mirrored layer has been removed, which will be a welcome relief for people who think the old NeoAir pads are noisy to sleep on. 
Therm-a-Rest also has a hot new ultralight quilt called the Vesper 32F/0C & 20/F/-6V that is filled with 900 fill power, RDS-certified, Nikwax Hydrophobic Down. The Vesper 32 weighs 15 oz in a size regular ($329.95) and 17 oz in a size long ($349.95), while the Vesper 20 weighs 19 oz in a size regular ($379.95) and 21 oz in a size long (399.95). All of the Vespers have side baffles, a neckline draft collar, insulated footbox, and incorporate Therm-a-Rest’s ThermaCapture lining. They also include SynergyLink connectors to integrate with your sleeping pad to form a complete sleep system. 
Big Agnes announced a new ultralight 40 degree sleeping bag called the Pluton ($349.95) that is filled with 850 fill power Downtek RDS-certified down and weighs in at 15 oz. It has a minimalist hood and a full-length, two-way zipper, so you can vent your feet if they’re too warm. Other Notable Products and Updates
What strikes your fancy?SectionHiker.com receives affiliate compensation from retailers that we link to if you make a purchase through them, at no additional cost to you. This helps to keep our content free and pays for our website hosting costs. Thank you for your support.The post Outdoor Retailer 2018: Editor’s Choice Gear Picks appeared first on Section Hikers Backpacking Blog. from https://sectionhiker.com/outdoor-retailer-2018-editors-choice-gear-picks/
Many people like to carry a hydration system (reservoir and hose) on day hikes and backpacking trips, but others prefer carrying water bottles instead. While you can chalk up the difference to personal preference, there are definite pros and cons to hiking with a hydration system in different circumstances, depending on the expected duration of your hikes and whether you’ll need to refill your hydration bladder. Expected durationWhile day hikes vary widely based on the distance travelled and expected duration, carrying a hydration system on shorter, half day trips can be convenient because it’s unlikely that you’re going to run out of water. As a general rule of thumb, you should drink about a liter of water every two hours when day hiking. So a three liter hydration system, should provide you with about six hours of water. For all-day hikes or overnight/multi-day backpacking trips, you’re probably going to need to refill your hydration bladder from a backcountry water source. The problem is knowing when, since you can’t see how much water is left in your hydration bladder when it’s packed inside your pack. That’s the main reason people carry external water bottles, so they can see how much water they have left and regulate their intake. While may people do use hydration systems for long day hikes and backpacking trips, refilling them is less convenient than if you use water bottles, because you’ll need to unpack your hydration bladder and then repack your pack once it’s been refilled. There’s also the risk that your hydration bladder can leak inside your backpack, which can have dire consequences if it soaks your gear. 
Terrain typeThere are still times when carrying a hydration system is better than carrying water bottles, even when you’re backpacking. For example, if you’re doing a lot of rock scrambling, it’s better to carry your water close to your center of gravity (back and hips) in a hydration pocket than in bottles on the outside of your backpack. A hydration system also eliminates the chance of losing your water, when your water bottles fall out of your backpack during a rugged scramble. I had this happen to me, just last week. The same holds if you’re bushwhacking through dense brush, where overhanging vegetation can rip bottles out of your backpack’s pockets. Carrying a hydration system is usually better in this case because your water is protected inside your pack, even though you have to monitor your usage to avoid running out. SummaryHydration systems are best used for shorter day hikes when you’re unlikely to run out of water, or when scrambling or bushwhacking, when there’s a chance that you could lose externally stored water bottles if they fall out of your backpack. Hydration systems are more challenging to use for backpacking trips and long day hikes because you can’t see how much water you have left if its packed inside your backpack. They’re also less convenient than bottles if you need to refill them frequently, because you’ll have to unpack your backpack and then repack it after your refill is complete. SectionHiker.com receives affiliate compensation from retailers that we link to if you make a purchase through them, at no additional cost to you. This helps to keep our content free and pays for our website hosting costs. Thank you for your support.The post Hiking and Backpacking Hydration Systems: Pros and Cons appeared first on Section Hikers Backpacking Blog. from https://sectionhiker.com/hiking-and-backpacking-hydration-systems-pros-and-cons-explained/
Peakbagging lists like the AMC 4000 Footers, the 52 with a View, the Grid (48 x 12), the Trailwright’s 72, and the Terrible 25 have always been a popular way to embrace and experience the grandeur of hiking in the White Mountains. Spanning New Hampshire and Maine, the White Mountain National Forest is home to hundreds of mountains with a well-developed network of connected hiking trails to explore. While much of the White Mountains hiking scene is focused on peakbagging, a growing subset of hikers and backpackers are focused on hiking all of the trails listed in the Appalachian Mountain Club’s White Mountain Guide, now in its 30th edition. Called “Redlining,” the goal is to hike all 623 of the trails listed in the guide, totaling 1454.1 miles in length. This includes every trail, up every mountain, to every viewpoint and destination, subsuming most of the region’s hiking lists, which are good stepping-stones toward the goal of finishing the entire redlining trail list. Since it takes most hikers years to finish redlining all of the trail in the White Mountain Guide, these peakbagging lists form an important source of motivation, community, and gratification along the way. RedlinersHikers who are actively working on the Redlining trail list are called redliners. Many have years of experience hiking in the White Mountains, often starting with the Appalachian Mountain Club’s 4000 footers list and branching out from there to hike to more and more destinations. Few start out with the intention of redlining all of the trails in the White Mountain Guide, but fall into it, when they run out of other lists to pursue. 
There comes a point when every nascent redliner tallies up the trails they’ve hiked and the parts of the trails that they’ve missed (short sections, called “chads”) using the Redlining Spreadsheet, which is a list of all the trails in the current edition of the White Mountain Guide. This spreadsheet is freely available for download from NETrailconditions.com. The Redlining Spreadsheet is broken into the 12 regions covered in the White Mountain Guide, listing each trail, its mileage, with space for you to record how much you have left to complete and notes for future reference. While most of the trails on the spreadsheet are in the White Mountain National Forest in New Hampshire and Maine, many are not. The mere mention of a trail in the White Mountain Guide is justification for its inclusion in the Redlining Spreadsheet. In some cases, you’ll need to venture as far north as the New Hampshire/Canadian Border and as far west as the Vermont/New Hampshire state line to hike those trails. 
Filling out the spreadsheet for the first time can be a sobering experience. When I filled it out for the first time, I found that I’d only hiked 50% of the trails and had dozens of unfinished trail segments that I had to go back and complete. This was even after eight years of intensive White Mountains peakbagging and backpacking. The Redlining spreadsheet soon became my focus of attention and completing it became a passion and obsession over the following two years. There are two important numbers on listed on the summary page of the Redlining Spreadsheet:
In my experience, I’ve found that the first metric, the percentage of trails completed, to be a better indicator of progress than the percentage of miles completed. Getting to the trails to hike them is the most difficult part of redlining; hiking the miles is easy after that. 
Rules of the GameThe Rules for Redlining the White Mountain Guide are easy to understand and follow. The following list is adapted from the unofficial White Mountains Redlining web page.
When you’ve finished the Redlining Spreadsheet and hiked 100% of the trails, you can submit an application to get the Redlining patch and have your name listed with the other people who’ve finished the Spreadsheet. To date, there have been 44 finishers since 1991 (click for the complete list). MapsAs a redliner, you’ll quickly discover that many of the trails in the AMC’s White Mountain Guide are not drawn on the AMC’s White Mountain maps. If you’ve been using a red sharpie to highlight the trails that you’ve hiked so far on hiking maps, you’ll want to switch to the Redlining Spreadsheet to keep an accurate record going forward. Here’s a partial selection of maps that I’ve found helpful for finding the trails you need to redline:
That said, many redliners are map collectors and you’re likely to accumulate an increasing number of maps as you work through the Redlining Spreadsheet. You’ll probably also want to increase your skill set and become adept at using a GPS receiver or Smartphone Navigations Apps like GaiaGPS or Guthook’s NE Hiker App which provide GPS information for many of the obscure trails in the White Mountain Guide. A sizable number of the trails on the Redlining list can be difficult to find and difficult to follow because they’re hiked infrequently, sparsely blazed, or poorly maintained. While maps are essential to carry, having a GPS track of the trail in your backpack can be quite handy if you’re having difficulty following it by sight alone. It’s also a useful aid in helping you find your car on the way out. Redlining ChallengesMotivation: The sheer number of trails on the Redlining Spreadsheet can be daunting. One way to stay motivated is to work on shorter-term peakbagging lists like the Terrifying 25, the Randolph Mountain Club 100, or the Trailwright’s 72 that require a lot of trail hiking to complete. It’s also easier to find friends who are willing to work on these lists with you, unlike many of the more esoteric trails on the Redlining Spreadsheet. For example, if you can hike 25% of the trails per year, you’re doing very well and moving through the spreadsheet at a fast pace. Most people take much longer though. Winter: Most of the trails on the Redlining Spreadsheet are not accessible in winter because the seasonal roads leading to them are closed and gated or because they’re not “broken out” enough to make them possible to hike without a large group of fellow snowshoers. Winter typically lasts from mid-November through April in the Whites. The only trails that are broken out enough in winter are trails leading to peaks on the AMC 4000 footer list, which will slow down the pace of your redlining efforts. See NETrailConditions.com for up to date trail condition information. Community: Most of your old hiking and peakbagging partners will probably abandon you when you start redlining and you’ll need to hike solo or surround yourself with the handful of people who are actively redlining. The best place to find kindred spirits is in the White Mountains Red-lining Group on Facebook, which is very supportive and convivial. Join it today, if you’re already redlining or want to get started. Redlining StrategiesHere are a few tried and true redlining strategies that can help you motor through the trail list and reduce the number of repeat hikes you need to do over the same trails. Hiking Partner: Redline with a friend, if you can, so you can bring two cars on hikes to avoid having to re-hike the same trail back to your car. Finding a hiking partner who is also redlining can be tricky though, unless you start at the same time and hike the list together, since most redliners avoid re-hiking trails they hiked before, even to help a friend. Loop Hikes: Try to plan loop hikes in order to avoid hiking the same trails twice. This in often inevitable, especially on individual trails that end at scenic destinations and don’t have any connecting trails. But loop hikes can be a very efficient way to hike a lot of trails. Backpacking: Backpacking trips over a period of one, two, or three days can give you the opportunity to hike many trails and cover many miles in one hike. In some cases, they’re the only efficient way to get to remote trails in the Mahoosuc Range or the Wild River Wilderness, deep in the Pemigewaset Wilderness, or along the western New Hampshire portion of the Appalachian Trail. Staying at the RMC’s low-cost huts or shelters is also a good way to knock off a large number of above-treeline trails in the Presidential Range in one trip. Bike Drops: If you have to hike a trail that is near a road, you can drop a bike at the far end and ride it back to your car. This can be a big time saver. Avoid Creating New Chads: Try not to leave portions of trails un-hiked, because they force you to come back and hike them. Don’t Let Existing Chads Pile Up: Don’t let un-hiked portions of trails pile up because they can be a frustrating distraction later, when you’re trying to finish the redlining list. Beware of Seasonal Closures: Hike the trails that are dependent on warm weather or dry days when conditions permit, rather than leaving them for shoulder seasons or winter, when seasonal conditions or road closures can make them impossible to reach. Concentrate on Trails not Miles: While there are many difficult and challenging trails to hike in the Redlining Spreadsheet, the hardest part of redlining is getting to the trails, not completing them. You’re not done until you finish all the trails, so focus on them instead of accumulating more miles. Tips and TricksLodging: If you don’t live near the White Mountains, you should find a nearby place to stay a few days a week while you’re working on the Redlining Spreadsheet. Staying in motels or hostels gets expensive quickly. Car camping is an option and often free, although it can be a hassle. Another good alternative is to join a Ski Club, which is a group house, shared by many other skiers and hikers for a reasonable annual fee. If you like a quiet place to sleep, use the ski house on weekdays and in the warmer months and avoid it on winter weekends when the partiers arrive to go skiing. Transportation: I’d recommend getting a higher clearance, 4 wheel drive vehicle for driving down the many unpaved forest service and logging roads required to find more remote trailheads. You might also want to pack a small hydraulic jack to make it easier to change wheels if you get a flat. You need to be very self-sufficient when redlining, because you’re going to be off-the-grid when hiking more remote trails. Planning Tools: It helps to master a navigation planning tool like Caltopo.com or Garmin Basecamp when planning your routes, to help you visualize new loops, and import/export them to a GPS or Smartphone navigation app. GPS Route Tracking: Once you’ve found the trail you plan to hike, consider tracking yourself on a GPS or Smartphone Navigation App so you can easily reverse your route if necessary. Less frequented trails are often overgrown and may be disturbed by logging, so having a reliable way of retracing your steps can be a real benefit. Wrap UpRedlining can be a joyous and fun way to experience the best of New England Hiking in the White Mountain National Forest and beyond. If you like to explore new places and hike new trails, it’s a great way to expand your horizons and increase your skill set as a hiker and backpacker. But redlining is a long term quest that can take years to complete. In order to stay motivated and engaged, try to work on some other peakbagging lists at the same time as you redline, hiking new trails that you’ve never hiked before to get to the destinations. This will help you keep your existing hiking friends around, while you pursue the longer term redlining goal.
About Philip Werner: Philip is the 36th person to finish hiking and backpacking all of the trails in the White Mountain Guide (1440 miles). He's also finished hiking many of the region's peakbagging lists including the White Mountain 4000 footers, the 4000 footers in Winter, the Terrifying 25, the RMC 100, and the Trailwrights 72. Philip is a 4 season backpacking leader for the Appalachian Mountain Club, a member of the executive committee for the Random Hikers, a Long Trail Mentor for Vermont's Green Mountain Club, and a Leave No Trace Master Educator. He also teaches several compass, GPS, and off-trail navigation courses each year, listed on Outdoors.org.
The post Redlining the White Mountain Guide: Challenges, Strategies, Tips, and Tricks appeared first on Section Hikers Backpacking Blog. from https://sectionhiker.com/redlining-the-white-mountain-guide-challenges-strategies-tips-and-tricks/
“Pull on my ankles!”, I shouted to Ken, from under a house-sized rock in Mahoosuc Notch. I’d dropped a water bottle as I scrambled between the giant boulders in what is often referred to as “the hardest mile on the Appalachian Trail” and didn’t want to leave it behind. Situated in a deep chasm, this one mile section of the Mahoosuc Notch “Trail” is a jumble of broken slabs that have fallen from the cliffs above. They make a fun, but slow and formidable scramble, bookended by a steep climb and descent at the ends. Laughing, Ken pulled me out of the hole and we continued on our merry way. Bridging the White Mountains and Southern Maine, The Mahoosuc Trail is part of a 31 mile section of the Appalachian Trail that runs from Gorham, NH to Grafton Notch in Maine. This section of the trail is quite rugged hiking, even more strenuous than the Presidential Range in the White Mountains to the south. My buddy Ken and I hiked it from north to south in two and a half days this July, during a pleasant stretch of cool sunny weather. Ken’s a professional mountaineering guide who’s hiked and climbed all over the world. He works out of North Conway, NH and is one of my frequent hiking and fishing companions. The biggest difference between hiking on the Appalachian Trail in the Mahoosucs and the White Mountains is the amount of slab that you need to climb up and down on trails. What’s slab? It’s less-than-vertical rock face that requires a lot of friction and balance moves to ascend and descend. While it’s short of rock climbing, it’s often slower than normal hiking and more strenuous because it requires a lot of big leg muscle moves and hand holds. Slab hiking also puts much more pressure on your heels, since your feet and ankles are cocked up for extended periods of time when climbing slanted rock. This can lead to painful hotspots or blisters, even if you’re a seasoned hiker and have tough feet. 
Day One: Grafton Notch to Full Goose ShelterWe dropped a car at the Rattle River trailhead off Rt 2 in Gorham, NH and drove north to Grafton Notch State Park in Maine to start our hike southward. While you can hike this route in both directions, going north-to-south gets the hardest parts over sooner while you have fresh legs. We packed three days of food and planned to hike about 10-12 miles per day, which is a fairly aggressive pace for this terrain. On day one, we started off by climbing Old Speck Mountain, the massive 4000 footer on the south side of Grafton Notch. It’s a steep climb, gaining 2850′ feet in 3.8 miles. While it was sunny, the wind was blowing hard and cold, and I wished I’d brought gloves for the climb. We set a good pace though and were soon at the fire tower on the summit. 
Next, we hiked down to Speck Pond. The 900′ descent down to the pond is all slab and we were thankful that we had dry conditions for it. Speck Pond (3400′), according to the AMC’s Maine Mountain Guide, is one of the highest elevation ponds in the State of Maine. We visited the new AT shelter, which had been built since my last visit to the pond in 2017. 
From Speck Pond we climbed up the North side of a mountain called Mahoosuc Arm, before descending steeply down its north face to the north end of Mahoosuc Notch, considered the hardest mile on the Appalachian Trail. Most northbound AT thru-hikers have to climb Mahoosuc Arm after they hike through Mahoosuc Notch. While the Notch has a fearsome reputation, thru-hikers are more frightened of the Arm than the Notch. Well they should be, because it’s a steep 1500′ climb up steep slab, that is probably even tougher in wet weather. Ken and I hiked down the Arm headed south, so we were spared this climb, although we had a grueling 1000′ climb after the Notch up to Fulling Mill Mountain. Once we were down at the base of the Arm, we hiked to the south end of Mahoosuc Notch. The route through the boulders is not as heavily blazed as the rest of the Appalachian Trail, but the steep side walls of the chasm prevent you from wandering off the route. While this section of trail is a long 0.9 mile scramble from rock to rock, under giant boulders and through lemon squeezers, it’s not insurmountable by most hikers. However, I wouldn’t recommend it for dogs, people with very large backpacks, or doing it in the rain, when the rocks are slippery. Some of the transitions are high consequence if you fall the wrong way. 
Ken and I made it through the Notch is about 90 minutes, but we were starting to seriously tire and we still had to climb another 1000′ of elevation up Fulling Mountain though to make it to our next water source and the Full Goose Shelter. Once there, we set up camp, ate, and went to sleep. We’d had a big day, but we’d also put the hardest part of the route behind us. 
Day Two: Full Goose Shelter to Dream LakeWhile the temperature had gone down to 40 degrees during the night, the sun shone brightly the next morning without a cloud in the sky, perfect conditions for the long stretch of above-treeline hiking we had to do that day. While Mahoosuc Notch gets all the fame along this section of the Appalachian Trail, the open summits south of it are my favorites, including the Goose Eye Mountains, Mount Carlo, and Mount Success, with their miles of sub-alpine boardwalk. We counted our blessings since we were hiking in a clear 3 day weather-window, without rain or thunderstorms to hamper our progress. The last time I’d hiked this stretch of the AT in 2009, I’d been scared witless here by thunder and lightning Our goal for the day was to hike another 10 miles to the Gentian Pond Shelter and campsite, or time-permitting, past it to a dispersed campsite in the vicinity of Dream Lake. After breakfast, we climbed out of the col where the Full Goose shelter is situated before hiking over slab and boardwalk to the north peak of Goose Eye Mountain, near the head of the Wright Trail, a lovely side trail that leads down toward the Sunday River ski area. 
The views were tremendous on this clear day and we could pick out many mountains over 50 miles away that we’d both climbed before including the Percy Peaks, Cabot, The Horn and the Bulge, Saddleback, Washington, Adams, Madison, Jefferson, and Clay. After summiting the Goose Eyes, we travelled over Mt Carlo, and hiked down to the Carlo Col AT Shelter, just off the main trail to resupply our water. While the water sources along the Mahoosuc Trail are known to run low in the summer, we had to use every trick in the book to get water out of the shallow and tepid brook. While I carry a pot to cook my dinners, it sure does come in handy when you need to scoop up water from shallow pools along slow creek beds. 
We returned to the main trail and continued south toward Mt Success, crossing the New Hampshire/Maine state line. After passing an AMC trail crew, digging ditches and hoisting rocks to make water bars, we arrived at the Gentian Trail Shelter and Campsite by about 4:00 pm. The shelter had been taken over by a youth camp which had taken all the tent platforms, dispersed campsites, and the shelter, so we decided to press on to Dream Lake instead rather than deal with them. Despite our fatigue, the trail got much easier to hike after we passed Mt Success, resembling trail conditions in the White Mountains proper, with far less slab. Still we were gassed when we arrived at Dream Lake and found a nice dispersed campsite. I ate the Ritter Bar I’d been saving for desert before dinner, to give me enough energy to make dinner, before hitting the hay. 
Day Three: Dream Lake to Rattle River (Gorham, NH)While the leg from Dream Lake to Rattle River was the easiest on our north-to-south Mahoosuc Traverse, our legs were still pretty smoked when we broke camp the next morning. But we only needed to hike 9 more miles and climb about 1000 feet total to get over Cascade Mountain and Mt Hayes, nothing like the elevation gains of previous two days. We popped into the Trident Col campsite after two hours to get water and the stream was also running pathetically low. So low, that I started warning the thru-hikers we met on the trail about the lack of water at the shelters. The ascent up Cascade wasn’t bad, but the water source in the col between Cascade and Mt Hayes was a muddy puddle and the thought of drinking the water, even filtered, was off-putting. It was hot enough though that we both resupplied, since it was the last sure water source before Gorham. The climb up Mt Hayes was fairly benign and we soon made it to the Centennial Trail Junction, which leads downhill to North Road, the Androscoggin River Damn, and the Rattle River Trail junction just down the road. After a quick descent, we shuttled back up to my car in Grafton Notch and were soon sipping beers at the Sunday River Brewery, planning our next adventure. While many parts of this trip were quite strenuous, it was good to hike the Mahoosucs again and re-experience this portion of the Appalachian Trail. While I remembered many parts, I’d forgotten many parts of the trail and scenery after such a long hiatus. There was a time that I would never have considered re-hiking trails that I’ve hiked before, but my attitude about that has changed in the past few years. It was good to top of my memory of the portions I’d forgotten and to do it with a friend. Total Mileage: 31 miles with 10,650 feet of elevation gain. Recommended Trail Guides
Route Map
The post AT Section Hike: The Mahoosucs and Old Speck Mountain appeared first on Section Hikers Backpacking Blog. from https://sectionhiker.com/at-section-hike-the-mahoosucs/
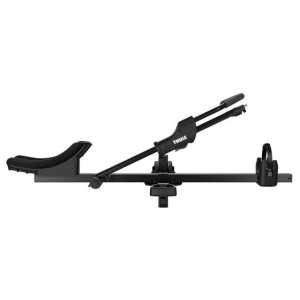
The problem with a lot of bicycle hitch racks is that they don’t fit 5″ fat tire widths or you can only get them in a 2″ truck-sized size hitch. I recently bought a new car with a towing hitch, so I could get a hitch rack capable of carrying a fat bike. Fat bikes are heavy and can bend the arms of a trunk-rack anchored by webbing straps. That was the fate of my last bike rack, which had also been getting on in age and was starting to rust. I knew I wanted to replace it with a hitch rack, so I shopped around and bought a Thule T1 9041 Single Bike Platform Style Hitch Rack, which is compatible for wheels up to 5″ wide and can fit both one and a quarter and two inch car hitches. I’m super happy with it, as I explain below. I thought about getting a rack that could hold two bikes, but the price difference between a one-bike and two-bike fat bike compatible rack is significant and I didn’t want to pay for something I’d only use occasionally. Specs at a Glance:
Advantages of Hitch RacksIf you’re on the fence about getting a hitch rack, they have many advantages over roof racks or trunk racks, especially for fat tire bikes. I wish I’d had a hitch on my old car. It would have made my life a lot simpler. 
Better for heavy bikesHitch mounts have been around for years, but a lot of people still use roof racks to transport their bikes or the kind that mount over your car trunk using straps. Those are both good solutions for conventional bikes, but fat bikes are too heavy to lift over your head and can bend a trunk rack because they’re so heavy. The Thule T1 Single Bike Hitch Rack is a platform style rack that has a capacity of 500 lbs (which you’re unlikely to ever exceed) and its low height, just above bumper height, makes it easy to load or unload a heavy bike. Disk brake alignmentThere’s also the subtler issue of disc brake alignment. If you’ve carefully adjusted your disc brakes so that they spin freely and *don’t* rub against the wheel rotor, you’re going to want to keep them that way. The best way to do that is to keep your wheels on their hubs. Hydraulic or mechanical disc brakes can be a real pain to adjust at trail heads (or at home), so save yourself some grief and get a Thule T1 hitch rack that lets you keep your wheels on. 
StabilityThe Thule t1 rack has a padded swing arm that hooks over your bike’s front wheel and clamps it to the rack in a vertical position. The swing arm is designed like this so it won’t scratch your frame. It’s surprisingly reliable and stable, even in wind at highway speed. I’ve also driven down many horrendously eroded and bumpy dirt roads in my car and the rack and attached fat bike haven’t budged. I’m not sure I understand why the swing arm keeps the bike so secure, but it does the job. The rear wheel is secured by a ratchet strap. Portability and securityThe Thule T1 hitch mount rack is also easy to put on and take off your car. It simply slides onto your hitch receiver and locks in place with a restraining bolt for transport. When you want to take it off, you unscrew the bolt them and slide the rack off. The rack has a handle that makes it easy to carry, so you can store it in your garage or house. Why would you take off a hitch mount? Better gas mileage is one reason, but security is another. When you’re not carrying a bike, you don’t want the hitch stolen. While the Thule T1 rack I bought does have a lock that you can secure over the restraining bolt to prevent theft, it’s not that substantial. While it’s a fine deterrent for highway rest stops and the trailhead, I wouldn’t trust it to protect the rack overnight in an urban area. That’s a good time to take the rack off and store it indoors. 
Rear lift-gate accessWhile it’s not a sure thing on all cars, I can open the rear hatch of my Subaru Crosstrek with a bike on the T1 hitch rack. I need to do this often to collect roadkill for the stew pot (just kidding), so this is a handy feature in my neck of the woods. Road surface clearanceAnother advantage of a Thule T1 hitch rack over a trunk rack is road clearance. With the T1, you always know that the bottom of your tire is resting on the rack platform, which is level with your rear bumper. If you have a high clearance vehicle, you get to use all of the clearance it provides. Worst case, you’ll drag the rack platform on the ground, but your bike will remain safely on top of it. That’s not the case with most trunk and some hitch racks, where your bicycle wheels can hang below the level of the rear bumper. Driving down bumpy dirt roads with your wheels hanging low is a good way to bend the rims or destroy them. With the Thule TI, your wheels remain safe because they sit on top of a steel beam, which protects them from road rash. 
Thule T 1 9041 installationAssembling and installing the Thule T1 9041 Bike Rack takes 30-45 minutes. You can do it entirely yourself without having to take it to a shop. Thule’s assembly instructions are very good, although you’ll want to double-check the spatial orientation of certain parts to make sure you’ve assembled them properly. The product includes all the tools you need for installation (mainly Allen wrenches), although I found a flat head screwdriver useful as well. Wheel compatibilityThe Thule T1 rack is compatible with bike tires up to 5″ in width. While that’s immediately evident with the front wheel, you do need to readjust the rear wheel strap to fit larger tires, since the factory installed position is the shorter of the two. Simply remove the strap and re-thread it higher up on the rear wheel chock. This will give you another 6″ or so of strap length, plenty long to accommodate 5″ and even larger tires. There’s also nothing to prevent you from using the T1 rack with bikes that have narrower tires, RecommendationThe Thule T1 9041 Hitch Rack is a great rack for hauling fat tire bikes with wheels that are up to 5″ wide. It’s easy to install by yourself, and take it off or put it back on again between trips. After years of hauling bikes around on a trunk rack, I cannot believe how convenient it is to haul a bike that on a platform-style hitch rack. Getting a rack like this has made it far easier for me to get out on weekday rides because there’s so much less overhead involved it attaching it to my car and lifting a bike onto it. I’m also more confident about the level of protection that the rack gives my bike, even when I drive down horrendously eroded forest service roads for a some wheeled wilderness exploration. Highly recommended. Compare 5 Prices
Last updated: 2018-07-20 02:31:06
The author purchased this bike rack SectionHiker.com receives affiliate compensation from retailers that we link to if you make a purchase through them, at no additional cost to you. This helps to keep our content free and pays for our website hosting costs. Thank you for your support.The post Thule T1 9041 Fat Bike Hitch Rack Review appeared first on Section Hikers Backpacking Blog. from https://sectionhiker.com/thule-t1-9041-fat-bike-hitch-rack-review/
The Red Ridge Loop is a 10 mile loop hike located just outside North Conway, New Hampshire that climbs the steep and rocky summit of North Moat Mountain before descending the Red Ridge Trail down a series of open ledges with awesome views of Mt Washington and the lesser summits of the Mt Washington River Valley. With close to 3000 feet of elevation gain, this is a moderately strenuous hike, but well worth the climb for the views. Hikers finish near Diana’s Baths, a famous White Mountains waterfall and swimming hole, that’s perfect for a refreshing dip at the end of the hike.
Recommended Waterproof MapDistance and Difficulty Rating
Trailhead Directions
Season
Printable Trip Plan Map and GPX FileTrail Sequence
On the TrailThis hike runs counter-clockwise along the route shown above, climbing North Moat Mountain first, before descending along the Red Ridge Trail. Follow the Moat Mountain Trail from the Trailhead, passing through a developed recreation areas that leads to by Diana’s Baths, a popular waterfall and summertime swimming hole on your left. This is a great place to stop at the end of the hike for a refreshing dip on a hot day. 
Continue along the Moat Mountain Trail which runs along Lucy Brook. At 1.2 miles, you’ll pass the southern end of the Red Ridge Trail Junction where it crosses a brook and rejoins the Moat Mountain Trail. Continue past the junction and stay on the Moat Mountain Trail which crosses several small brooks. At 2.4 miles, you’ll arrive at a trail junction with the Attitash Trail. Veer left here, following the Moat Mountain Trail and begin to climb, passing through mixed scrub, which gradually gives way to open ledges as you climb toward the summit of North Moat Mountain. This is the steepest section of the hike, so set a comfortable pace as you climb. 
At 4.2 miles, you’ll reach the open summit of North Moat Mountain (3196′) which has 360 degrees views that include Mt Washington and Mt Chocorua. There many good places to sit at the summit, which is a fine place to take a break and admire the views. If you look to the southeast, you can also make out the open ledges of the Red Ridge Trail as they descend to the valley below. 
Leaving North Moat, continue southeast along the Moat Mountain Trail, dropping down a series of ledges that require a bit of scrambling. After passing another open viewpoint, you’ll enter a wooded stretch, climbing again towards the junction with the Red Ridge Trail at 5.3 miles, turning left to follow it. There’s a good chance you’ll encounter wood grouse guarding their nests at the top of the trail who may screech an alarm as you approach. There’s no need to fear them. They’ll run away as you approach, although they may be agitated. 
As you descend, take a moment to admire the profile of North Moat Mountain over your right shoulder. 
Follow the cairns that mark the Red Ridge Trail carefully, while admiring the grand views that of the Mt Washington Valley that open up before you. Hikers in the White Mountains yearn for these grand expanses of open ledge and the vistas that they offer. 
After approximately a mile, the trail drops down below treeline again, descending steeply down open ledges that require careful footwork. After passing once again through forest, it rejoins the Moat Mountain Trail at 8.9 miles after a brook crossing, which is often rock hoppable in low water. Turn righ tonto the Moat Mountain Trail at this junction (which you passed early in the route) and continue for 1.1 miles, once again passing Diana’s Baths on the way to the trailhead parking lot.
About Philip Werner: Philip is the 36th person to finish hiking and backpacking all of the trails in the White Mountain Guide (1440 miles). He's also finished hiking many of the region's peakbagging lists including the White Mountain 4000 footers, the 4000 footers in Winter, the Terrifying 25, the RMC 100, and the Trailwrights 72. Philip is a 4 season backpacking leader for the Appalachian Mountain Club, a member of the executive committee for the Random Hikers, a Long Trail Mentor for Vermont's Green Mountain Club, and a Leave No Trace Master Educator. He also teaches several compass, GPS, and off-trail navigation courses each year, listed on Outdoors.org.
Safety DisclaimerThis trip plan can not alert you to every hazard, anticipate your experience, or limitations. Therefore, the descriptions of roads, trails, routes, shelters, tent sites, and natural features in this trip plan are not representations that a particular place or excursion will be safe for you or members of your party. When you follow any of the routes described on SectionHiker.com, you assume responsibility for your own safety. Under normal conditions, such excursions require the usual attention to traffic, road and trail conditions, weather, terrain, the capabilities of your party, and other factors. Always check for current conditions, obey posted signs, and Backcountry Camping and Wilderness Area Regulations. Hike Safe and follow the Hiker responsibility code. SectionHiker.com receives affiliate compensation from retailers that we link to if you make a purchase through them, at no additional cost to you. This helps to keep our content free and pays for our website hosting costs. Thank you for your support.The post Great Hikes in the Whites: The Red Ridge Loop appeared first on Section Hikers Backpacking Blog. from https://sectionhiker.com/great-hikes-in-the-whites-the-red-ridge-loop/ |

ABOUT MEHello my pleaseure to introduce myself, I am Jose Johnson. I am 26 years old from Monroe, LA. I love to got for hikings with my friends on holidays. Archives
April 2019
Categories |


 RSS Feed
