|
The Appalachian Mountain Club (AMC) announced plans today build an underground parking garage at The Highland Center, its conference center hotel in the Crawford Notch, at the foot of the Presidential Mountain Range near Mt Washington in New Hampshire. The new garage will have space for 415 cars and service Highland Center guests as well as walk-in hikers and backpackers. “The lack of parking for hikers has become a critical safety issue in Crawford Notch,” explained John Judge, the CEO of the AMC. “Every weekend there’s an unsightly line of illegally parked vehicles a mile long on both sides of the road in front of the Highland Center that obscures the view of the famous mountain pass.” “We’ve tried to educate hikers about the pedestrian safety issues of parking along the side of the road in Crawford Notch and how cars interfere with road clearing operations,” said NHDOT Spokesperson Sandy Ahearn, “but it’s been a losing battle. A portion of the garage’s future proceeds will help fund NHDOT operations and illegally parked cars in the notch will be towed at the owner’s expense.” In addition to parking, the garage will have a bookstore where hikers can purchase maps, a cafeteria, and coin-operated showers much like the facilities at the AMC’s Joe Dodge Center at the base of Mt Washington in Pinkham Notch. While parking will be free to Highland Center Guests, a fee will be charged for day visitors, although AMC members will receive a discount rate. The garage will be buried under the large alpine meadow in front of the Highland Center. Construction is expected to take two years to complete since winter weather makes excavation difficult. Local environmental and community groups have raised concerns about erosion and construction impacts to nearby Saco Lake and the headwaters of the Saco River, which originate across Rt 302 from the Highland Center. Judge acknowledges these, but explains, “Conservation is our business. You can trust us to protect the fragile mountain and river ecology, since it’s in our mutual interest to protect the natural and historic legacy of Crawford Notch for future generations.” About the Appalachian Mountain ClubFounded in 1876, the Appalachian Mountain Club promotes the protection, enjoyment, and understanding of the mountains, forests, waters, and trails of America’s Northeast and Mid-Atlantic regions. We believe these resources have intrinsic worth and provide recreational opportunities, spiritual renewal, and ecological and economic health for the region. Because successful conservation depends on active engagement with the outdoors, we encourage people to experience, learn about, and appreciate the natural world. Click for reservations at the Highland Center and the AMC’s other Camps and Lodges. Group rates are available. April Fools! The post Appalachian Mountain Club to Build Underground Parking Garage in Crawford Notch appeared first on Section Hikers Backpacking Blog. from https://sectionhiker.com/appalachian-mountain-club-to-build-underground-parking-garage-in-crawford-notch/
0 Comments
There’s nothing worse than chafing on a hike or backpacking trip between your thighs or butt cheeks. Often called monkey-butt or baboon ass, it is absolute agony and gets worse with every step you take. Here are some trail-tested ways to prevent chafing and cure it quickly if you have the bad luck to experience it. Hiking Underwear (No Cotton)The most important way to prevent butt and thigh chafing is to wear synthetic underwear, compression shorts, or lined running shorts that will not absorb moisture. This means NO COTTON underwear. Cotton absorbs your sweat when you hike and sticks to your skin. The seams of cotton underwear will then scrunch up between your thighs and rub your skin raw. You should also avoid wearing underwear made of modal, rayon, viscose, tencel, lyocell and bamboo. All of these materials are made of wood fibers and behave very similarly to cotton when they get damp or wet. Wool baselayers also absorb sweat and are slow to dry, but many people prefer them because they stink less than synthetic underwear when they accumulate sweat. On the other hand you can easily rinse out synthetic underwear and it will dry a lot faster than wool. I recommend that your hiking underwear have at least a 6″ long leg to protect the top of your thighs from friction. That means no bikini underwear or thongs! In cooler weather, wearing a 9″ long leg will also keep you warmer. I prefer Under Armour Mesh Boxer Jocks in hot weather and have never had any chafing while wearing them. Never ever. Many people also like Ex Officio Give-N-Go Boxers, which are available for men and women.
Lubricate Your SkinMany hikers pre-treat their skin with an anti-friction lubricant like Body Glide which is a mixture of zinc oxide and antiperspirant. If you take this route you need to apply Body Glide before your skin is rubbed raw or else it will sting like hell when you apply it. Vaseline is also an inexpensive lifesaver and a great fire starter, too Protect and Soothe Your SkinIf you’ve got the chafe, you need the cure. I think Zinc Oxide Ointment is by far the best treatment available for chafing. It’s the same white cream your mum used to put on your bum when you had diaper rash and sold as Desitin, Anti-Monkey-Butt Cream, and Boudreaux’s Butt Paste Diaper Rash Ointment. If you put it on at bedtime (be sure to wear some underwear to avoid getting your sleeping bag/quilt dirty) it is a VERY EFFECTIVE cure, and immediately soothes and protects raw areas, healing most overnight. Zinc oxide is also the active ingredient in Dermatone Z-cote sun block and is easily carried in a little 0.5 oz tin. It doesn’t take much to make you feel better. Don’t Tuck in your ShirtIf you’re wearing a backpack in summer, you are going to be sweating. That sweat is going to drip down your back and soak your underwear if you tuck your hiking shirt into your pants. So don’t tuck your shirt into your hiking pants. This works very well and will keep you crack drier. Ventilated BackpacksUsing a ventilated backpack, one with a suspended mesh back, can also cut down on the amount of sweat dripping down you back. You’re still going to sweat, just not quite as much. See Top 10 Ventilated Backpacks, for some ideas about good ultralight and lightweight backpacks with mesh backs. Polish That HoleMake sure you clean your butthole carefully and completely after using the privy. It’s common sense, but you want your toilet paper to come back lilly white and clean after a deuce. Dried excrement can be a nasty skin irritant, especially when it’s mixed with your perspiration and constant friction. Yuck! Prevention is key. Stay CleanThis is common sense, but you’d be surprised how many people forget to wash or rinse their nether regions if they’re on a backpacking trip.
How do you prevent chafing or cure it? See also:
Written 2018. Disclosure: SectionHiker.com receives affiliate compensation from retailers that sell the products we recommend or link to if you make a purchase through them. When reviewing products, we test each thoroughly and give high marks to only the very best. Our reputation for honesty is important to us, which is why we only review products that we've tested hands-on. Our mission is to help people, which is why we encourage readers to comment, ask questions, and share their experiences on our posts. We are independently owned and the opinions expressed here are our own.The post How to Cure and Prevent Butt Chafing on Backpacking Trips appeared first on Section Hikers Backpacking Blog. from https://sectionhiker.com/how-to-cure-and-prevent-chafing-on-backpacking-trips/
Tenkara fly fishing is a minimalist style of fly fishing used for stream fishing. With an emphasis on simple lightweight gear, this form of fishing is perfect for backpackers who want a richer wilderness experience in the backcountry. There’s nothing like hiking into an isolated pool drop on a remote mountain stream and playing hide and seek with elusive wild trout to make you appreciate the simplicity of life and the power of patience. While some people are crazy strict in their interpretation of Tenkara “philosophy” and gear, I’m more of a pragmatist, willing to use whatever gear and flies work for my local mountain streams. If you fish in New England mountain streams, where the trout are small and wily, you need to be willing to experiment and adapt techniques and fly patterns used by reel fisherman, as well as your Tenkara peers. Here’s a look at my Tenkara Fly Fishing kit since pictures illustrate how simple it is to get outfitted for this style of fishing. The gear pictured here weighs about 12 ounces total, but I could easily halve that it I cared to. The real weight savings comes from the fact that I can fish in my normal backpacking clothes without the need for waders or wading boots. That’s the beauty of fishing smaller mountain streams where you can reach eddies along the opposite bank with a simple cast or rock hop from pool to pool. Tenkara Rod/CaseI own a half-dozen Tenkara rods in a variety of lengths, but the rod I carry most of the time is a 12′ Tenkara USA Iwana because it has a lightweight and precise feel with excellent sensitivity so I can feel light strikes on my fly. At the same time, it has a soft enough tip action that it doesn’t overpower small fish and pull the hook out of their mouth. I carry it in the stock Tenkara USA rod case. While there are lighter weight cases available, I use this one because I can fit a second rod into it when I feel like carrying one. Line and TippetI use high visibility orange Sunline Buttobi 4 weight flourocarbon level line, usually between 9′ and 11′ long. The high visibility flourocarbon is much more sensitive than a braided line for detecting strikes and the bright color makes it easy to see when my tippet gets pulled down by a fish. I rarely need to change a line in the field, but I carry extra in the field just in case. I use Frogs Hair Tippet 4x, usually somewhere between 2′ and 6′ in length depending on the stream, its depth, and the amount of wooden debris in it. I connect the tippet to the flourocarbon using a tiny tippet ring, so I don’t have to tie a knot to connect the flourocarbon to the tippet (and shorten it) every time I need to replace the tippet. I usually go through about 2 tippets a day. I keep my line on the rod most of the time using Fuji EZ keepers, hooking a fly into the cork handle. Some people like to store their line on little reels and only attach them when they get to the water, but I’m out frequently enough that I leave everything attached and set up. Nippers and HemostatsThe nippers are essential for cutting line and tippet. They have built-in nail knot tool which I mainly use for reel fishing, which I do on occasionally on larger rivers and ponds. The hemostats come in handy for removing deeply embedded hooks that don’t slip out of fish mouths or for mashing barbed hooks flat that I missed mashing with my vice when I tie my flies. The little ‘biner lets me connect them to my shirt or pack easily, so I can find them without having to look. Fishing GloveThis Buff fishing glove used to be part of a pair, but I lost the other one somewhere, and haven’t replace it yet. While it provides sun protection for the top of my left hand, I mainly use it to grab hold of the fish I catch instead of using a net. The outside of the glove has an embossed silicon pattern that doesn’t strip away the protective mucus that coats fish bodies, so I can grab them, pull out the hook, and release them back into the stream. I used to carry a Tenkara net, but it was really awkward to carry in a backpack and overkill for the smaller fish I catch. Flies/Fly BoxI’m probably like most fisherman in that I bring many more flies to a river than I need. But I like having a little variety, just in case the fish express a preference on any given day. This fly box holds about 130 flies, although on most days I usually only use (and lose) a couple. I tie all of my own flies because I enjoy doing it. It’s really not hard and helps to enrich the overall experience. I tie a variety of simple soft hackle patterns, wooly buggers, bugs, scuds, and terrestrials like worms and ants. Last year, I used a Stewart Black Spider almost exclusively and caught lots of trout with it. It’s quite similar to a Japanese reverse hackle but Scottish in origin, and easily tied with just thread and a starling feather.
Advice for Getting StartedIf the thought of Tenkara fly fishing appeals to you, it’s easy to get started. I took a two-hour guided lesson with a fishing guide recommended by a friend and then taught myself everything else by watching youtube videos, scouring the Tenkara Bum website, and practicing on streams. Since then, Daniel Galhardo the owner of Tenkara USA, has written an excellent and richly illustrated intro book called “Tenkara” that I can highly recommend and that will help accelerate your learning process. I wish I’d had it a few years ago. See Also:Written 2018. Disclosure: SectionHiker.com receives affiliate compensation from retailers that sell the products we recommend or link to if you make a purchase through them. When reviewing products, we test each thoroughly and give high marks to only the very best. Our reputation for honesty is important to us, which is why we only review products that we've tested hands-on. Our mission is to help people, which is why we encourage readers to comment, ask questions, and share their experiences on our posts. We are independently owned and the opinions expressed here are our own.The post Tenkara Fly Fishing Gear List appeared first on Section Hikers Backpacking Blog. from https://sectionhiker.com/tenkara-fly-fishing-small-stream-gear-list/
A Willey Range Loop is a moderate 2-3 day, 22 mile loop that climbs four 4000-footers: Mts Tom, Field, and Willey in the Willey Range, before looping past the magnificent Thoreau Falls, Zealand Falls and climbing Mt Hale on the opposite side of the Zealand Valley. The route follows several quite scenic, but seldom used trails that provide an intimate glimpse of the Lincoln Woods Scenic Area. This is an exceptionally pretty route in autumn when the trees in Crawford Notch and the Pemigewasset Wilderness are ablaze in color. 
Rating/Difficulty*****/3 out of 5 Distance/Elevation Gain22 miles w/5500′ of cumulative elevation gain White Mountain 4000 Footers
Recommended Duration2-3 days Seasonmid-June thru October Permits RequiredNone. RegulationsBackcountry Camping Regulations for the White Mountain National Forest. The area around Thoreau Falls is in a Wilderness Area. Please observe all wilderness area regulations. Trailhead DirectionsTrail SequenceThe route follows the following trails in sequence. Refer to the AMC White Mountain Trail Map 3-4: Crawford Notch-Sandwich Range (2017 ed), which is the best waterproof map available for this region, although I’d recommend buying the complete AMC White Mountain Waterproof Map Set (2017 ed) rather than one map at a time. More detailed trail descriptions can be found in the AMC White Mountain Guide (2017 ed), which is considered the hiking bible for the region. Take photos of the pages using your phone for easy reference, instead of carrying the entire book with you on hikes.
Scenic HighlightsThe following list provides cumulate distances on the route to each view or landmark.
Camping/Shelter Options
WaterNatural water sources are plentiful in the White Mountains although you may need to descend to them from ridgelines along side trails if you run short. In any case, carry a detailed topographic map with you and don’t rely on the overview map provided with this trip description to find water sources. I also recommend purchasing the WMNF Pemigewasset Map in Guthooks Guide’s New England Hiker Smartphone App (IOS, Android) which is a GPS guide to all of the trails, trailhead, shelters, campsites, views, and water sources in the White Mountains National Forest. I use it all the time and it is much more complete and current than using the maps bundled with the Gaia Smartphone App. On the TrailThe Zealand Trailhead is located in the parking at the end of gravel-topped Zealand Road, off Rt 302. From the trailhead, follow the Zealand Trail for 2.3 miles along an old railroad grade that was used to haul lumber out of the Zealand River Valley. 
The trail is easy to hike and passes a variety of beaver meadows and ponds. Most of the stream crossings and wet areas have bridges or boardwalks, although the trail can become wet after very heavy rains. This trail leads the AMC Zealand Falls Hut, so it’s very well maintained and a popular route. 
At the A-Z Trail Junction, turn left and climb gently at first, then more steeply, to the col between Mt Tom and Mt Field in 2.7 miles. This less travelled trail provides a convenient back-way between the AMC Highland Center in Crawford Notch and the Zealand Falls Hut, although it’s seldom used by day hikers. The trail crosses a wet area over planked bog bridges, which can be slippery if wet. When crossing bog bridges, go slow and avoid building momentum, since it’s very easy to slip if you try to stop abruptly. If you’re running low on water, there are a few small streams along this stretch where it’d be good to resupply, since the trails are dry from this point on, until you descend the south side of Mt Willey. 
When you reach the Willey Range Trail Junction, stay on the A-Z Trail for another 80 yards until you come the Mt Tom Spur Trail. Turn left onto it and ascent to the Mt Tom summit in 0.6 miles until you reach the summit cairn. There are several viewpoints off the trail that have been cut in recent years, including a south-facing one with a view of Mt Washington. Retrace your steps to the beginning of the Mt Tom Spur Trail and turn right onto the A-Z Trail, hiking back 80 yards to the Willey Range Trail Junction. Turn left and head toward Mt Field, 0.9 miles down the trail, climbing gradually through forest, until you come to the summit cairn. There are two views just before the summit, one overlooking Mt Washington and Crawford Notch to the east and the other to the west, overlooking the Mt Zealand and the Bonds. 
From Mt Field, continue along the Willey Range Trail to the Mt Willey summit, past several cols and false summits until you reach the short summit spur trail. The best view is on the south side of the summit from an open ledge overlooking Crawford Notch. There is an expansive view of the Saco River Valley and the Notch from this viewpoint, including the dramatic cliffs of Mt Webster on the other side of the valley. The word “Notch” is synonymous with a mountain pass in the local parlance. 
Continue down the south side of Mt Willey, descending a series of wooden ladders that look like they’re props in an M.C. Escher painting. I’ve always found it easiest to walk down them like walking down stairs, knowing that I can always sit down if I’m feeling unsteady. Once again, try to avoid building any momentum and take your time in descending. There’s a stream at the very bottom where you can resupply your water if needed. 
You’ll soon arrive at the Ethan Pond Trail junction. Turn right onto the trail and climb to height of land. Continue through forest for one mile to the spur trail leading to the Ethan Pond Lean-to and campsite. This is a good place to stop and camp for the night. Moose frequent the pond at the foot of the campsite, which also has good fishing. Dispersed camping beyond this point, along the Ethan Pond Trail is rather poor, so it really is your best bet for a comfortable night. 
From the campsite spur trail, turn right onto the Ethan Pond Trail hiking through dense and mossy forest over occasional bog bridges. This area drains into the North Fork of the Pemigewasset River which is hidden to your right, beyond the trees. The water in the river is colored a deep red from leaf tanins. Hike 2 miles, passing the Shoal Pond Trail on your left, until you come to the Thoreau Falls Trail. Turn left onto it and pass the Wilderness Boundary, where you’ll soon come to a large ledge at the top of a beautiful curving waterfall that drops 80 feet in a series of cascades and slides. There is a good view of Mt Bond from the top of the falls, but be cautious when walking out on the ledge, which can be slippery when wet. 
Backtrack to the Ethan Pond Trail, turning left at the junction, crossing to enter Zealand Notch. In 0.8 miles, you’ll pass the Zeacliff Trail on your left, which climbs 1200 feet to a ledge overlooking the valley. Avalanche debris from Whitewall Mountain on your right litter the valley floor. 
Continue straight ahead for another 2 miles over easy trail, turning left at the Twinway Trail junction, and hike 0.2 miles to the AMC’s Zealand Falls Hut. There’s a short spur trail on your left before reaching the hut, which brings you to the base of Zealand Falls. When you get to the hut, drop your pack on the porch and go inside to look around. The Hut crew (spelled locally as “croo”) sells drinks and baked goods during the day for passing hikers. Potable water is also available for free, along with a bathroom. 
Exit right from the hut porch and follow the Twinway a short distance, turning right onto the Lend-a-Hand Trail, which climbs 2.7 miles through forest to the summit of Mt Hale, the fourth 4000-footer on this route. The summit of Hale is open with limited views. But it has a large rock cairn, with magnetized rocks that can temporarily throw a magnetic compass off-kilter. Descend from Mt Hale on the Hale Brook Trail which leaves from the north side of the summit, and winds moderately down the mountain, until you reach the trailhead on Zealand Road. When you reach the road, turn right and walk about a mile back to the Zealand Trailhead, where you car is parked, and this journey ends. Written 2018. Safety DisclaimerThis trip plan can not alert you to every hazard, anticipate your experience, or limitations. Therefore, the descriptions of roads, trails, routes, shelters, tent sites, and natural features in this trip plan are not representations that a particular place or excursion will be safe for you or members of your party. When you follow any of the routes described on SectionHiker.com, you assume responsibility for your own safety. Under normal conditions, such excursions require the usual attention to traffic, road and trail conditions, weather, terrain, the capabilities of your party, and other factors. Always check for current conditions, obey posted signs, and Backcountry Camping and Wilderness Area Regulations. Hike Safe and follow the Hiker responsibility code. Disclosure: SectionHiker.com receives affiliate compensation from retailers that sell the products we recommend or link to if you make a purchase through them. When reviewing products, we test each thoroughly and give high marks to only the very best. Our reputation for honesty is important to us, which is why we only review products that we've tested hands-on. Our mission is to help people, which is why we encourage readers to comment, ask questions, and share their experiences on our posts. We are independently owned and the opinions expressed here are our own.The post A Willey Range Loop Trip Plan: Backpacking the 4000 Footers Guidebook appeared first on Section Hikers Backpacking Blog. from https://sectionhiker.com/a-willey-range-loop-trip-plan-backpacking-the-4000-footers-guidebook/
The Gossamer Gear Murmur is one of oldest continuously made frameless ultralight backpacks available today. While the materials it’s made with have evolved over the years (this is the third time I’ve reviewed the Murmur since 2009), the basic ultralight design remains unchanged. This is a backpack designed for people with a base gear weight (minus food, fuel, and water) of 10 pounds or less, with a max recommended load of 15 pounds. It’s a specialized pack and one that Gossamer Gear warns many potential customers off when they say “if you’re not sure if it’s the right pack for you, it probably isn’t.” Specs at a Glance
Backpack Organization and StorageThe Murmur is set up like a typical UL pack with a roll top closure, a front mesh pocket, and side water bottle pockets. The roll top has a plastic stiffener on the edge to make it easier to close, and provides great top down compression for stabilizing the load. The roll top straps that hold it closed terminate at the top of the side water bottle pockets, so they don’t interfere with their use. This is just one of the details that makes this such a refined backpack. The side water bottles are tall and narrow, ideally sized for carrying 1L Smartwater bottles, although regular 1L size plastic bottles work just as well. It’s also easy to reach back and pull a bottle out or replace it afterwards. If you prefer using a hydration system, the pack has three internal hang loops, with dual hydration ports above the shoulder straps. 
The Murmur also comes with a minimal and non-load-bearing hip belt that has two mesh-faced zippered pockets. These are tiny and can barely fit a iPhone 6. The hip belt is attached to the pack with plastic clips that make it completely removable if you don’t want it. It can be useful however, to help stabilize the pack and keep it from bouncing if you’re fastpacking or trail running. I’d prefer having a hip belt option that didn’t have the hip belt pockets and was just a piece of webbing with a center buckle. But if you really have a light load, chances are you’ll remove the hip belt anyway and carry the Murmur like a ruck sack. 
The front mesh pocket is designed to hold layers and snacks that you want fast access to during the day, so you don’t have to open the main pack up. This reduces your transition times and breaks, thereby increasing the number of miles you can hike in a day. The mesh pocket can also be used to hold or dry wet items like a water filter or wet tarp that you don’t want mixing with dry gear inside the pack. The main pack bag is made with very lightweight 30 denier Robic nylon, which is nearly transparent. The high abrasion points at the base of the pack and on the bottom of the water bottle pockets are made with tougher 70 denier Robic, but this is a pack you need to treat gently because it will get ripped to shreds if you take it into dense vegetation. 
When packing a pack like the Murmur, which doesn’t have a rigid frame, you want to avoid overstuffing the main pack bag to avoid having it barrel into your back. At the same time, you want to pack so that your load “becomes a frame” and provides its own structure. One way to achieve this is to pack your gear loose, without stuff sacks, so you avoid corners and voids inside the main pack bag. Loose gear compresses rather well, congealing into a rectangular-shaped mass that works well with this pack. If you find yourself packing the Murmur high into the extension collar, you probably have too much gear, and should consider using a higher volume backpack. One technique for adding structure to a frameless pack, is to roll up a foam sleeping pad, stick it in the main compartment, and that fill the middle with your gear. I’ve tried this with the Murmur and it doesn’t work that well, because the main compartment “wants” to maintain a rectangular shape and not a roundish one. External Attachment and Compression SystemThe Murmur doesn’t come with any side compression straps. It’s easy to add them though with some cord and cordlocks, using the gear loops found along the seams of the pack. Gossamer Gear sells accessory compression cord sets for just this purpose and I use them to customize the attachment points on many of my other packs as well. 
The pack has an ice axe loop, and trekking poles holders which are good when you need to put your poles away and scramble up rock ledges. Shaft holders are included, a convenience which some backpack makers inexplicably omit. Backpack Frame and Suspension SystemWhile the Murmur is a frameless backpack, it has an external pad pocket that can be used to give the pack a little structure and back-padding. This a signature feature on all of Gossamer Gear’s overnight backpacks and you’ll be surprised by how useful it is. It’s great to whip out to sit on wet ground or as a warm seat while sitting around a fire at night. I use mine as a mini-porch if I’m under a tarp and as extra “oh-shit” insulation if I experience cold butt syndrome in a hammock. The sit pad is so useful that I carry it with other non-Gossamer Gear backpacks, as well. 
The pad has a sculpted surface that won’t stick to your back when you sweat and is covered at the top and the bottom with breathable mesh sleeve to wick away perspiration. When you want to pull the pad out of the sleeves, you grab it by the middle and pull. The breathable mesh is stretchy, making it easy to re-insert the pad into the pad sleeves when you want to get moving again. There’s nothing forcing you to use the sit pad that Gossamer Gear supplies with the pack and some people roll up thinner but longer pieces of foam and stick them back there instead. However, accordion pads like a Therm-a-rest Z-Lite or the Gossamer Gear Nightlight don’t work well because they’re too thick and move the back of the pack to far away from your shoulders and core. 
The shoulder straps are not padded at all. They’re covered with a breathable mesh and very minimal, without any daisy chains to hang gear from. They are only available in a J-shape however, and may be uncomfortable if you have a well-developed chest or big breasts. The sternum strap can be adjusted by moving it up or down or you can just remove it altogether, which is fairly common when using a pack this light. RecommendationIs the Gossamer Gear Murmur 36L right for you? The question is worth repeating because this isn’t a suitable overnight or multi-day backpack unless you have a dialed-in ultralight gear list with highly compressible gear that doesn’t take up much space. The Murmur is a great backpack, but far less forgiving than other frameless backpacks that are made with thicker, more structured fabrics that rely less on load structure to maintain their shape: packs like the Zpacks Nero 38, the SWD Superior 30, the Mountain Laurel Designs Burn 38, or even the Gossamer Gear Kumo 36. That doesn’t mean that the Murmur is less suitable for its intended purpose, but it’s not a backpack that I’d recommend for someone who hasn’t fully embraced a sub-10 pound gear list. Disclosure: Gossamer Gear provided the author with a sample backpack for this review. Written 2018. See Also:
The post Gossamer Gear Murmur 36 Hyperlight Backpack Review appeared first on Section Hikers Backpacking Blog. from https://sectionhiker.com/gossamer-gear-murmur-36-backpack/
One person, solo backpacking tents are ideal if you’re thru-hiking, fast-packing, or backpacking big miles and want to trim your gear weight as low as possible. More livable than bivy sacks, one person tents are designed for sleeping and to protect you in bad weather. While some solo tents are more plush and spacious than others, you almost always have to choose between competing priorities including weight, ease of use, durability, and costm when selecting one. This can make it tough to choose between tents, especially since few stores have display models so you can see the tents first-hand. Taking these different priorities into consideration, here are our picks for the top 10 one-person tents of 2018. 1. NEMO Hornet 1
Weighing just 27 oz, the Hornet 1 is a lightweight double-wall tent with a side entrance and vestibule that make it easy to get in and out of. Semi-freestanding, it’s easy to set up, with excellent ventilation between the inner tent and rain fly to help reduce tent condensation. Aerodynamic vents encourage airflow, while the high bathtub floor provides prevents cold wind from chilling you inside. When the rain fly is not needed, you can use the inner tent like a bivy sack to watch the stars.
2. MSR Hubba NX Solo
The MSR Hubba NX Solo is a 39 oz double wall tent with a side entrance and vestibule, so you can store your extra gear under cover and still get in and out of the tent easily. The tent is easy to set up with a dual hub pole structure that provides excellent head and foot room, in addition to an overhead eyebrow pole that creates vertical side walls to increase livability. The same pole structure provides excellent stability in wind conditions, while rain fly vents help prevent internal condensation.
3. REI Quarter Dome
The REI Quarter Dome 1 is a highly livable 39 oz double wall tent with vertical side walls and plenty of head and shoulder room. The hubbed and shock-corded pole assembly combines is color codes to simplify setup, while adjustable stakeout points make stake placement easy and allow for quick vestibule tensioning. Abundant mesh and a roof vent help prevent internal condensation, while a variety of pockets and hang loops help organize the interior. This tent is surprisingly affordable and quite a good value.
Check out the latest price at: 4. Eureka Spitfire 1
The Eureka Spitfire 1 is a 44 oz double-wall tent loaded with mesh for great ventilation with ample headroom and interior living space. A deep bathtub floor with taped seams protects against splashing rain while internal pockets provide gear storage. The tent’s hoop-style aluminum poles lock into corner grommets making set up fast and easy, while requiring just 2 stakes to secure the inner tent. A large side entry door provides easy access, while the rain vestibule provides gear protection.
5. The North Face Mica 1
The North Face Mica FL 1 is a one person double-wall tent that weighs 32.5 ounces. The inner tent is freestanding, making it very easy to set up, and the rain fly only requires an additional 2 stakes to pitch. Steep side walls and the curved pole architecture provide plenty of head room, while an inner tent length of 85? gives tall people plenty of room to stretch out. The tent also comes bundled with an optional footprint (not shown) which is unusual, since most tent manufacturers charge people extra for them.
6. Yama Mountain Cirriform SW Dyneema
The Yama Mountain Gear Cirriform SW is a 21.4 oz single-wall tarp shelter with a front vestibule and a deep bathtub floor. The Cirriform is a great for squeezing into tight spots in dense forest, but doesn’t sacrifice wind or rain protection like an open tarp. It requires two trekking poles to set up, although you can also use a short tree branch for the rear pole support if that’s all you have available. The Cirriform SW is made with Dyneema DCF (formerly called cuben fiber) making it tough, ultralight, and waterproof. Less expensive, but heavier versions are also available in a number of different fabrics and fabric combinations.
Check out the latest price at: 7. ZPacks Altaplex
The ZPacks Altaplex is a hybrid, single-wall, double-wall tarp tent with a floating bathtub style floor and mesh front wall. Weighing 17.9 ounces, the Altaplex is sized inside for one person plus their gear. It requires one trekking pole or tent pole (optional) to pitch and has a front vestibule which can tied open in good weather. The Altaplex, like all of ZPacks shelters is made with DCF (formerly called cuben fiber) which is a very lightweight and waterproof laminate that is taped together rather than sewn. DCF can be rather noisy in heavy rain and provides limited privacy since its translucent, but it is puncture resistant and easy to repair with tyvek tape.
Check out the latest price at: 8. Gossamer Gear “The One”
Gossamer Gear’s “The One” is is an ultralight, single-walled trekking-pole tent that weighs 21.65 oz. It has a spacious interior that’s a palace for one, with excellent ventilation to help prevent internal condensation. Factory seam-taped, there’s no need to seam seal The One which is made with an ultralight PU coated silnylon fabric instead of cuben fiber to help keep its price competitive. The front vestibule is quite large with a zippered center opening which can be closed shut in inclement weather, or partially or completely rolled back for views and ventilation. It’s also large enough to store your pack under one of the doors and get in and out through the other.
Check out the latest price at: 9. Tarptent Notch 1
The Tarptent Notch is a 27 oz, one-person double-wall tent that can be pitched as a standalone fly or a complete double walled tent with an inner tent, making it a cost-effective option for many kinds of trips ranging from UL fast packs to car camping. The Notch is a trekking pole tent with two peaks and two vestibules, that provide excellent storage for gear and make it easy to get in and out of the tent. Internal ventilation is excellent and the tent is very windworthy in stormy weather. The inner tent is available in an all mesh version or one with solid walls for cold weather use. Mode of silnylon, the Notch must be seam-sealed. A new DCF version is also available.
Check out the latest price at: 10. Six Moon Designs Lunar Solo
The Six Moon Designs Lunar Solo is an ultralight style, single walled tent that’s pitched with a single trekking pole. Weighing just 24 ounces, the Lunar Solo is quite lightweight and easy to set up. It has a bathtub style floor to prevent flooding in rain and a side door, making entry easy. The interior is quite roomy, with a pentagon shaped floor, providing room to store your gear in the tent, and plenty of head room to sit up inside. A large vestibule also provides gear storage and room to cook in bad weather.
Check out the latest price at: Check out SectionHiker’s Gear Guides
Written 2018. Disclosure: SectionHiker.com receives affiliate compensation from retailers that sell the products we recommend or link to if you make a purchase through them. When reviewing products, we test each thoroughly and give high marks to only the very best. Our reputation for honesty is important to us, which is why we only review products that we've tested hands-on. Our mission is to help people, which is why we encourage readers to comment, ask questions, and share their experiences on our posts. We are independently owned and the opinions expressed here are our own.The post 10 Best One Person Backpacking Tents of 2018 appeared first on Section Hikers Backpacking Blog. from https://sectionhiker.com/10-best-one-person-backpacking-tents-of-2018/ 
I’ve been evaluating a mobile navigation app for the past few months called Topo Maps+ (IOS only) that lets you print maps and routes to wireless printers without having to go through a computer or an internet portal to print them. Many people have stopped buying computers and laptops and only have mobile phones, so this is a great feature to include in a mobile navigation app. Plus you always want to carry a paper map with you so you have one if your mobile phone runs out of power or dies. Wouldn’t it be nice if it matched the one on your phone? 
While Topo Maps+ isn’t as polished as GaiaGPS, it’s a pretty good navigation app and I recommend you check it out. It has lots of excellent maps bundled with it, so you can get many different views of the same area you intend to hike. You can download map tiles for offline use when you don’t have cell network connectivity, and you can record tracks and publish routes. 
I’ll do a more complete review of Topo Maps+ in the future, but wanted to alert you to the printing feature, which I think is pretty useful. Disclosure: Topo Maps+ provided the author with a free app license for help in beta testing this app. See Also:
Written 2018. Disclosure: SectionHiker.com receives affiliate compensation from retailers that sell the products we recommend or link to if you make a purchase through them. When reviewing products, we test each thoroughly and give high marks to only the very best. Our reputation for honesty is important to us, which is why we only review products that we've tested hands-on. Our mission is to help people, which is why we encourage readers to comment, ask questions, and share their experiences on our posts. We are independently owned and the opinions expressed here are our own.The post How to Print Paper Maps Directly from the Topo Maps+ Mobile GPS Navigation App appeared first on Section Hikers Backpacking Blog. from https://sectionhiker.com/how-to-print-paper-maps-directly-from-the-topo-maps-mobile-navigation-app/
When you backpack in New Hampshire’s White Mountain National Forest, there are two types of backcountry campsites. The first are designated backcountry lean-tos and tentsites managed by the US Forest Service or local trail organizations, and the second are dispersed campsites that you choose yourself in wilderness settings, provided you adhere to the White Mountain Backcountry Camping Regulations.
New to the White Mountains? Read this Quick and Dirty Guide to Backpacking in the White Mountains for information about camping regulations, road access, trail shuttles, lodging, dangerous wildlife, weather, etc.
Designated TentsitesThe White Mountain’s designated tentsites are heavily used, pretty much the same conditions you’d expect in any US National Forest or National Park. They’re primarily pressed-earth tent pads, often surrounded by sunken logs, that delineate the sites where people should set up their tents. 
The surrounding trees have been stripped for wood fires, rocks have been formed into fire rings, and the tentsites themselves are heavily worn. Many designated sites have a water source, a bear box, or privies though, so it’s easy to overlook their cosmetic deficiencies in the name of comfort and the sense of security that comes from camping with other forest visitors. 
Some White Mountain campsites have slatted wooden platforms instead of tent pads, that are used to provide a level campsite surface on steep mountainsides, or in fragile eco-systems, where tent camping would normally be impossible. The best tents for both types of sites are ones that have deep bathtub floors, since water pools on the tent pads and wooden platforms, even though there are gaps between the slats. 
When camping on the wooden platforms, you’ll also want a tent that is as “freestanding” as possible, and requires a minimum number of stakes to hold up. The wooden platforms have metal rings and hooks positioned around their perimeter framing that you can tie guylines to, although you’ll want to bring a few extra 8-10′ lengths of cord to span the gap between your tent and the hooks. 
The easiest tents to set up on wooden platforms are dome-style tents with poles that drop down to grommets or connectors at the four corners of the inner tent that are also used to secure the rain fly. These are typically double-wall tents with two pole hubs like the MSR Hubba Hubba NX 2 or the Big Agnes Copper Spur HV UL 2, or the Hilleberg Niak, which has a single central hub but four corner connectors. I also use a freestanding Black Diamond First Light, although it’s really more of a winter tent. You’ll still need to anchor your tent so it doesn’t blow off the platform and tie down the vestibule door(s), but you can always tie them back and leave them open if it doesn’t rain. 
While you can pitch a tarp or ultralight trekking pole tent on a wooden platform, it’s really sub-optimal if bad weather blows in since the wind and rain blows up under the air gap separating the shelter from the wooden platform…even in fairly well protected tent sites. I’ve spent some cold and windy nights shivering in ultralight tents because they’re so well “ventilated.” 
If you have a tent or shelter like this, you’ll be much better off camping at a dispersed wilderness campsite, provided you adhere to the White Mountains backcountry camping rules. However, camping is prohibited above treeline and in sensitive alpine terrain, so you’ll have to lose elevation and head down into the valleys in most cases to camp legally (and levelly.) Ground CampingThere are many places in the White Mountain National Forest where you can camp in a backcountry setting provided you follow a few simple camping regulations. These are intended to minimize overuse and promote leave-no-trace ethics so everyone can enjoy the forest in its wild state.
However, the forest is very dense and it can be quite difficult to find a good campsite that’s large enough for a tent. The forest floor is a tangle of roots and stumps, fallen trees, rocks, and dense vegetation so it can also take a while to find a level campsite, that’s free of debris. 
I’ve found that the best ground tents and shelters are narrow one person tent, tarps, or a bivy sack that you can squeeze in between the trees. 
Small freestanding tents can also work well, since you can pick them up and move them to another spot when you discover a rock, root, or tree branch under your tent. Hammock Camping
It took me a while to realize it (Andrew Skurka insisted I’d come around eventually), but I believe that hammocks are the most practical and convenient camping shelters to use in the White Mountain National Forest.

Hammocks can also be used to camp at designated campsites or over wooden platforms, provided you have long enough tree straps or suspension cords to span widely spaced trees. There are no regulations for required tree strap widths in the White Mountains, but a minimum of 1″ of width is recommended by Leave No Trace. 
Wrap-UpThere’s definitely a learning curve to dispersed, wilderness hammocking, but if you already own a hammock and want to backpack in the Whites, I’d encourage you to give it a go. Dome-style freestanding tents and narrow 1-person tents or shelters are the other shelters that work the best in the White Mountain National Forest, at least in my experience. Written 2018. Disclosure: SectionHiker.com receives affiliate compensation from retailers that sell the products we recommend or link to if you make a purchase through them. When reviewing products, we test each thoroughly and give high marks to only the very best. Our reputation for honesty is important to us, which is why we only review products that we've tested hands-on. Our mission is to help people, which is why we encourage readers to comment, ask questions, and share their experiences on our posts. We are independently owned and the opinions expressed here are our own.The post What is the Best Tent for Backpacking in the White Mountain National Forest? appeared first on Section Hikers Backpacking Blog. from https://sectionhiker.com/best-tent-backpacking-white-mountains/
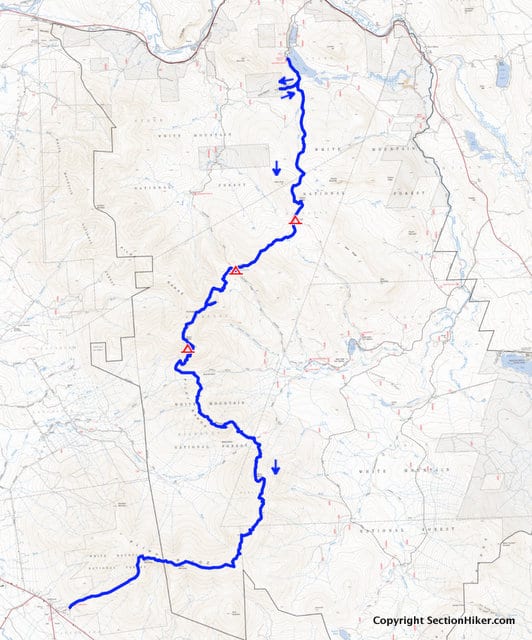
The Kilkenny Ridge Traverse is a moderate 2-3 day, 27 mile scenic traverse of some of wildest and remote scenery in the White Mountains. It’s a particularly attractive route for backpackers interested in avoiding the crowds of day hikers who frequent the southern and central Whites. It’s also a wilder section of the National Forest and a good place to see wildlife, particularly moose. Bearded trees, their branches and trunks festooned with moss and fungus, line the ridgeline, battered by wind and storms. Open ledges and summits provide magnificent views of the entire ridge as it undulates north to south, past vast stands of forest shrouded in mist and cloud, with scant evidence of a human presence. Hikers climb two White Mountain 4000-footers, Mt Cabot and Mt Waumbek, in addition to several smaller peaks called The Bulge, The Horn, and Mt Starr King, at the south end of the route. Side trips to a narrow canyon named the Devil’s Hopyard, Roger’s Ledge, Unknown Pond, and the Mt Cabot Fire Warden’s Cabin add to the novelty of this less-visited region.
Rating/Difficulty*****/3 out of 5 Distance/Elevation Gain27 miles w/8000′ of cumulative elevation gain White Mountain 4000 Footers
Recommended Duration2-3 days Seasonmid-June thru October Permits RequiredNone. RegulationsBackcountry Camping Regulations for the White Mountain National Forest. Trailhead DirectionsSouth Pond Recreation Area: (From the White Mountain Guide 3oth ed, p. 569) “South Pond Rd, the 1.8 miles access road to the South Pond Recreation Area and the northern terminus of the Kilkenny Ridge Trail, leaves NH 110 14.4 miles west of Berlin and 10 miles east of US 3 in Groveton, NH. Bear right at a fork 0.7 miles from NH110; just beyond this ford there is a WMNF gate, which is locked from 8:00 pm to 10:00 am during the summer/fall season when the beach and picnic area are open. A fee is charged for day use, although in the past there has been no charge for parking of hikers’ vehicles with a WMNF parking pass. Hikers should park in one of the first two lots on the left past the gatehouse. When the beach and picnic area are not open, the gate is usually locked necessitating a 1.1 mile walk to the start of the trail. (Park outside the gate, not blocking it, with all wheels off the road/pavement.) Foot travel is always permitted. Check with the Androscoggin Ranger District Office of the WMNF for details. ” Starr King Trailhead: There is additional hiker parking across from the road leading to the Starr King Parking Lot along Rt 2 next to a stone monument. Trail SequenceThe route follows the following trails in sequence. Refer to the AMC White Mountain Trail Map 6 – North Country, Mahoosuc Range (2017 ed), which is the best waterproof map available for this region, although I’d recommend buying the complete AMC White Mountain Waterproof Map Set (2017 ed) rather than one map at a time. More detailed trail descriptions can be found in the AMC White Mountain Guide (2017 ed), which is considered the hiking bible for the region. Take photos of the pages using your phone for easy reference, instead of carrying the entire book with you on hikes.
Scenic HighlightsThe following list provides cumulate distances on the route to each view or landmark.
Camping/Shelter Options
WaterNatural water sources are plentiful in the White Mountains although you may need to descend to them from ridgelines along side trails if you run short. In any case, carry a detailed topographic map with you and don’t rely on the overview map provided with this trip description to find water sources. Guthook Guides does not have a map of the North Country yet (as of 3/18), so you’ll need to rely on the USGS maps in the Gaia Smartphone App or a GPS Receiver if you want digital mapping support. While the topographic information found on USGS maps for this area is quite accurate, be aware that the trail information is frequently out of date or omitted. Carrying the AMC maps listed above is really your best option. There are also several dry stretches along this route where it may be prudent to carry extra water. These include the stretch of trail between Unknown Pond and the York Pond Trail (the spring below Mt Cabot is difficult to locate and may be dry) and between the York Pond Trail and the Starr King Trailhead. If you don’t find water directly on the Kilkenny Trail, it’s usually just a short distance down one of these side trails. Weather CautionsThis route experiences frequent blowdowns (trees knocked over by wind and snow) in winter, which may obscure the trail each spring, before trail crews can remove them. The greatest damage usually occurs along the stretch from the Kilkenny Ridge Trail/York Pond Trail junction south to Mt Waumbek. The trail is usually quite obvious despite these obstacles and blazed in yellow. Other than that, this route is almost entirely below treeline and well protected from the weather. On the TrailThe Kilkenny Ridge Trail starts at the south end of the South Pond Recreation Area. The trail enters the woods and quickly comes to a junction with the Devil’s Hopyard Trail. This side trail leads to a gorge with steep sidewalls and “huge boulders set in picturesque confusion.” While not up to the caliber of Mahoosuc Notch farther north (also in the White Mountains), it is still a fun diversion and provides one with a first glimpse of the unusual foliage and scenery found along the rest of the Kilkenny Ridge Trail. 
After you’ve hiked to the end of the Devil’s Hopyard, retrace your steps to the Kilkenny Ridge Trail junction and continue south. Continue through birch forest before climbing moderately to Rogers Ledge at 5.3 miles, a large south-facing cliff with a huge view of the Pliny Range to your right. You can even the see high peaks of Presidential Range from this vantage point, far to the south, on a clear day. 
Descending Rogers Ledge, you’ll pass a spur trail to the Roger’s Ledge campsite in 0.5 miles, followed shortly by the Mill Brook Trail Junction. Continue past it heading south along the Kilkenny Ridge Trail, entering a boggy area near Kilback Pond. 
Hike over bog bridges before climbing the shoulder of Unknown Pond Peak, a 3500′ trail-less mountain before dropping down to the Unknown Pond Campsite at the junction of the Unknown Pond Trail. This pond is a pretty place camp and a great place to watch the sun set over The Horn. However, camping is only permitted at the designated campsite and not within 0.25 miles of the pond or along its shore. 
Return to the Kilkenny Ridge Trail which runs along the north side of the pond before climbing to The Horn and The Bulge, two distinct viewpoints before Mt Cabot. A short spur trail leads to The Horn, which is topped by a rocky ledge. The best way to climb it is around the back side, although it can be a difficult solo scramble. 
Retrace your steps to the Kilkenny Ridge Trail and resume hiking south to the summit of The Bulge, before climbing steeply to Mt Cabot, passing a summit sign at 10.8 miles. Beyond the summit, the trail passes a side path that leads to an unreliable and often hard-to-find spring (it’s best not to count on this water source) before arriving at the former Mt Cabot Fire Wardens Cabin. The interior of this cabin has two rooms: a kitchen eating area with a table a small bunk room with space for 4-6. While you can sleep in the cabin, most people just stop in to sit down and have a snack out of the weather or hang out on the porch. There’s also a nearby privy. There’s been a rain barrel situated outside in cabin in the past, but I’d be very hesitant to drink water out of it, even filtered water. 
Continue along the Kilkenny Ridge Trail, descending by switchbacks, passing the unmaintained Mt Cabot Trail (which has been closed in a landowner dispute), to a junction with the Bunnell Notch Trail. Continue right, climbing Terrace Mtn, passing a short spur trail to its southern-most peak (3665′), before dropping down into Willard Notch and the York Pond Trail junction. There is a primitive campsite just before the junction on the right (see the White Mountain Guide, p. 573) near a small brook. 
Passing through the junction, continue heading south towards North, Middle, and South Weeks Mountains, passing through fern carpeted forest and moss covered trees. The forest here is unlike any other area in the White Mountain. There is an intermittent stream south of North Weeks, but that’s the only potential source of water along this section of trail until the bottom of the Starr King trail. Continue along the ridge to Mt Waumbek at 22.2 miles. While the summit is viewless, there is a small, east-facing opening just north of the summit, with a view of the Crescent Range near Randolph, NH. The Kilkenny Ridge Trail ends on Mt Waumbek in a typical New England fashion, far from a road or trailhead. Continue straight (south) along the Starr King Trail toward Jefferson, NH, reaching the summit of Starr King Mountain (3907′) in 1 mile. This peak is named after Thomas Starr King, author of The White Hills: Their Legends, Landscape, and Poetry, an influential description of the natural history of the White Mountains published in 1859. 
While Mt Starr King has a view, it’s probably best known for the stone chimney on its summit, the remains of an old cabin. From the summit, continue south, through forest as the trail drops gradually and soon parallels a noisy mountain stream that empties into the Israel River. Near the bottom of the trail, you’ll pass an old stone well, before arriving at the trailhead parking lot and the end of this journey. Written 2018. Safety DisclaimerThis trip plan can not alert you to every hazard, anticipate your experience, or limitations. Therefore, the descriptions of roads, trails, routes, shelters, tent sites, and natural features in this trip plan are not representations that a particular place or excursion will be safe for you or members of your party. When you follow any of the routes described on SectionHiker.com, you assume responsibility for your own safety. Under normal conditions, such excursions require the usual attention to traffic, road and trail conditions, weather, terrain, the capabilities of your party, and other factors. Always check for current conditions, obey posted signs, and Backcountry Camping and Wilderness Area Regulations. Hike Safe and follow the Hiker responsibility code. Disclosure: SectionHiker.com receives affiliate compensation from retailers that sell the products we recommend or link to if you make a purchase through them. When reviewing products, we test each thoroughly and give high marks to only the very best. Our reputation for honesty is important to us, which is why we only review products that we've tested hands-on. Our mission is to help people, which is why we encourage readers to comment, ask questions, and share their experiences on our posts. We are independently owned and the opinions expressed here are our own.The post A Kilkenny Ridge Traverse Trip Plan: Backpacking the 4000 Footers Guidebook appeared first on Section Hikers Backpacking Blog. from https://sectionhiker.com/a-kilkenny-ridge-traverse-trip-plan-backpacking-the-4000-footers-guidebook/
The NEMO Hornet Elite 1 Tent is an ultralight double-wall tent that only weighs 1 lb 7 oz. It’s ideal for solo backpacking or bikepacking trips when you need a shelter that packs up small, but provides better wind and weather protection than a bivy sack. Made with thin and lightweight (7 and 10 denier nylon) but conventional fabrics, I would recommend using a tent footprint with this tent to protect the floor from abrasion or pointy objects. There are limits to the durability of ultralight gear and this tent definitely pushes the envelope. Specs at a Glance
Inner TentSized for one person, the Hornet Elite 1P comes with a single hubbed Y-pole that connects to the inner tent floor at three points, two on the corners of the “head” end and one in the middle of the “foot” end of the tent. While these three arms are enough to hold the up the inner tent, you still need to stake out the four corners of the inner tent to stretch out the corners and help shape the bathtub floor. I recommend staking the corners first (especially in wind), before inserting the pole, which connects to the inner tent with corner clips and plastic hooks on top. 
The inner tent is sized for a one person but wide enough to hold a 72″ x 25″ sleeping pad. There’s one door, which opens into a side vestibule, which you’ll want to store your pack and extra gear to free up more space inside the inner tent. Cross ventilation is quite good provided that you fully stake out the rain fly and leave the door partially unzipped to help prevent internal condensation. A high bathtub floor protects you from cold breezes and helps extend the range of the tent so it can be used in cooler weather. There are overhead gear loops on the ceiling to hang gear, a mesh pocket near the door, and one overhead pocket, which is designed to hold a headlamp in order to provide ambient light. This isn’t a tent to car camp or hang out in with your dog if you’re looking for a larger interior space, but for changing your clothes, sitting up inside, reading maps, and sleeping it’s just fine. The inner tent floor is made with a 10 denier Sil/PeU Nylon Ripstop which held up fine when I tested it, but I’d still recommend using a footprint with the Hornet Elite 1. A 75 denier footprint is available for this tent that weighs 5.3 ounces, but you can do much better with a small 2 oz piece of clear plastic insulating window wrap, sized so it’s cut a bit smaller than the inner tent floor. Less expensive too. 
Rain FlyThe rain fly is a gossamer thin 7 denier marigold-colored PeU Nylon Ripstop, but provides good privacy if you’re camped near others. It connects to the four staked corners of the inner tent and maximizes the utility of your tent stakes. The fly requires an additional two tent stakes to fully set up, one to stake out the front vestibule over the door and the other on the opposite side. The front vestibule is large enough to store a backpack so you can retain easy access to gear at night without having it crowd the interior space, while toggles on the fly let you roll back both sides in good weather. The center zipper is protected against rain with an external storm flap, however there’s relatively little lateral coverage near the top of the zipper to prevent you from getting drenched in a heavy rain. 
The edges of the rain fly are cut fairly high to channel air up the solid slanted sides walls of the inner tent, while preventing splash-back. While the tent is surprisingly wind worthy, extra guylines and guyout points are provided if you need to secure the tent in heavier weather. RecommendationThe NEMO Hornet Elite 1 is a great ultralight double-wall backpacking tent for solo trips when light weight and low gear volume are priorities. It’s easy to set up and narrow enough to fit into tight spaces when you need to camp at wild, non-designated campsites, but provides far more comfort, weather, and insect protection than a bivy sack or tarp. Weighting just 1 lb 7 oz, the Hornet Elite 1 is mindbogglingly lightweight for a tent made with conventional fabrics, although it is on the pricy side. If cost is an issue, the regular NEMO Hornet 1 is nearly identical, but just 4 ounces heavier, more durable, and significantly less expensive. Disclosure: NEMO provided the author with a sample tent for this review. Written 2018. Disclosure: SectionHiker.com receives affiliate compensation from retailers that sell the products we recommend or link to if you make a purchase through them. When reviewing products, we test each thoroughly and give high marks to only the very best. Our reputation for honesty is important to us, which is why we only review products that we've tested hands-on. Our mission is to help people, which is why we encourage readers to comment, ask questions, and share their experiences on our posts. We are independently owned and the opinions expressed here are our own.The post NEMO Hornet Elite 1 Ultralight Tent Review appeared first on Section Hikers Backpacking Blog. from https://sectionhiker.com/nemo-hornet-elite-1-ultralight-tent-review/ |

ABOUT MEHello my pleaseure to introduce myself, I am Jose Johnson. I am 26 years old from Monroe, LA. I love to got for hikings with my friends on holidays. Archives
April 2019
Categories |


 RSS Feed
