
North and Middle Tripyramid are two 4000 footers located in the Waterville Valley, in the southern section of the White Mountains. They’re quite close together and usually climbed on the same day. South Tripyramid is another peak on the same ridge, but is not climbed as frequently because it’s not on the official 4000 footer list. There are a number of different trails to approach the Tripyramids, but they’re all steep, including two trails that climb up avalanche slides. For this hike, we approached the peaks from the north on the Pine Bend Brook Trail, before hopping onto the Mt Tripyramid Trail and following that to North and Middle. This being January, this was a winter hike, which makes these ascents a non-trivial affair. The snow conditions were favorable however, with loose granular snow on top of a thick icy crust, which made traction quite good with the aid of crampons. I was accompanied by four other hikers on this trip, Hilde and Keith, who’d climbed the South Carter with me in December, and Tom and Nicole, who I’d never hiked with before. They’re all Random Hiker regulars though, a very hard core Meetup Group I lead trips for, and I was pretty sure we’d get along. We also have a lot of mutual friends. Other Nearby hikes
It’d been some years since I hiked up the Pine Bend Brook Trail and I’d completely forgotten what the approach hike looked like. The trail was broken out and we hiked up it quickly passing through open forest that looked like it’s been thinned by logging. We had to make a number of stream crossings along the way, but the water was running low and the ice shelves along their banks were stable, so we had no problems crossing them. 
The temperature at the trailhead has been 8 degrees when we started our hike, but we soon felt a curiously warm breeze blowing through the trees. Temperatures were expected to get up to 40’s later that day in the valleys, but I expected it to be much colder on the summits. Tom said that the higher summits (Mt Washington and the Northern Presidentials) had 50-60 mph winds and I expected us to get some of that higher up on the peaks we were climbing as well. The first two miles flew past as we passed the Wilderness Boundary and started climbing up a steep draw that the trail follows to the ridge. It soon became difficult to ascent with microspikes and we switched to full crampons. It’s been a while since I’ve had to hike in crampons, but I quickly remembered how to use them and practice my International Step and French Technique as we slogged up the steeps. I kind of wish I’d brought an ice axe to be truthful, because the slopes were much steeper than I recalled. In its absence, I concentrated on my footwork in order to avoid an unplanned slide. 
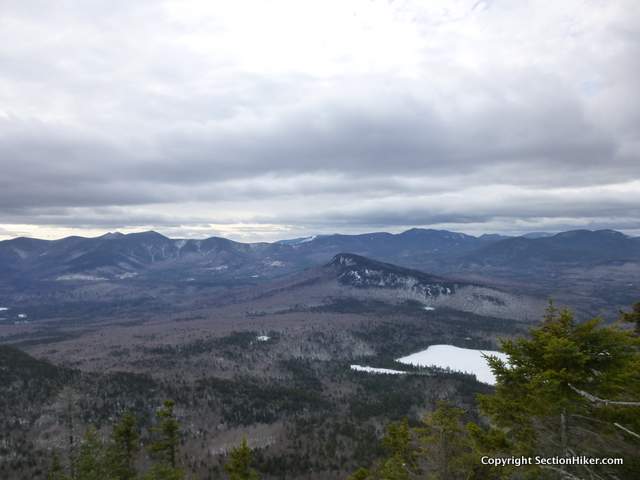
There was surprisingly little snow when we reached the ridge trail, which thankfully, is fairly protected from the wind. There was a layer of monorail on the trail, which is kind of surprising, because we usually don’t see that until April or May in spring conditions. The rest of the snow on the ridge had been blown off or melted. There was a final steep ascent to the summit of North Tripyramid which towered above us, but was only intermittently visible through the trees. And then we were at the summit, where we took a few pictures and has a snack break. From there it was an easy 0.8 mile ramble to Middle Tripyramid, passing the Sabbaday Brook Trail Junction. That trail was not broken out at all, which is just as well as it requires many stream crossings, which can be very tricky in winter if the stream is not well bridged with ice. 
We backtracked from Middle and then reversed our route. This was easier said than done because we had to climb down three very steep ascents in crampons, avoiding an uncontrolled slide each time. This required careful footworks and an extra effort to keep all of my spikes deep and perpendicular to the surface to avoid a slide into the surrounding trees. On the way down, we passed many hikers who had churned up the trail and made it more slippery by breaking the snow that had been frozen on top of the ice during the morning into a granular powder. I’m glad we had started early that morning because it meant we had had snow conditions and traction on the way up, which had been plenty tough without having to deal with the now unconsolidated snow. We got back to the trailhead after about 6.5 hours, plenty of time to stop at The Moat in North Conway for a few beers and burgers. Then back to the ski lodge for a quick afternoon shower and nap before dinner. 
Total distance: 8.9 miles w/3400′ of elevation gain. Recommended Guidebooks and Maps:
Written 2018. Support SectionHiker.com, where we actually field test the products we review. If you make a purchase after clicking on the links above, a portion of the sale helps support this site at no additional cost to you.The post Climbing the Tripyramids in January appeared first on Section Hikers Backpacking Blog. from https://sectionhiker.com/climbing-tripyramids-january/
0 Comments
|


|
Support SectionHiker.com, where we actually field test the products we review. If you make a purchase after clicking on the links above, a portion of the sale helps support this site at no additional cost to you. |
The post Climbing Mt Tremont in January appeared first on Section Hikers Backpacking Blog.
from
https://sectionhiker.com/climbing-mt-tremont-in-january/

You’re on a backpacking trip and your sleeping bag gets wet. What should you do?
Assess the Situation
The first thing I’d do is to assess how wet the bag is.
If the foot end or cover are wet because they rubbed up against your tent at night and got damp from internal condensation, that’s a pretty low-risk (normal) situation. You can probably still use the bag as is, dry it out in the sun before breaking camp, or during the day during a rest stop. Drying gear is a normal “backpacking chore” and something that we all do when we have to, even if it means kicking back and waiting a few hours before setting out for the day.
If the wetness is through and through a significant portion of your sleeping bag because you fell in a river or a mini flash flood blew through your tent, things are a little bit more serious. First off, squeeze (but don’t ring) as much moisture out as possible. Next hang up your bag and let it drip dry further while keeping the dry parts from becoming wet. Be very careful in handling the sleeping bag because it’s easy to tear a wet bag. It doesn’t matter if your sleeping bag is filled with down or synthetic insulation. I’d recommend the same technique.
Bail Out
If you’re within a day’s hike of a town, your best bet would be to hike out and dry your bag in a drier at a laundromat, motel, or B&B. (How to Wash a Sleeping Bag) It’s going to take at least three hours to dry in a commercial drier, so you can imagine how long it would take to dry in the wilderness if you hang it from a tree. Of course, if you have cell phone or sat phone/text service, you can also just call a trail shuttle driver or Uber for a ride. I wouldn’t recommend drying your sleeping bag by a campfire. That’s a good way to melt or destroy the fabric that holds it together. If you’re not near civilization, keep reading.
Leverage Your Group
If getting to a drier is not feasible in one day, but you’re backpacking with other people, you’re going to have a lot more resources available to you than if you’re alone. Provided your sleeping pad is intact, you can share a sleeping bag with someone else by unzipping it all the way and using it like a quilt.
Or you can put all of your clothes on and some of theirs, and roll yourself up in a tent body or tarp to stay warm. This might be a bit sweaty, but it’s a common wilderness medicine technique called a “human burrito” which is used to keep patients warm when they’re injured or hypothermic. You can even place hot water bottles inside the “wrap” as another heat source. You can use this technique night after night until you get back to civilization or your sleeping bag dries by itself.
Solo Survival Strategies
If you’re backpacking alone, I’d still recommend hiking out and drying your bag in town. You’ll stay warm as long as you’re hiking, so get moving. If you do need to stop to sleep, then the human burrito technique is still a good option. If you happen to have a saw or an axe, you can also build a fire and a heat reflector, but that’s going to take a lot of time away from hiking out, so it’s probably not be worth it.
If you do backpack alone, it’s worth asking yourself whether you have enough gear, clothing, or skills to survive a catastrophic loss of sleeping insulation like a soaked sleeping bag or quilt. For instance, I normally use a plastic bag as a pack liner which I’ve used more than once as a bivy bag in cold weather. I always carry long underwear on trips to keep my sleep insulation free of dirt and body oils, but it’s also come in handy as a layer on cold nights. The same holds for carrying a stove, rain pants, a puffy insulated jacket, fleece cap, gloves, and a sleep shelter, even if it’s just a tarp.
What would you do if your sleeping bag got wet? Comment below.
Written 2018.
See Also:
- Backcountry Survival and Rescue Skills 101
- Some Basic Bushcraft Skills for Backpackers
- How to Backpack in the Rain and Stay Reasonably Happy
The post What to do if your sleeping bag gets wet on a backpacking trip appeared first on Section Hikers Backpacking Blog.
from
https://sectionhiker.com/what-to-do-if-your-sleeping-bag-gets-wet-backpacking/

Backpackers and campers have a wide range of stoves available to them ranging from all-in-one stove systems to general purpose units that can be used across a wide range of temperatures and locales. Backpacking stoves fall into three categories: isobutane canister stoves which are best for solo cooking and short trips, alcohol stoves which are best for ultralight backpacking and thru-hiking, and liquid fuel stoves which are best for group cooking, cold weather use, and international travel. Below are our picks for the best backpacking stoves of 2018.
- MSR Pocket Rocket 2
- Jetboil Flash
- MSR WindBurner
- Trail Designs Caldera Cone
- Soto Amicus
- Jetboil MiniMo
- MSR Whisperlite Universal
- Snow Peak Giga Power 2.0
- Trangia Alcohol Stove
- Etekcity Orange Stove
The post 10 Best Backpacking Stoves of 2018 appeared first on Section Hikers Backpacking Blog.
from
https://sectionhiker.com/10-best-backpacking-stoves/

Pyramid tents and tarps are shaped backpacking shelters that can be sized for one, two, or multiple people. Often called “mids”, short for pyramids, there are many pyramid tent and pyramid tarps available today ranging from ultralight minimalist shelters to multi-person winter tipis, complete with stove jacks and wood stoves.
Despite their cosmetic or functional differences, all pyramid shelters share a few common properties. They are exceptionally wind and weather resistant, they have a single peak, and solid walls. This makes them a good choice for camping in exposed terrain that doesn’t have a lot of natural windbreaks like trees or vegetation, and for winter camping, where the steep side walls of a pyramid can help shed snow.
A Selection of Pyramid Manufacturers and Models
- Black Diamond Mega Lite Tent
- Hyperlite Mountain Gear UltaMid 2, UltaMid 4
- Mountain Laurel Designs Solomid, Solomid XL, Duomid, Duomid XL, Supermid, Mondomid
- Bearpaw Wilderness Designs Luna 2, Luna 4, Luna 6, PyraTent 2, HexaTent 3
- Oware Pyramid Tarps
- Seek Outside Silvertip, Cimarron, and Tipis
- Locus Gear Khufu, Khafra, Menkaura, Hapi, Apollo
- My Trail Company Pyramid 3, Pyramid 4
- Sierra Designs Mountain Guide Tarp
- NEMO Apollo 3P Tarp
- Nigor WickiUp 3, WickiUp 4, WickiUp 5
- Kifaru Tut, Sawtooth, Tipis
Pyramid Tents and Tarps
What’s the difference between a pyramid tent and a pyramid tarp? Pyramid tents are usually just pyramid tarps with an optional add-on inner tent that has a floor and mesh netting to protect occupants from ground moisture, insects, and creepy-crawlies. If you use an inner tent with a pyramid tarp, you’ve effectively turned it into a double wall tent, with all of the advantages and disadvantages commonly associated with them. On the plus side, many pyramid inner tents can be set up after the outer tarp when it’s raining, so they stay dry. They’re also optional, so you can leave them at home when you want to save gear weight or bulk.

If you opt not to use an inner tent in a pyramid tarp, you can use a lightweight footprint, like tyvek or window wrap, as a waterproof groundsheet, or an ultralight bivy sack with a mesh hood for added insect protection. Another common alternative is to purchase a half-sized inner tent that only fills part of the pyramid to save weight and so you can safely cook in the floorless half in bad weather. Hyperlite Mountain Gear, Bear Paw Wilderness Designs, and Ookworks all sell half mids that can be used for this purpose. When purchasing a pyramid, make sure to look for ones that have interior gear loops or attachment points so you can conveniently suspend accessories in the interior.

Center Pole
Pyramid tents and tarps are called monopole shelters because they only require one pole to set up. The pole is usually placed inside the peak in the center of the pyramid, although it can also be slanted with the base off-center to provide more interior room. The peak itself is usually reinforced so the center pole doesn’t puncture it. Most peaks also include an air vent to release the water vapor and warm air that can cause internal condensation.
A pole is often included with the shelter or available as an option. Most smaller capacity pyramids (1-3 people) can be set up with a trekking pole instead of a separate tent pole, which is common with the ultralight pyramids made by cottage manufacturers. If your trekking pole is not long enough, you can lash it to a second trekking pole with a Voile ski strap to create a longer pole, or extend it with a pole jack, which is essentially a tent pole repair sleeve that fits over your trekking pole tip to make it longer.
Front Door
Most pyramid tents and tarps have a single front door, which can be problematic depending on its position and the number of people sharing the shelter. While not an issue for solo use, you’re probably going to wake up a partner if you have to get out of a multi-person pyramid at night. When evaluating multi-person pyramids, try to find ones that lets you orient your head facing the front wall so you and your partner(s) have equal access to the door, rather than pyramids where you’re lying perpendicular to the door.

Another option is to get a pyramid that is larger than necessary so you have more room inside to move around. For example, the GoLite Shangri-La 3 (now sold as the MTC Pyramid 3) is a spacious 2 person mid, but can be awkward for 3 adults to share given the center pole position and angled front door.
Internal Condensation
Pyramid tents and tarps are prone to internal condensation just like any other single or double-walled tent and shelter. The best way to reduce or eliminate any internal condensation is to maintain as much airflow as possible. While many pyramid shelters have a vent in the peak, this isn’t usually sufficient by itself to vent moisture built-up. While sleeping with the front door rolled open in fair weather can be quite helpful, the best way to ensure good airflow is to maintain a wide air gap between the bottom edge of the tarp and the ground so breezes can pass through the tent. Lengthen the center pole a few inches to raise the peak, and stake out the base as normal.

Interior Volume
While the head room at the center of a pyramid tent or tarp is usually quite good, letting you sit up with ease, the interior can be awkward to use depending on the slope angle of the walls and their distance from your face and the top of your feet. While elevating the center pole can help increase the distance between the tarp and your face, there’s always going to be less clearance at the edges of the tarp farthest away from the center pole. If this bothers you, look for pyramids with a higher peak height and steeper side walls. The shape of the footprint – circular versus square or rectangular – can also have an impact on in the amount of edge clearance you have. Edge clearance is usually less of an issue in winter because you can dig a pit into the snow under the pyramid to create more headroom.

Campsite Selection
Pyramid tarps and tents have a fairly large footprint, which can make it difficult to pitch in heavily forested terrain where you need to wedge them between trees. They also work best on flat and even ground, unlike a flat tarp, where you can pitch one side considerably higher than the other and still get a viable shelter. If the only ground you can set a pyramid up on is uneven, you’re probably going to get some “wall sag” instead of a drum-tight pitch on the high side. This can reduce the amount of useable space you have inside, but is unlikely to have a serious functional impact.
When camping in exposed and windy terrain, it’s best to set up your pyramid with the door facing away from the wind or at an angle. You should also stake out the sidewall guy-out points for added security and to prevent wind pressure from bowing the walls into your living space.

Summary
Pyramid tarps and tents are a popular ultralight backpacking shelter option because they’re relatively lightweight and wind resistant. If sleeping on the ground doesn’t appeal to you or if you need insect protection, you can add an inner tent to a pyramid tarp to create a double-walled tent. Internal condensation is best addressed by encouraging plenty of airflow through a pyramid, by keeping the front door open or pitching them so plenty of air can blow through, low down near the ground. Most ultralight backpacking pyramids can be set up using a trekking pole(s), but you can usually obtain and carry a separate tent pole if you don’t use them. Pyramids work best on flat ground with fairly open campsites because they require a fair amount of space to set up and stake down. While headroom is quite good in the center of a pyramid, the ends can be quite low above your face or the tops of your feet. This can be addressed by getting a larger capacity pyramid that provides more living space, although it will be heavier to carry.
Written 2018.
Support SectionHiker.com, where we actually field test the products we review. If you make a purchase after clicking on the links above, a portion of the sale helps support this site at no additional cost to you.See Also:
- Ultralight Backpacking Tent and Shelter Guide
- Mountain Laurel Designs Duomid Review: Long Term Review
- My Trail Company Pyramid 3 Review
- Bear Paw Wilderness Designs Luna 2 Review
The post Ultralight Backpacking Pyramid Tent and Tarp Primer appeared first on Section Hikers Backpacking Blog.
from
https://sectionhiker.com/ultralight-backpacking-pyramid-tent-and-tarp-guide/

The North Face Mica FL 1 is a one person double-wall tent that weighs 32.5 ounces. The inner tent is freestanding, making it very easy to set up, and the rain fly only requires an additional 2 stakes to pitch. Steep side walls and the curved pole architecture provide plenty of head room, while an inner tent length of 85″ gives tall people plenty of room to stretch out. The tent also comes bundled with an optional footprint (not shown) which is unusual, since most tent manufacturers charge people extra for them.
Specs at a Glance
- Weight: 32.5 oz, minus tent stakes and footprint
- Fly: 12.3 oz
- Inner Tent: 11.3 oz
- Pole (1): 8.9 oz
- Actual Inner Tent Dimensions: 85″ (length) x 40″ (height) x 24″ (foot width) and 30″ (head width)
- Minimum number of stakes to pitch 1; recommended 6, maximum 8
- Materials: 20D high-tenacity ripstop nylon, w/ 1200 mm PU coating, DAC Featherlite NSL aluminum poles
The Mica 1 is pretty comfortable as one person tents go, although you can’t do much more than lie down inside and go to sleep. It is bright and airy though and easy to fit into small or unprepared tent sites, which can be quite convenient if you like to camp in wild country, outside of well-defined campsites.

The inner tent is tapered: 30″ wide at the head end and 24″ wide at the foot end, and therefore best used with a 20″ or 25″ tapered mummy sleeping pad. A high bathtub floor keeps water from seeping into the tent and the front and rear mesh walls/ceiling provide plenty of cross ventilation to keep help reduce internal condensation. The inner tent has a height of 40″ so you can sit up inside easily. There’s a single front door that can be toggled open, one mesh pocket at the head end of the tent, and abundant internal gear loops to hang lights or electronics overhead.

The Mica 1 has a front vestibule that provides valuable gear storage space and is really the only place you can store your backpack and wet shoes. The fly zipper is protected with a gutter to prevent rain from splashing down on you when you open the fly to get out at night, although the zipper has a tendency to get stuck unless you’re careful when you open it. There are also two large vents at the head and foot ends of the tent that you can stake out for additional ventilation.

The rear window of the tent fly can also be staked out for added ventilation. While it covers a space that’s large enough to be a small vestibule, there isn’t a second door in the inner tent to access it except from the outside.
The corners of the inner tent and rain fly have color-coded grommets that slip over the tent pole struts, making set up fast and easy. While this almost makes the tent freestanding, you will want to stake out the tent corners to fully stretch out the inner tent floor. All of the guy-lines are fixed cord loops and are not adjustable with tensioners however, something I would recommend modifying, especially on the front vestibule and the rear window. Otherwise, you might find you need to move the tent around to find good ground that will hold your tent stakes.

The Mica FL 1 floor and fly is made with a 20D Ripstop Nylon with PU which is lightweight and reasonably durable with good campsite selection. Tent fabric notwithstanding, I think a bigger area of concern are the tent poles that the tent uses. The two-segment horizontal cross-pole used on the Mica 1 FL is very easy to break. When assembling the pole, make sure the two halves are well seated before attaching it to the tent hub and ball joints at the other ends. If they’re not securely connected, you can easily split the “male” pole end, which will necessitate a repair or replacement.
Recommendation
The North Face Mica FL 1 is an easy tent to like. It’s fast to set up and it has a small footprint, so you can fit it in just about anywhere. The Mica 1 also has great ventilation, good stability, and a generously sized front vestibule to stash your gear. Really, the only awkward thing about the Mica FL 1 is the single, multi-segment tent pole which is bulky and somewhat ungainly to pack. While the lightweight design and materials used in the Mica 1 require some care to use and maintain, its ease of setup and spacious dimensions make it a good beginner tent or a nice upgrade from a more cramped camping shelter.
Disclosure: The author purchased this tent with his own funds.
Written 2018.
See Also:
The post The North Face Mica FL 1 Tent Review appeared first on Section Hikers Backpacking Blog.
from
https://sectionhiker.com/the-north-face-mica-1-fl-tent-review/

The Western Mountaineering Ultralite is a 20 degree sleeping bag that weighs 29 ounces. It’s filled with 16 ounces of 850+ fill power goose down and loaded with features that make it comfortable to use, especially during early spring and late autumn when there’s a touch of winter chill in the air. I’ve owned one for going on 10 years and still consider it a first-rate component of an ultralight sleep system despite the increased popularity of lighter weight backpacking quilts. While the color on the outside fabric of my Ultralite has faded a bit with age, it’s still as warm as ever.
Specs at a Glance:
- Weight: 29 oz
- Down Fill: 16 oz
- Insulation: 850+ fill power goose down
- Fabric: 12 denier nylon ripstop
- Loft: 5″
- Shoulder/hip/foot girth: 59″/51″/38″
- Length: 5’6″, 6’0″, 6’6″ (6′ 0″ reviewed)
- Zipper: full length; right or left-hand
- Compressed size: 6-7 liters
- EN Temperature Ratings:
- Comfort: 24.8F / -4C
- Lower Limit: 14F / -10C
- Extreme: -20F /-29C
When I purchased the WM Ultralite, it was an investment. I can’t remember exactly what I paid for it, but it was one of the most expensive 20 degree sleeping bags available at the time. That hasn’t changed and Western Mountaineering bags are still priced at a premium. In fact, Western Mountaineering refuses to let retailers discount their bags, which is why they’re never on sale at a discount. What has changed is the breadth of the Western Mountaineering product line and the new sleeping bags, quilts, and hammock under-quilts they’ve started to introduce in recent years. A few years ago, it seemed like the brand was languishing. But they’ve introduced a wave a new products in the past few years and are clearly innovating with the times.
The Ultralite isn’t the only great sleeping bag that Western Mountaineering makes, but it has all of the standard features you find across the product line and that set Western Mountaineering bags apart from others:
- Down-filled draft collar
- Down-filled draft tubes along zipper
- Zipper guard
- Continuous baffles
Draft Collar
A draft collar is a tube of goose down that drapes across your upper chest and back to seal in the warm air inside the sleeping bag. It prevents what’s called the “bellows effect”, which causes warm air to be being pushed out the top of a sleeping bag or quilt when you move around at night. Draft collars are more commonly found on sub-zero -20 and -40 degree sleeping bags, but are just as effective in warmer temperature sleeping bags like the Ultralite 20.
Draft Tubes
The Ultralite has two down-filled tubes that run the length of the side zipper. When you zip up the sleeping bag, they come together and block any cold drafts that might make their way past the zipper.
Zipper Guard
There’s a wide piece of fabric tape that runs along one side of the zipper on the Ultralite which prevents the zipper from getting stuck in the shell fabric of the other side. I’ve ripped the shell fabric of many sleeping bags made by other manufacturers that don’t have this feature, which is a real life saver in preserving the exterior shell.
Continuous Baffles
The 850+ fill power goose down in the Ultralite is distributed in continuous horizontal baffles from zipper to zipper, so you can shift the down insulation from one side of the bag to the other. For instance, during hot summer nights, you can shift the down from the top of the bag to the bottom so there is less insulation on top of you. When the weather is cold, you can move the down to the top of the bag. This is a desirable feature in a 3 season, 20 degree bag because it means you can use it across a wider range of temperatures and conveys quilt-like flexibility, in terms of temperature regulation, for a sleeping bag. It requires a bit more thought to use, but the extra flexibility is quite useful and can cut down on the number of sleeping bags you need to purchase if you backpack and camp year-round.

Performance
I’ve used the Ultralite 20 year-round from early spring to late autumn up and down the US East Coast and in Scotland in temperatures ranging from 15 degrees up to 80 fahrenheit. It’s fantastic for cool weather backpacking in early spring and late autumn when the days are short and nighttime temperature run between 20 and 50 degrees. I like to section hike the Appalachian Trail during “shoulder seasons” in those temperatures and the Ultralite is perfect for that time of year. I’ve also backpacked across Scotland twice in May with the Ultralite in similar conditions.
But for temperatures over 60 degrees, the Ultralite is overkill and you have to unzip it or use it like a quilt when it gets hot out. When I first bought it, I was just getting back into backpacking and didn’t have much gear, so I used it year-round. These days I use a quilt or a hoodless sleeping bag when nighttime temps get above 50 degrees, depending on whether I’m sleeping in a hammock or on the ground.
Fit-wise, the Ultralite is a bit narrow at the shoulders and over the chest. That’s by design, to save fabric weight and reduce the amount of air that your body needs to heat up at night. Western Mountaineering sells similar bags with a wider shoulder girth if you prefer more space. As a side sleeper, I’ve never found these dimensions to be terribly constricting. In addition, the hood on the Ultralite is fairly “flat” as opposed to fitted, which makes it easier for side sleepers to use.

Recommendation
The Western Mountaineering Ultralite 20 Sleeping bag is a premium mummy sleeping bag best used for nighttime temperatures under 60 degrees. It’s loaded with high-end features that you won’t find on most three-season sleeping bags, like 850+ fill power goose down, a draft collar, down draft tubes, zipper tape guard, and continuous baffles. These features cost more because they have to be hand sewn and require more labor to make, but they really increase the performance characteristics of the bags that have them. While Western Mountaineering sleeping bags are expensive, they do retain their value over time. I’ve had my Ultralite 20 for 10 years now and it’s still as warm and functional as ever despite hard use.
If the Ultralite feels like an attractive option, you need to ask yourself whether its temperature range matches your needs. Mummy sleeping bags aren’t for everyone and with the increased availability of quilts and hoodless sleeping bags, backpackers have a lot of options available when it comes to sleep insulation. While I do prefer a quilt and hammock in warmer weather and it’s must-have in a hammock, I still like to use a mummy bag when temperatures drop below 40-50 degrees at night for the extra head and shoulder insulation they provide. My advice is to figure out what temperature range you need to cover and what you’re willing to spend before you invest in a Western Mountaineering bag like the Ultralite 20. They’re fantastic ultralight sleeping bags, but it’s best to make an educated purchase rather than an impulse buy with such a premium product.
See Also:
- Western Mountaineering Sleeping Bags Buyers Guide
- Western Mountaineering Puma -25 Sleeping Bag Review
The post Western Mountaineering Ultralite Sleeping Bag Review appeared first on Section Hikers Backpacking Blog.
from
https://sectionhiker.com/western-mountaineering-ultralite-sleeping-bag-review/

ABOUT ME
Hello my pleaseure to introduce myself, I am Jose Johnson. I am 26 years old from Monroe, LA. I love to got for hikings with my friends on holidays.
Archives
April 2019
March 2019
February 2019
January 2019
December 2018
November 2018
October 2018
September 2018
August 2018
July 2018
June 2018
May 2018
April 2018
March 2018
February 2018
January 2018
December 2017
November 2017
October 2017
September 2017
August 2017
July 2017
June 2017
May 2017
April 2017
March 2017
February 2017
January 2017
 RSS Feed
