
The Passaconaway Slide Trail is an old “lost” trail that climbs an avalanche path to Mt Passaconaway, a 4000 footer in the Sandwich Range. While it’s no longer signed or listed in the White Mountain Guide, it is possible to find the old route with a little bushwhacking saavy and a climb up the steep route, which comes out at a signed viewpoint at the summit. 
The 1948 AMC White Mountain Guide describes the Passaconaway Slide Trail as follows: This trail, ascending the mountain from the N, coincides with Downes Brook Trail (see below) as far as the foot of the slide. It leaves the Albany Intervale Road on the S a short distance W of the U. of N. H. Forestry School. Crossing Downes Brook four times, the trail reaches the slide on its L, 2 m. from the road. Painted arrows now indicate the driest and easiest routes up the slide. About halfway up, the slide turns sharply R and continues more steeply to its top. Care should be taken not to start rocks rolling. From the top of the slide the trail climbs steeply through thick woods, passing a series of outlooks to the N and joins the short trail between the two outlooks on the summit. As there is no sign where the Downes Brook Trail diverges at the foot of the slide, note that this slide is the first slide to be met, and is the only rock ledge slide. This trail is dangerous, especially after a rain, and is not recommended to amateur climbers. For this reason it is not signed. Distances. U. of N. H. Forestry School to foot of slide 2 m. (1 hr. 15 min.); summit 4 m. (4 hrs.). 
The start of the route is fairly obvious approximately two miles up the Downes Brook Trail from Rt 302, but some off-trail finesse is helpful to find a good route through the debris at the bottom of the slide. One you start up the slide proper, old blazes and cairns are visible which still mark the trail, while a mellow waterfall flows down its center. 
Part way up, the slide splits into two branches at a large, shallow pool. Follow the right hand branch by hiking up the rock lined gully between the two branches. A faint trail should be evident and runs back and forth across the slide as it climbs steeply through thick woods. If you look carefully, you can see indications of old trail maintenance (pruned branches and sawn logs) that indicate the route. While climbing, I could catch glimpses of the upper slide through the trees, which looked impossibly steep and wet to climb without climbing protection. 
The slide ends at a gully at about 3500′ while the old trail keeps climbing up the ridgeline crest to the summit viewpoint through increasingly open woods. We didn’t meet anyone until we reached the summit loop around Passaconaway, which was crawling with hikers on a busy summer Saturday. 
From the Passaconaway summit, we followed the Rollins Trail to the cairn on top of Mt Whiteface, before following the Kate Sleeper Trail back to the Downes Brook Trail for the 5.2 mile hike back to our cars. It’d been 10 years since I last hiked the Downes Brook Trail in its entirety, which requires 11 stream crossings back and forth across the river. It seemed like yesterday because the trail hasn’t changed that much during the interval, except for top of the trail where it meets the Kate Sleeper Trail. 
This area has been trashed by wind, snow, and avalanche damage with a large number of blowdowns including multiple sections of trail that have been washed away. If you’ve considered hiking through this area in winter, I’d think again. I can’t imagine being able to traverse the section on snowshoes, let alone find the trail in deep snow. Most of the Downes Brook Trail is not blazed, which is common practice in White Mountain wilderness areas. There were a few places where we had to scout around to find the trail or it was overgrown by hobble bush and spruce. Just be patient and remember that the trail follows the river. Knowing that you can always hike downstream until you pick it up again if you lose the trail. Climbing the Passaconaway Slide and looping back down the Downes Brook Trail is a great loop hike, but a long one, nearly 13 miles in length with close to 4000′ of elevation gain. Don’t underestimate the difficulty of climbing the slide, which would require bushwhacking through dense vegetation on a steep slope unless you can find the old trail. 
Recommended Guidebooks and Maps:
from http://sectionhiker.com/bushwhacking-passaconaway-slide/
0 Comments

Outdoor Retailer is a trade show held every summer where gear manufacturers come together and show off the gear they plan to bring to market in the upcoming year. It’s a very social event where you get to catch up with old friends, drink a lot of beer together, and try to figure out what the most promising new products will be in the upcoming year. My focus at these shows is to look for new gear that I can use on trips and adventures and that I think my readers will benefit from knowing about. Here are the most interesting new products that I saw at Outdoor Retailer 2017. 
Osprey’s Levity and Lumina Ultralight BackpacksOsprey Packs has new ultralight backpacks, the Levity and Lumina, which will be available this autumn. Both will be available in men’s and women’s-specific versions in 60L and 45L sizes and cost $270 and $250. All four packs are top loaders with a non-detachable top lids and a large wrap-around solid stretch pocket that provides plenty of external storage for water bottles, extra clothing layers, or wet gear. Both packs use the ventilated mesh AirSpeed frame system which has a partially visible wire aluminum frame with top and bottom cross pieces for rigidity. 
The Levity and Lumina are made with a lightweight, durable, and nearly waterproof fabric that Osprey calls NanoFly. It’s an abrasion resistant mix of 100 denier Cordura nylon and (UHMWPE) ultra high molecular weight polyethylene that is in the same wheelhouse as the cuben fiber composites used by some cottage manufacturers. It will be interesting to see if the Levity and Lumina packs will impact the popularity of the ultralight backpacks sold by them or whether they’ll be able to innovate in time to compete head-to-head with Osprey.
One notable omission on Osprey’s Levity and Lumina packs is the lack of hip belt pockets and hip belt padding. While their larger and heavier packs still have hip belts and pockets, I think Osprey wants to to make the case that form fitting nature of their AirSpeed mesh frame eliminates for the lack of a beefy hipbelt. That’s a pretty bold statement and it will be interesting to see how customers react to it when these new packs reach market. An updated Exos and a new women’s-specific Exos, called the Eja, also have the same mesh hipbelt as the Levity and Lumina. 
Gregory Packs Optic and Octal Ultralight BackpacksGregory Packs also announced four new men’s and women’s ultralight backpacks which will be available in Spring 2018. The men’s Optic will be available in 58L and 48L sizes that weigh 2.52 lbs and 2.47 lbs, while the women’s specific Octal will be available in 55L and 45L sizes, weighing 2.34 lbs and 2.31 lbs. Both packs have an ultralight 7001 aluminum UL frame with a ventilated back panel and leaf spring lumbar pad. The pack bodies are made with 100 denier high tenacity nylon with a 210 denier high tenacity nylon base for durability. The top lids of the packs can be removed to reduce weight and both include a stretch mesh front pocket. Unlike Osprey’s Levity and Lumina packs, Gregory’s UL packs have beefy hip belts and large hip belt pockets. 
Granite Gear Crown2 38L BackpackGranite Gear announced a lower capacity 38L version of the wildly popular 60L Crown 2 backpack that came out earlier this year. The 38L Crown 2 weighs 2.265 lbs when configured with a top lid, frame sheet, and adjustable hip belt. All of those components are removable though, depending on your needs, bringing the pack’s weight down to a measly 1.3 lbs for fast and light day hikes or overnight adventures. The 38L Crown 2 will be available in men’s and women’s specific models with an MSRP of $184.95. I think the 38L Crown2 will be great for one-nighters or as a technical day pack and can’t wait to try it out. 
Big Agnes Goose Creek Deluxe HammockBig Agnes has entered the hammock market with two gathered end hammocks, the Goose Creek Deluxe (12 oz) and the UL Headwall (6 oz). The Goose Creek Deluxe Hammock has an integrated sleeping pad sleeve that’s compatible with any inflatable sleeping pad with multiple attachment points to fit a variety of different pad sizes and shapes. You can also configure your pad to have a bend under the knees to help prevent knee hyperextension, a common user problem with many short or narrow hammocks where it’s difficult to sleep on a diagonal. 
Big Agnes AXL and Insulated AXL Sleeping Pads
Big Agnes also has several new sleeping pads that push the boundaries on ultralight inflatable sleeping pad weights. The AXL Air (9 oz) and Insulated AXL Air (10 oz) are full size 20″ x 72″ pads with a reflective heat layers. Big Agnes also introduced their first ever foam pad, the 12 oz Third Degree Pad, for use under an inflatable pad in extreme winter and alpine conditions. 
Sierra Designs High Side 1P TentThe Sierra Designs High Side is a new 1 lb 14 oz single person, side-entrance bivy style tent designed for solo trips and bikepacking in mind. It’s small pack size and pole length (12.5 inches) make it an interesting option for trips where keeping your load size to a minimum is important. It has an MSRP of $280 USD. 
Western Mountaineering QuiltsWestern Mountaineering has two new ultralight quilts, the 11 oz Nanolite ($330) and the 16 oz Astralite ($400). Both quilts have 7 denier shells with 850+ fill power goose down. They are available in regular 5’8″ and long 6’4″ lengths and have yoke-shaped top draft collars to help seal in heat around a person’s neck and shoulders. I suspect that Western Mountaineering is feeling competitive pressure from quilt manufacturers that is eroding sales of their ultralight warm weather sleeping bags and that these new quilts are a competitive response.

MSR Windburner Duo Stove SystemsMSR has several new radiant stove and cook pot systems built around a remote, decoupled version of the Windburner radiant stove for people who want to cook for a group and not just boil water. The new Duo stove stores inside the pots for ease of packing and has a very stable stove base that’s a big improvement over the top-heavy, single-user, Windburner system. 
ENO Fuse Side-By-Side Hammock SystemIf you’ve ever want to position your hammock next to a companions’ at night, but couldn’t find two pairs of aligned trees to hang from, look no further. The Eno Fuse lets you hang a pair of hammocks side-by-side from the same tree, separated by spreader bars. It’s an ideal solution for hammocking couples or families, so you can sleep next to a child who needs a little more assurance when hammock camping. 
Rab Mythic 200 Sleeping BagRab introduced the Mythos 200, a 16.5 ounce down mummy bag rated for 34 degrees that’s filled with 900 fill power goose down and has a silky 7 denier Pertex Quantum inner and outer shell. The Mythos is a 1/4 zip bag with a trapezoidal baffle chamber design, snag-free zipper guards, and an internal draft collar. 
Sea-to-Summit Alpha Cook Pots and PansThe new Alpha Series Cook Pots are made with a lightweight, hard-anodized alloy with a polished internal surface, while the Alpha Pans have a durable PFOA-free Halo non-stick surface. The pots are stamped with internal volume measurements and the base is textured for better stability on camp stoves. The pot lids have build-in colander holes for straining pasta or nice, as well as fold-away handles that lock the lids in place for transport. The Alpha Pans also have fold-away handles and are compatible with the pots, so you can nest them inside each other for easy transport.

Exped HyperquiltThe Exped Hyperquilt combines the best properties of a quilt and a mummy sleeping bag with an optional integrated hood. Weighing 18.2 oz, the Hyperquilt is insulated with 800+ fill power goose down and has a 20 denier ripstop nylon shell. It connects to sleeping pads using a toggle-based sheet system and is also available in a two person, two hood model for couples. When not needed, the hood opening cinches shut so cold air doesn’t leak into the quilt. 
Wenzel Shenanigan 5Wenzel has a fun new pyramid shelter designed for car camping and music festivals called the Shenanigan that sleeps 5. Priced at $120 (a great deal), it has mesh covered windows which zip close in the event of rain. Other Notable Products
What strikes your fancy? from http://sectionhiker.com/outdoor-retailer-2017-editors-choice-gear-picks/
“Mountains make their own weather.” I’ll never forget hearing that from the friend who introduced me to trip planing and accident analysis. It’s a sobering and important lesson for anyone who climbs above timberline across exposed terrain on backpacking and mountaineering trips. Written by Jeff Renner, Mountain Weather explains how mountains influence weather patterns and what to look for when planning your own trips. “Life in high places exists by meteorological consent.” The book begins with simple introduction to understanding warm and cold fronts, how they influence weather patterns on the ground, and how to recognize pending atmospheric conditions based on cloud formations. Illustrated with easy to understand diagrams, you can quickly understand the significance of cloud observations in the field. Renner pays considerable attention to thunderstorms, the most frequent weather related hazard experienced by outdoor adventurers. He explains the mechanism that cause lightning and thunder, the different stages in the development of a thunderstorm, how long they last, where they occur relative to mountains, and how to arrange your travel schedule to avoid them…”Move high in the morning. Get low in the afternoon.” What should you do it a thunderstorm is moving toward you? How long do you have to act before it overtakes your position? How can you mitigate your risk if the thunderstorm is on top of you? How should you treat a victim if they are hit by lightning? If you’ve ever been caught out in a thunderstorm, had lightning strike a tree or ground near you, or been hailed-on by a black cloud directly overhead, you’ll understand the significance of this information. It’s happened to me a handful of times and not something I ever want to experience again. Thunderstorms are not the only weather related danger faced by hikers and backpackers. Renner explains how to avoid and escape flash floods, wildfires, avalanches, high winds, and hypothermia – which are all weather-related dangers and phenomena. Armed with this knowledge, how does one apply it when planning a trip and before you set out on day one. Renner advocates compiling a pre-trip “weather briefing” and walks you through how to interpret the forecast information available from NOAA and other information services. This is the best explanation of how to interpret the forecasts that meteorologists share with one another, weather radar, satellite photos, and avalanche forecast in the context of trip planning risk assessments that I’ve found anywhere. Combined with local weather wisdom, these weather briefings provides an excellent basis to make go-no go decisions about trip objectives and plans. Renner also includes chapters on weather patterns region by region across the U.S., highlighted by reference maps. If you lead trips for outdoor clubs, work as a professional guide, or you want to expand your backcountry skill set, Mountain Weather is a highly readable guide to understanding backcountry weather forecasting and risk assessment. Renner has also recently published a shortened laminated fold out field reference called Mountain Weather Pocket Guide: A Field Reference which you may also find useful. Jeff Renner serves as Chief Meteorologist at Seattle’s KING Television; he’s forecast weather in the northwest since 1980, holding a degree in Atmospheric Science from the University of Washington. Jeff has served as a board member for the American Meteorological Society and regularly serves as a guest contributor on the Weather Channel. Disclosure: The author purchased this book with his own funds.
from http://sectionhiker.com/mountain-weather-backcountry-forecasting-for-hikers-and-backpackers/ 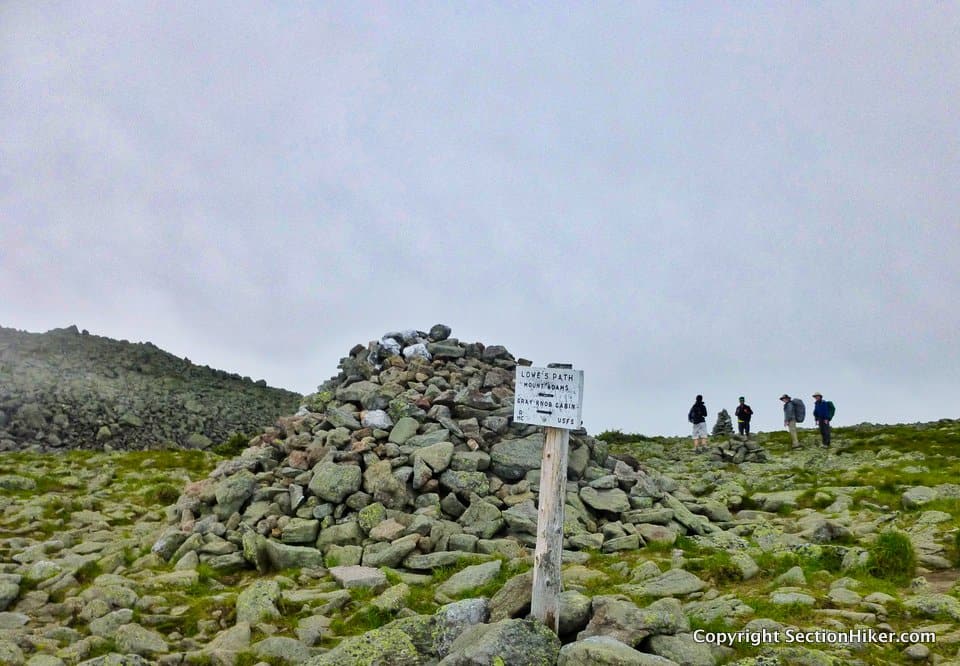
“Do you know the way to Mt Jefferson?”, asked a confused hiker, as I approached Thunderstorm Junction on the sedge plateau below Mt Adam’s summit. It must be summer, I thought, a bit incredulous that hikers were walking around above treeline in the Northern Presidentials without a map or any kind of directional device. I pointed her in the correct direction and plunked down on a rock to rest and eat some gorp. I’d just finished climbing the Great Gully Trail, one of the trails that climbs the King Ravine headwall on the north side of Mt Adams. It’s a steep and rocky trail with water gushing down it, that’s a bit hard to follow in places. I’d been nervous about climbing it solo that morning. The trail had rattled a friend of mine and her description of the trail’s challenges had been unnerving. It’s definitely not for the faint-hearted or anyone afraid of heights, but it didn’t turn out to be as sketchy as I’d feared. 
The Great Gully and Chemin des Dames Trails climb the steep walls of King Ravine, on the north side of Mt Adams. The term ravine is used interchangeably with cirque and gulf in the White Mountains. Both of these trails are on The Terrifying 25, a popular list of challenging White Mountain trails that have rocky scrambles, boulder caves, and avalanche slides. The Great Gully Trail climbs the southwest corner of King Ravine. It’s just one mile long, but gains 1700′ of elevation and is best ascended rather than down-climbed. The Chemin des Dames Trail climbs the east wall of King Ravine, linking the ravine floor to the Airline Trail, which runs along the top of a knife-edge ridge. The Chemin is 0.4 miles long and gains a modest 800′, making it much easier to descend with care. 
I started my hike at the popular Appalachia Trailhead off Rt 2 and hiked up the Airline, Short Line, and King Ravine Trails to the floor of the ravine. It’s about a two-hour hike to 3824′, a gain of about 2500′. Most of the hike up is pretty mellow until you get to Mossy Brook Fall, which is good place to resupply your water if you’re short. After that, the trail turns into a rocky scramble through a maze of large boulders. 
The Great Gully Trail splits off from the King Ravine Trail weaves its way though stunted trees and rocks to the base of a gully, a narrow channel of rock that runs from the floor of the ravine to boulder fields at the top of the trail. Because the trail is north-facing, snow lingers in the gully into late June and the trail is best avoided until it melts out. As I was climbing the trail, I did see the some ice between the rocks bordering the trail, but thankfully none on the trail itself. 
The gully has a stream flowing through it which the trail crosses over, back and forth. Route finding can be difficult though and the trail gets harder to follow the higher up you go. At one point, I lost it on the ascent and briefly thought about bushwhacking up the gully itself to the top of the headwall. That would have been a mistake because I could feel my feet getting numb with cold while standing in the stream. Instead, I consulted my map and altimeter and figured out where the trail ought to be, before contouring sideways to acquire it. From there, I climbed a sea of boulders marked with cairns to the top of the headwall, popping out near Thunderstorm Junction, where the Great Gully Trail ends. After my snack break, I looped around the top of King Ravine on the Gulfside Trail to the Airline Trail and descended that to the Chemin de Dames Trail junction. The Gulfside Trail is the major trunk trail linking the northern presidential peaks: Madison, Adams, and Jefferson. This section of the trail is made with rocks that have been carefully fitted together in a surprisingly smooth surface that’s easy to walk on. 
There are other trails like this in the Northern Presidentials, built by the great trail builders of the early 1900’s who lived in the town of Durant, now called Randolph, located on the valley floor below. Mike Dickerman, co-editor of the AMC’s White Mountain Guide, has written a book about these men and women called White Mountains Hiking History: Trailblazers of the Granite State that I recommend if you’re interested in learning more about the history of the White Mountain trail system. I headed down the Airline Trail, taking in the great views from the top of the ridge. I know the volunteer trail maintainer who oversees the Airline Trail. I saw him close to this same time last year, napping among the rocks overlooking King Ravine, close to the Chemin des Dames trail junction. He wasn’t around, but it wouldn’t have surprised me if he was, since we both have odd schedules. 
I had some reservations about down climbing the Chemin des Dames Trail, as well. But I knew that my friends Brian and Mary Bond had climbed down it recently, which emboldened me to give it a go. The trail plunges steeply from the junction, past boulders and through krummholz, but the top is easy to down-climb if you take your time and keep your center of gravity low. There’s a tight lemon squeeze about halfway down, but I passed my pack through it first and followed behind. The descent does get more challenging about halfway down when you hit a boulder field, but careful footwork and patience will see you through. 
Once I was back at floor of the ravine, I marveled at the route I’d hiked. I get enormous satisfaction when I push my limits and use my wits to do it. I reversed my route and hiked back down to the valley floor, my hiking addiction satiated once again. 
Total Distance: 8.5 miles with 4200′ of elevation gain. Recommended Guidebooks and Maps:
from http://sectionhiker.com/climbing-the-great-gully-and-chemin-des-dames-trails-in-king-ravine/ 
The Terrifying 25 is a popular list of difficult White Mountains Hiking Trails compiled by Trish Herr, the author of Up! A Mother and Daughter’s Peakbagging Adventure, for her young daughters Alex and Sage. They enjoy hiking through boulder caves, rocky scrambles, and traversing avalanche slides, which are well represented by this list. The rules for hiking this list are pretty simple. You need to hike 20 trails on the Required list and 5 more trails from the Electives List. It just so happens that I’ve hiked all of them, but you don’t have to go to such extremes if you don’t want to. There is also a patch awarded to people who finish this list, which is much coveted by hard core White Mountain hikers. Click for the complete set of rules and award information. Required Trails (Pick 20)
Elective Trails (Pick 5)

from http://sectionhiker.com/the-terrifying-25-a-list-of-challenging-white-mountain-trails/ 
When I fly fish larger rivers with a rod and reel or a Tenkara rod, I often need to wade from the shore to get closer to the best trout habitat. But I’ve found that traditional bib waders are overkill for my needs and often too warm to wear. I prefer waist-high, stocking feet wading pants, like the Redington Palix River Wading Pant, because they fit like a regular pair of pants and are much more comfortable. They’re also lightweight and packable enough that I’m willing to carry them on bikepacking trips when I can afford to carry some extra gear on my bike. Specs at a Glance

I normally wear the Palix River Pants over my regular hiking pants and socks for convenience and the combination provides just enough insulation that I can wade in cool water for hours without getting too hot or too cold. The 3mm neoprene booties keep my socks completely dry because they’re sewn to the bottom of the pants and sealed to remain waterproof, while the integrated elastic wading belt is comfortable and easy to open and snap closed. 
I wear the Palix Pants with a pair of Crocs Swiftwater Sandals which are very lightweight water shoes with a rigid foot bed and good ankle support instead of wading boots to save weight. Using the Swiftwater Sandals instead of real wading boots can be uncomfortable when gravel gets between the shoe sole and the neoprene sock, but it’s easy enough to swish out and worth well worth the weight and cost savings. You do need to size up however when wearing the sandals with the Palix neoprene boots. In my case, that meant sizing up 3 full sizes from a size 10 shoe to a size 13. 
I normally wear a size 38 pant and the Palix River Wading Pants fit perfectly over my hiking pants without being too baggy in the waist or along the thighs. They really feel like you’re wearing a normal pair of pants in the water and quickly fade into the background so you can concentrate on catching trout. I think they’re a fantastic value compared to much more expensive wading pants and a best buy. Highly recommended. Disclosure: The author purchased this product with his own funds.
from http://sectionhiker.com/redington-palix-river-wading-pants-review/
DEET and Picaridin-based insect repellent sprays and lotions are available from a wide range of brands and in a variety of forms factors. How effective are they are repelling mosquitos and ticks? What are the best concentrations to get? Which one’s are the safest to use for children and pregnant women? Can insect repellents damage clothing and gear? Are lotions and wipes more effective that pump-sprays or aerosol cans? Are there any natural products that have also proven effective at repelling mosquitos and ticks? Insect Repellents: Key Takeaways
Insect Repellents: In-depthDEETDEET (N, N-diethyl-meta-toluamide) is found in Sawyer Jungle Juice (concentration of 98%), Ben’s 100 Max Formula Insect Repellent (95%) and Repel 100 Insect Repellent Spray (98%). In use since 1946, it’s the most widely used insect repellent today, and highly effective against mosquitos and ticks. The smell of DEET is highly offensive to mosquitos who avoid the scent. Studies have found that the 20%-30% concentrations of DEET are just as effective as the 100% concentrations listed above, but need to be applied more frequently. DEET with a 100% concentration can last up to 12 hours, while 30% DEET concentrations last up to 6 hours before requiring reapplication.
Lower concentration 30% DEET is also available in slow-release lotions, which can last up to 12 hours before needing to be reapplied. Ultrathon 34% Insect Repellent is the most popular long-lasting formulation and ideal for overseas travel to areas infested with malaria-carrying mosquitos because a little goes a long way. One of the downsides of DEET-based insect repellent is that it will fog plastic lenses on watch faces, smartphones, and glasses. It also dissolves nylon-based clothing, so be very careful when applying it to keep it away from plastic and synthetics. 30% concentrations of DEET are safe for use by pregnant women and small children. When applying DEET to children, don’t let them apply it themselves. Instead, spray it or rub it on your hands before rubbing it on exposed skin. Do not apply near eyes and mouth, and apply sparingly around ears. Avoid applying DEET to their hands because children frequently out their hands in their mouth and eyes. Only apply to skin that is exposed and not under clothing. Avoid the use of DEET near food and water. Wash with soap and water at the end of the day. PicaridinPicaridin became available in the United States in 2005 and is a synthetic compound, related in structure to black pepper. It repels mosquitoes, ticks, biting flies, sand flies, gnats, chiggers, and midges. It is widely used in Europe and recommended by the World Heath Organization for the prevention of malaria in 40 countries.
The most effective concentration of Picaridin is 20% and will last up 8-12 hours before repeat application is required. Lower concentrations, sometimes found in wipes are not as markedly less effective, however. Unlike DEET, Picaridin is safe to use around plastics, synthetic apparel, and gear with synthetic coatings such as fishing line, sunglasses, watches, GPS units or phone screens. Picaridin is considered to be safe for children as young as 2 months of age and pregnant women. Contact with the eyes and mouth should be avoided however, and the usage directions followed carefully. Lotions, Wipes, Aerosols, and PumpsInsect Repellent lotions last considerably longer than sprays of comparable DEET or Picaridin concentrations, because the repellent is rubbed into the skin, delaying evaporation. It’s also far more accurate than applying insect repellent than with a spray or pump because it’s easy to accidentally miss areas. Wipes also provide an effective way to apply insect repellent to the skin, but result in additional waste which must be disposed of after use. Spray-on and pump sprays containing DEET are also harder to direct accurately when applied and can ruin plastic gear or synthetic garments if the spray is accidentally applied to them. If you accidentally apply DEET to gear and clothing, immediately rinse it off with plenty of water immediately to prevent damage. Natural Insect RepellentsResearch studies by the Centers for Disease Control, the Environmental Protection Agency, and Consumers Union have shown that Oil of Lemon Eucalyptus (OLE) is the only effective natural insect repellent proven effective against mosquitos and ticks. It’s important not to confuse this product with Lemon Eucalyptus Oil which is a very different product. OLE, available as Repel Lemon Eucalyptus is effective for up to 6 hours in a 30% concentration. However, OLE has not been well-tested on children and the CDC and Consumer Union advise against using it on children under 3 years of age. Natural insect repellents including citronella, spearmint, clove, lemon grass, and other botanicals have not proven to be an effective insect repellent for mosquitos and ticks. What’s your preferred insect repellent for mosquitos and ticks?from http://sectionhiker.com/best-deet-picaridin-and-natural-insect-repellents-how-to-choose/ 
The Solo Stove Bonfire Fire Pit is not a substitute for a real backcountry campfire, but it is a vast improvement over making a fire in the rusty fire grates and barbecues you find at national parks and state-run campgrounds. You can also use it at home to have a campfire without building a fire ring in your garden or creating a mess of partially burnt wood and coals. 
The Bonfire is an open-ended, stainless steel can with hollow walls and a double bottom. Weighing 20 pounds empty, it’s 19.5 inches wide and 14 inches tall, with ample interior room to hold a half dozen pieces of standard-sized cut firewood. It burns very hot and is best used for evening entertainment like a campfire or toasting marshmallows, but not for boiling water or cooking food like the 1-person Solo Stove Lite or the 2-person Solo Stove Titan. 
The Bonfire burns wood and the smoke produced by a wood fire in a two stage process, so you get a fire that’s virtually smoke free. To start a fire, you stack kindling inside the Bonfire on top of the elevated metal grate at the bottom of the can. There’s an solid ash pan underneath that which forms the base of the unit and prevents hot coals from burning the ground under the Bonfire. The metal grate ensures that the base of the fire receives plenty of oxygen, making fires very easy to light, while the Bonfire’s sidewalls act as a wrap-around windscreen that channels the fire up the middle and helps prevent sparks from jumping the sidewalls. Once lit, heated oxygen flows up the hollow walls of the Bonfire and out round vents under the top rim of the stove. This added oxygen creates a second stage of combustion, resulting in a hotter fire, that burns almost all of the smoke that the fire generates. It’s wonderful because you can sit people around the Bonfire without having to move constantly to get away from the smoke every time the wind shifts. Since the fire burns hotter, the Bonfire reduces the wood inside to ash, so there are no burnt and blackened logs to clean up afterwards. 
The Bonfire is large enough that you can sit a half dozen friends around it to enjoy a fire. But it’s so hot, that you’ll probably want to sit a bit farther back than you would a normal campfire. In addition, the exterior sides of the can get very hot to the touch, so you’ll want to supervise children so they don’t get burned. If you want to toast marshmallows, I’d recommend letting the fire burn down to rim level first. After that, hold your marshmallow forks well above the top of the fire if you like them golden brown and not black and burnt. If you don’t feel like waiting for the fire to burn down to ash, you can extinguish it with water like you normally would with a campfire. However, if you let the fire burn itself out, you’ll be amazed by how little wood is left at the end of the burn. 
If you want to bring the bring the Bonfire camping or transport it to a different location, it comes with a durable bag (with handles) to enclose the unit and make it easy to carry. Contrary to what you might expect, the Bonfire has no noticeable smell when packed in the car, probably because it burns all of the smoke that’s normally wasted with a regular fire. The Solo Stove Bonfire Fire Pit is more “Leave No Trace” than a campfire because it doesn’t scorch the ground, you don’t need to build a new fire ring to have a fire, and it burns firewood to ash hiding any trace of a fire when you leave. Those are all great things, but my guess is that most people will buy the Bonfire for home use and entertainment, rather than backcountry or car camping use. That’s not a bad thing, but I’d caution you to be careful about using the Bonfire near wooden structures because some sparks do escape, even though they are greatly reduced by the units high sidewalls and construction. Disclosure: The author received a sample Bonfire for this review.
from http://sectionhiker.com/campfire-2-0-solo-stove-bonfire-fire-pit-review/ 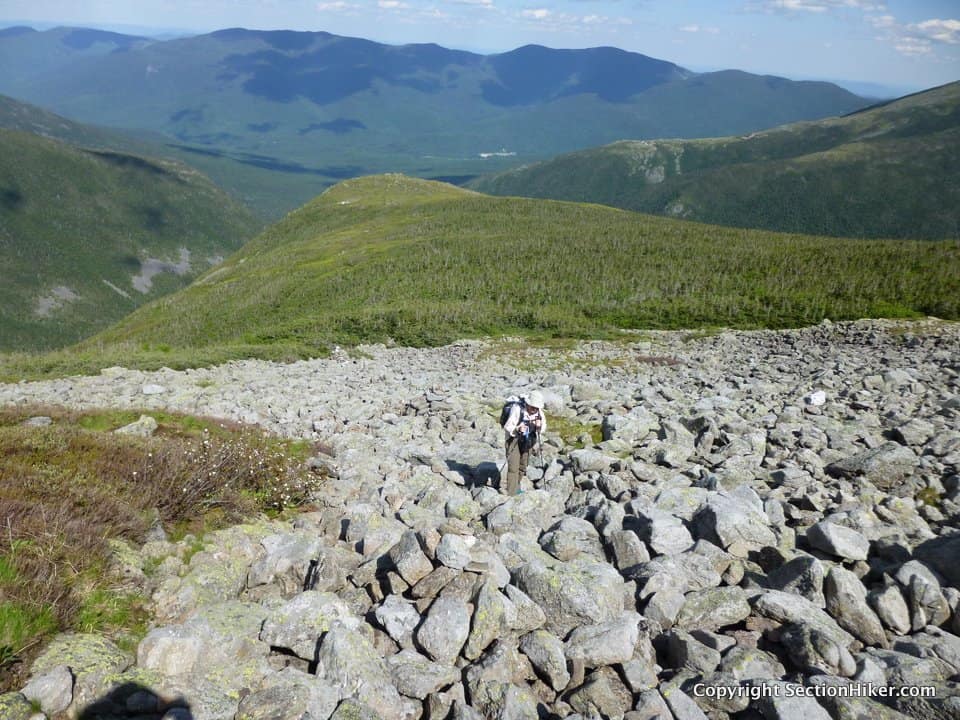
Beth and I met at the Caps Ridge Trailhead at 6:00 am for my Redlining finish hike. We wanted an early start to hike our 13+ mile route (with 6300′ of elevation gain), up Mt Jefferson via the Caps Ridge Trail, down Sphinx Col, and back up the Six Husbands Trail. I had just 3 trails left to complete out of the 608 on the White Mountain Redlining trail list, a list that took me 10 years to complete. Beth and I aren’t regular hiking partners, since I like to hike alone most of the time. But we have been pairing up on more some of the more challenging and intimidating routes in the Presidential Range, like the Huntington Ravine Trail, because we respect each other’s skills and experience. Beth’s also very skilled backcountry navigator who’s completed the NH 200 highest list, which is mostly off-trail, and she should finish Redlining this autumn at the current rate. We also recently taught our first map and compass class together this past spring, which I expect we’ll offer at least once a year. 
The first leg of this hike involved hiking up the Caps Ridge Trail to the summit of Mt Jefferson, the third highest peak in the White Mountains. The last time I’d hiked it had been in thick fog, back in September of 2012, and I didn’t remember the trail at all. This time we had clear, glorious views, and I was enthralled by the views of Mt Washington, the Southern Presidentials, and the nearby Dartmouth Range once we’d popped above treeline. The Caps Ridge Trail is not the faint-hearted. It is a tough, knee-grinding trail to hike up and down, requiring a lot of rock scrambling over the caps, which are rocky peaklets, along the trail. Called caps, they’re similar to the “howks” you find on the Howker Ridge Trail or the “castles” on the Castle Trail, both in the Northern Presidential Range. 
We reached the summit of Jefferson by 8:00 am, without a soul in sight. After a short snack, we headed down to Edmands Col to get on the Edmands Col Cutoff Trail, one of the three remaining trails I had left on my redline list. This short but challenging trail runs from Edmands Col to the uppermost portion of Six Husbands Trail across the northeast face of Mt Jefferson. It’s quite exposed, skirting in and out of krummholz, with steep drop offs into Jefferson Ravine far below. The trail is marked with cairns and best hiked early in the day before the rocks that form the tread heat up too much. From from Six Husband’s Trail junction we hiked a short distance up to the Gulfside Trail (we’d have to repeat this section later in the day) and made our way south to the Sphinx Col Trail. If you were just hiking a Sphinx Col – Six Husbands loop, you’d bypass this Edmands Cutoff diversion and hike directly to Sphinx Col from Jefferson. 
The Sphinx Col Trail is one of a handful of escape routes off the Presidential Range if lightning and thunderstorms roll up on you unexpectedly. It plunges steeply down to upper part of the Great Gulf Trail, close to Spaulding Lake and the Mt Washington headwall. It’s also quite wet with water running down the trail from a spring near the top, a handy fact to keep in mind if you’re in need of water on a Presidential Traverse. (See Natural Water Sources in the Presidential Range) The trail description of the Sphinx Col Trail is a bit intimidating, but it’s not a difficult trail to descend. Just go slow on the wet rocks and make sure of your footing. The trail does cross back and forth across a stream, so you do need to look for blazes and cairns that mark the crossings and double back if you lose the trail. Beth and I did lose the trail at one point on our descent, but we soon found it again after a little creative bushwhacking since the trail corridor hugs the stream. If it’s a warm day and you’re not in a rush, there are several very nice cascades to see on the route down and pools to cool off in, if you’re so inclined. 
The bottom of the Sphinx Col Trail intersects the Great Gulf Trail, which we followed down to the Six Husbands stream crossing over the West Branch of the Peabody River. This short section of the Great Gulf Trail is quite rugged and torn up by avalanche and flood damage. Just remember that the trail follows the river and you should be able to find it if it disappears from sight. The Six Husbands stream crossing can be quite challenging in high water, so watch the weather forecast and let the river level drop for a few days after a heavy rain. There’d been a heavy rain a few days prior to our hike and Beth and I had postponed our hike together for a few days for just this reason. 
The White Mountain Guide also has a scary description of the Six Husbands Trail, which has four wooden ladders that you need to climb during the steepest part of the accent. Once you leave the brook in Jefferson Ravine, the trail is one giant rock scramble up to the top of Jefferson’s Knee, a subsidiary ridge off Mt Jefferson which juts out into the Great Gulf. While there is some exposure, it’s not that bad unless you’re afraid of heights. There are plenty of hand holds and the hardest part of the ascent is quickly over. 
When you get to the top of Jefferson’s Knee, you’ll hike through a long stretch of dwarf trees (krummholz) until you get to the Edmands Col Cutoff Junction sign. This was the point where I finished Redlining the White Mountain Guide, a feat that I can still barely comprehend several weeks later. 
From here, we hiked back up to the Gulfside Trail and made our way to the Cornice Trail which loops around Jefferson, intersecting with the Caps Ridge Trail below the summit on the west side of Jefferson. We’re were pretty beat at the point, 10 hours into this hike, and this roundabout route was easier than climbing to the Jefferson summit again. The rest of the descent down the Caps Ridge Trail passed uneventfully, and we celebrated with a cold beer back at the trailhead. 
Recommended Guidebooks and Maps:
from http://sectionhiker.com/hiking-a-sphinx-col-six-husbands-loop-via-the-caps-ridge-trail/ 
I keep several map books in my car for the different states that I hike and backpack in, called Gazetteers. They’re published by a company called Delorme (recently acquired by Garmin) and contain detailed maps of each state including all of the paved and unpaved roads, seasonal roads, gated fire roads, mountains, ponds, rivers, streams, and campgrounds in the state, as well as a host of other recreation-specific information. Gazetteers are absolutely indispensable for planning backcountry trips and contain a lot of the information that is left out of activity-specific maps intended for hiking, backpacking, skiing, and mountain biking. Each state is broken out into a numbered grid, each with a full page topographic map. The scale in the Maine Gazetteer is 1:135,000, which is a good scale for identifying roads and natural features. 
I use Gazetteers to for planning on almost every trip I take into the backcountry. They’re so useful for finding remote trail heads, trout streams, hiking trails, primitive campsites, and old jeep trails, you name it, because they integrate so much information into a single uniform overview that I can’t get anywhere else. In addition to topographic maps, the Gazetteers contain huge lists of:
It’s a treasure trove of outdoor recreation information that’s far easier to browse than anything online. 
Gazetteers in Action: Some ExamplesHere are a few way that you could use theMaine Gazetteer to plan trips that’d be hard to plan any other way. Theses are representative of the types of questions you can answer with any of the state-specific Gazetteers that Delorme publishes.
That’s just scratching the surface. Whatever your pleasure: hiking, camping, boating, fishing, hunting, kayaking, photography, or mountain biking, Delorme Gazetteers are your gateway to backcountry exploration off the grid.
from http://sectionhiker.com/backcountry-exploration-with-delorme-gazetteers/ |

ABOUT MEHello my pleaseure to introduce myself, I am Jose Johnson. I am 26 years old from Monroe, LA. I love to got for hikings with my friends on holidays. Archives
April 2019
Categories |


 RSS Feed
